
Patiently Problem-Solving the Brighton Press
Patiently Problem-Solving the Brighton Press

It was a pretty complete display from Arsenal once again on Saturday as a resounding win propelled them back to the top of the table, but it wasn’t without its challenges.
Roberto De Zerbi’s side were a tough nut to crack whilst also proving capable of cutting through the Arsenal block (and press), sometimes at will. However, such is Arsenal’s fluidity and adaptability in possession these days, they showed, in real time, how they were able to overcome the host’s stubborn press to carve open the game’s best chances early on.
This piece is a breakdown of just that. What Arsenal were faced with, what they looked to do initially, and how they eventually constructed the right setup to exploit the home side.
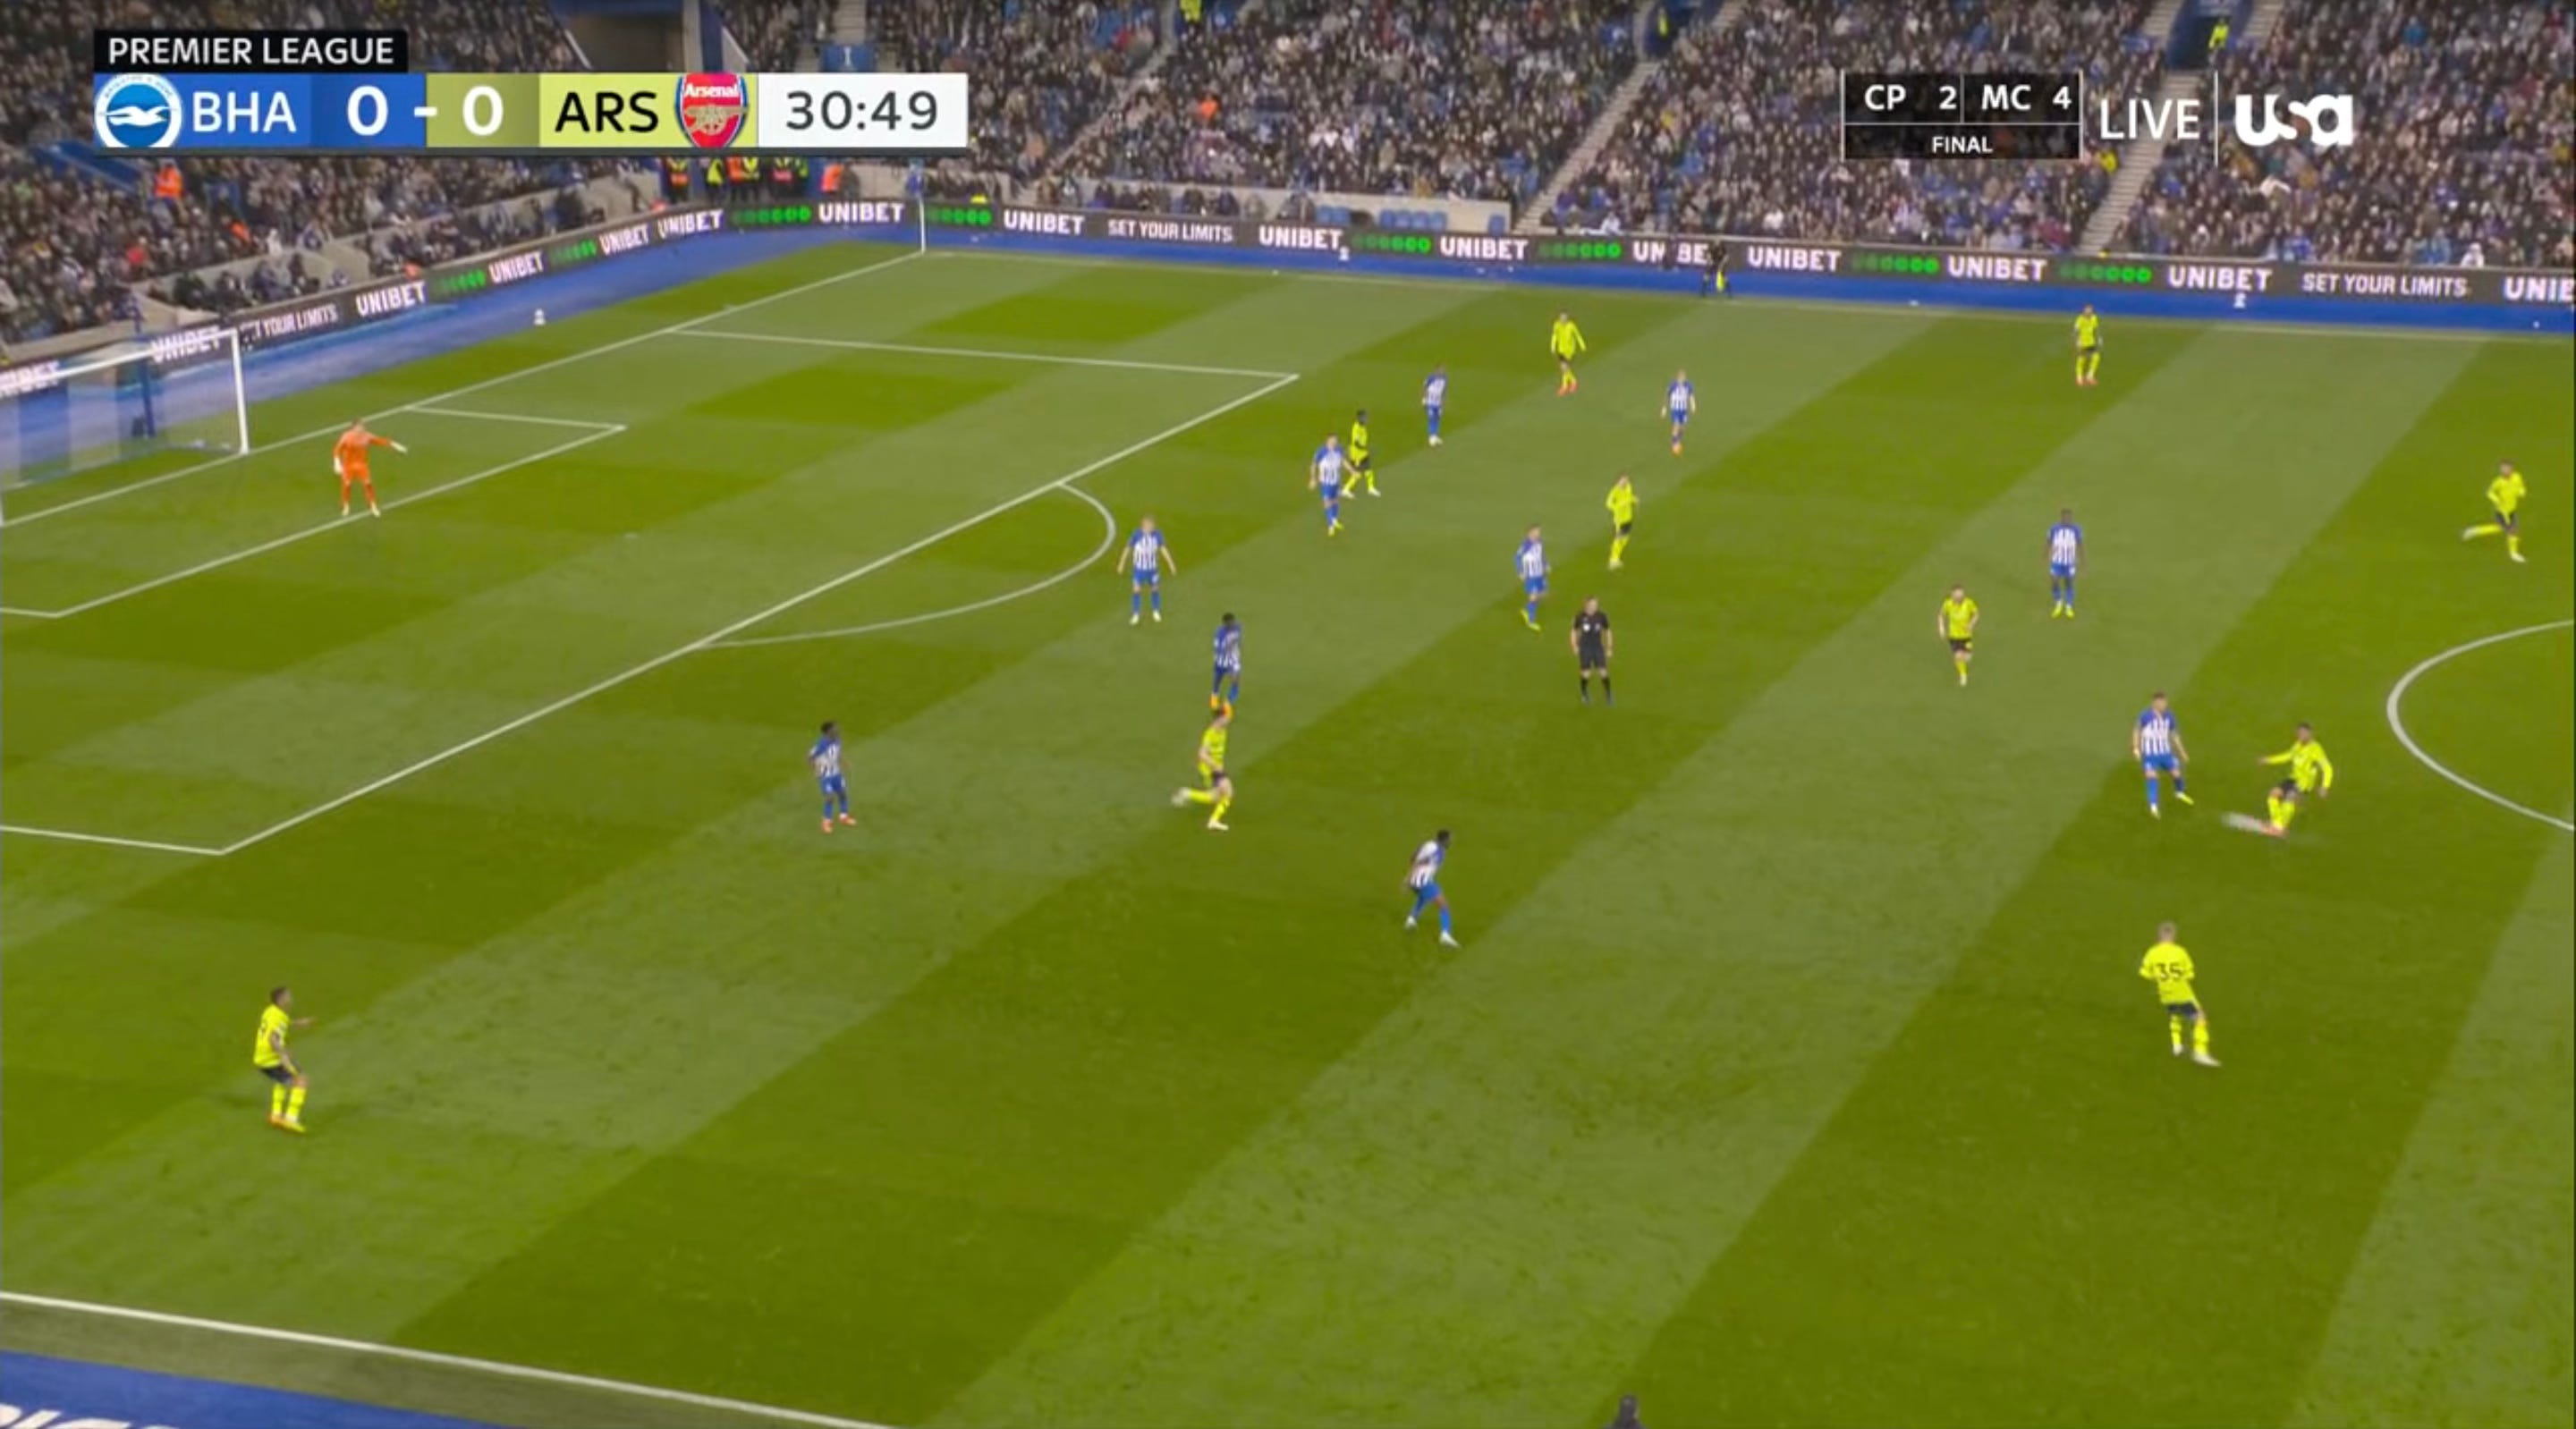
Early phases
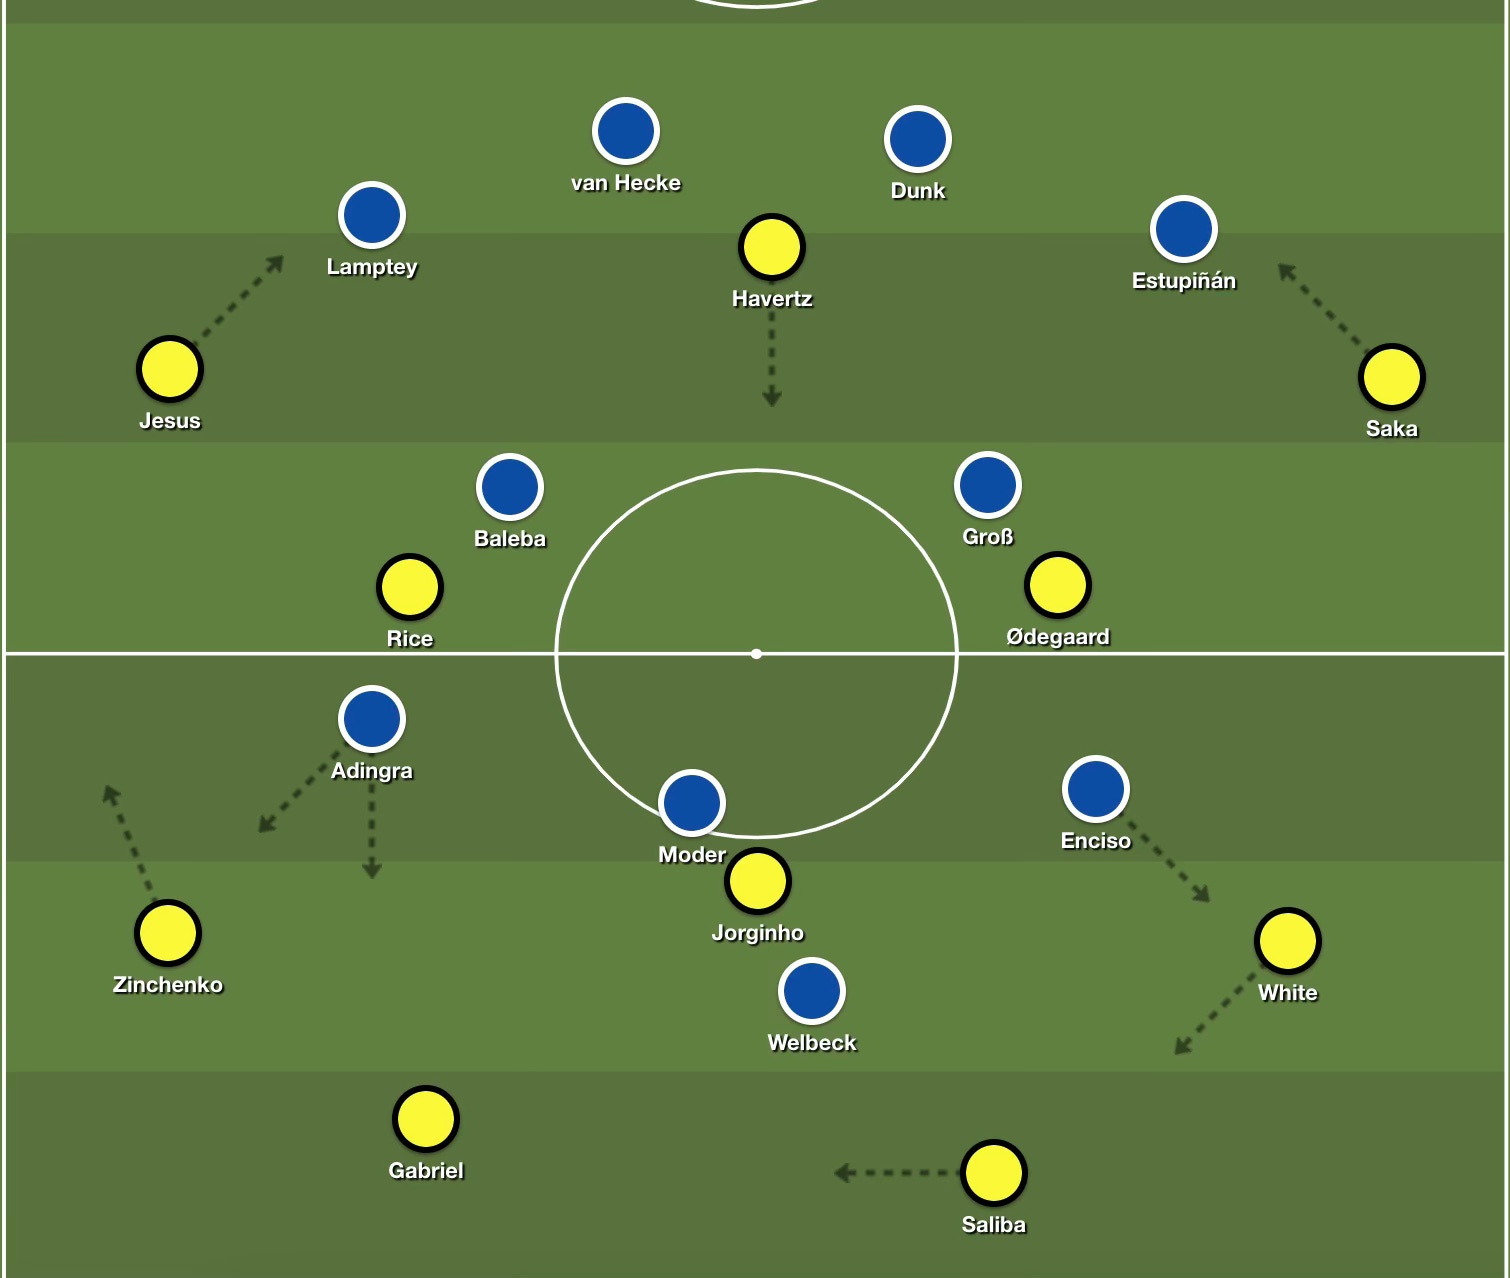
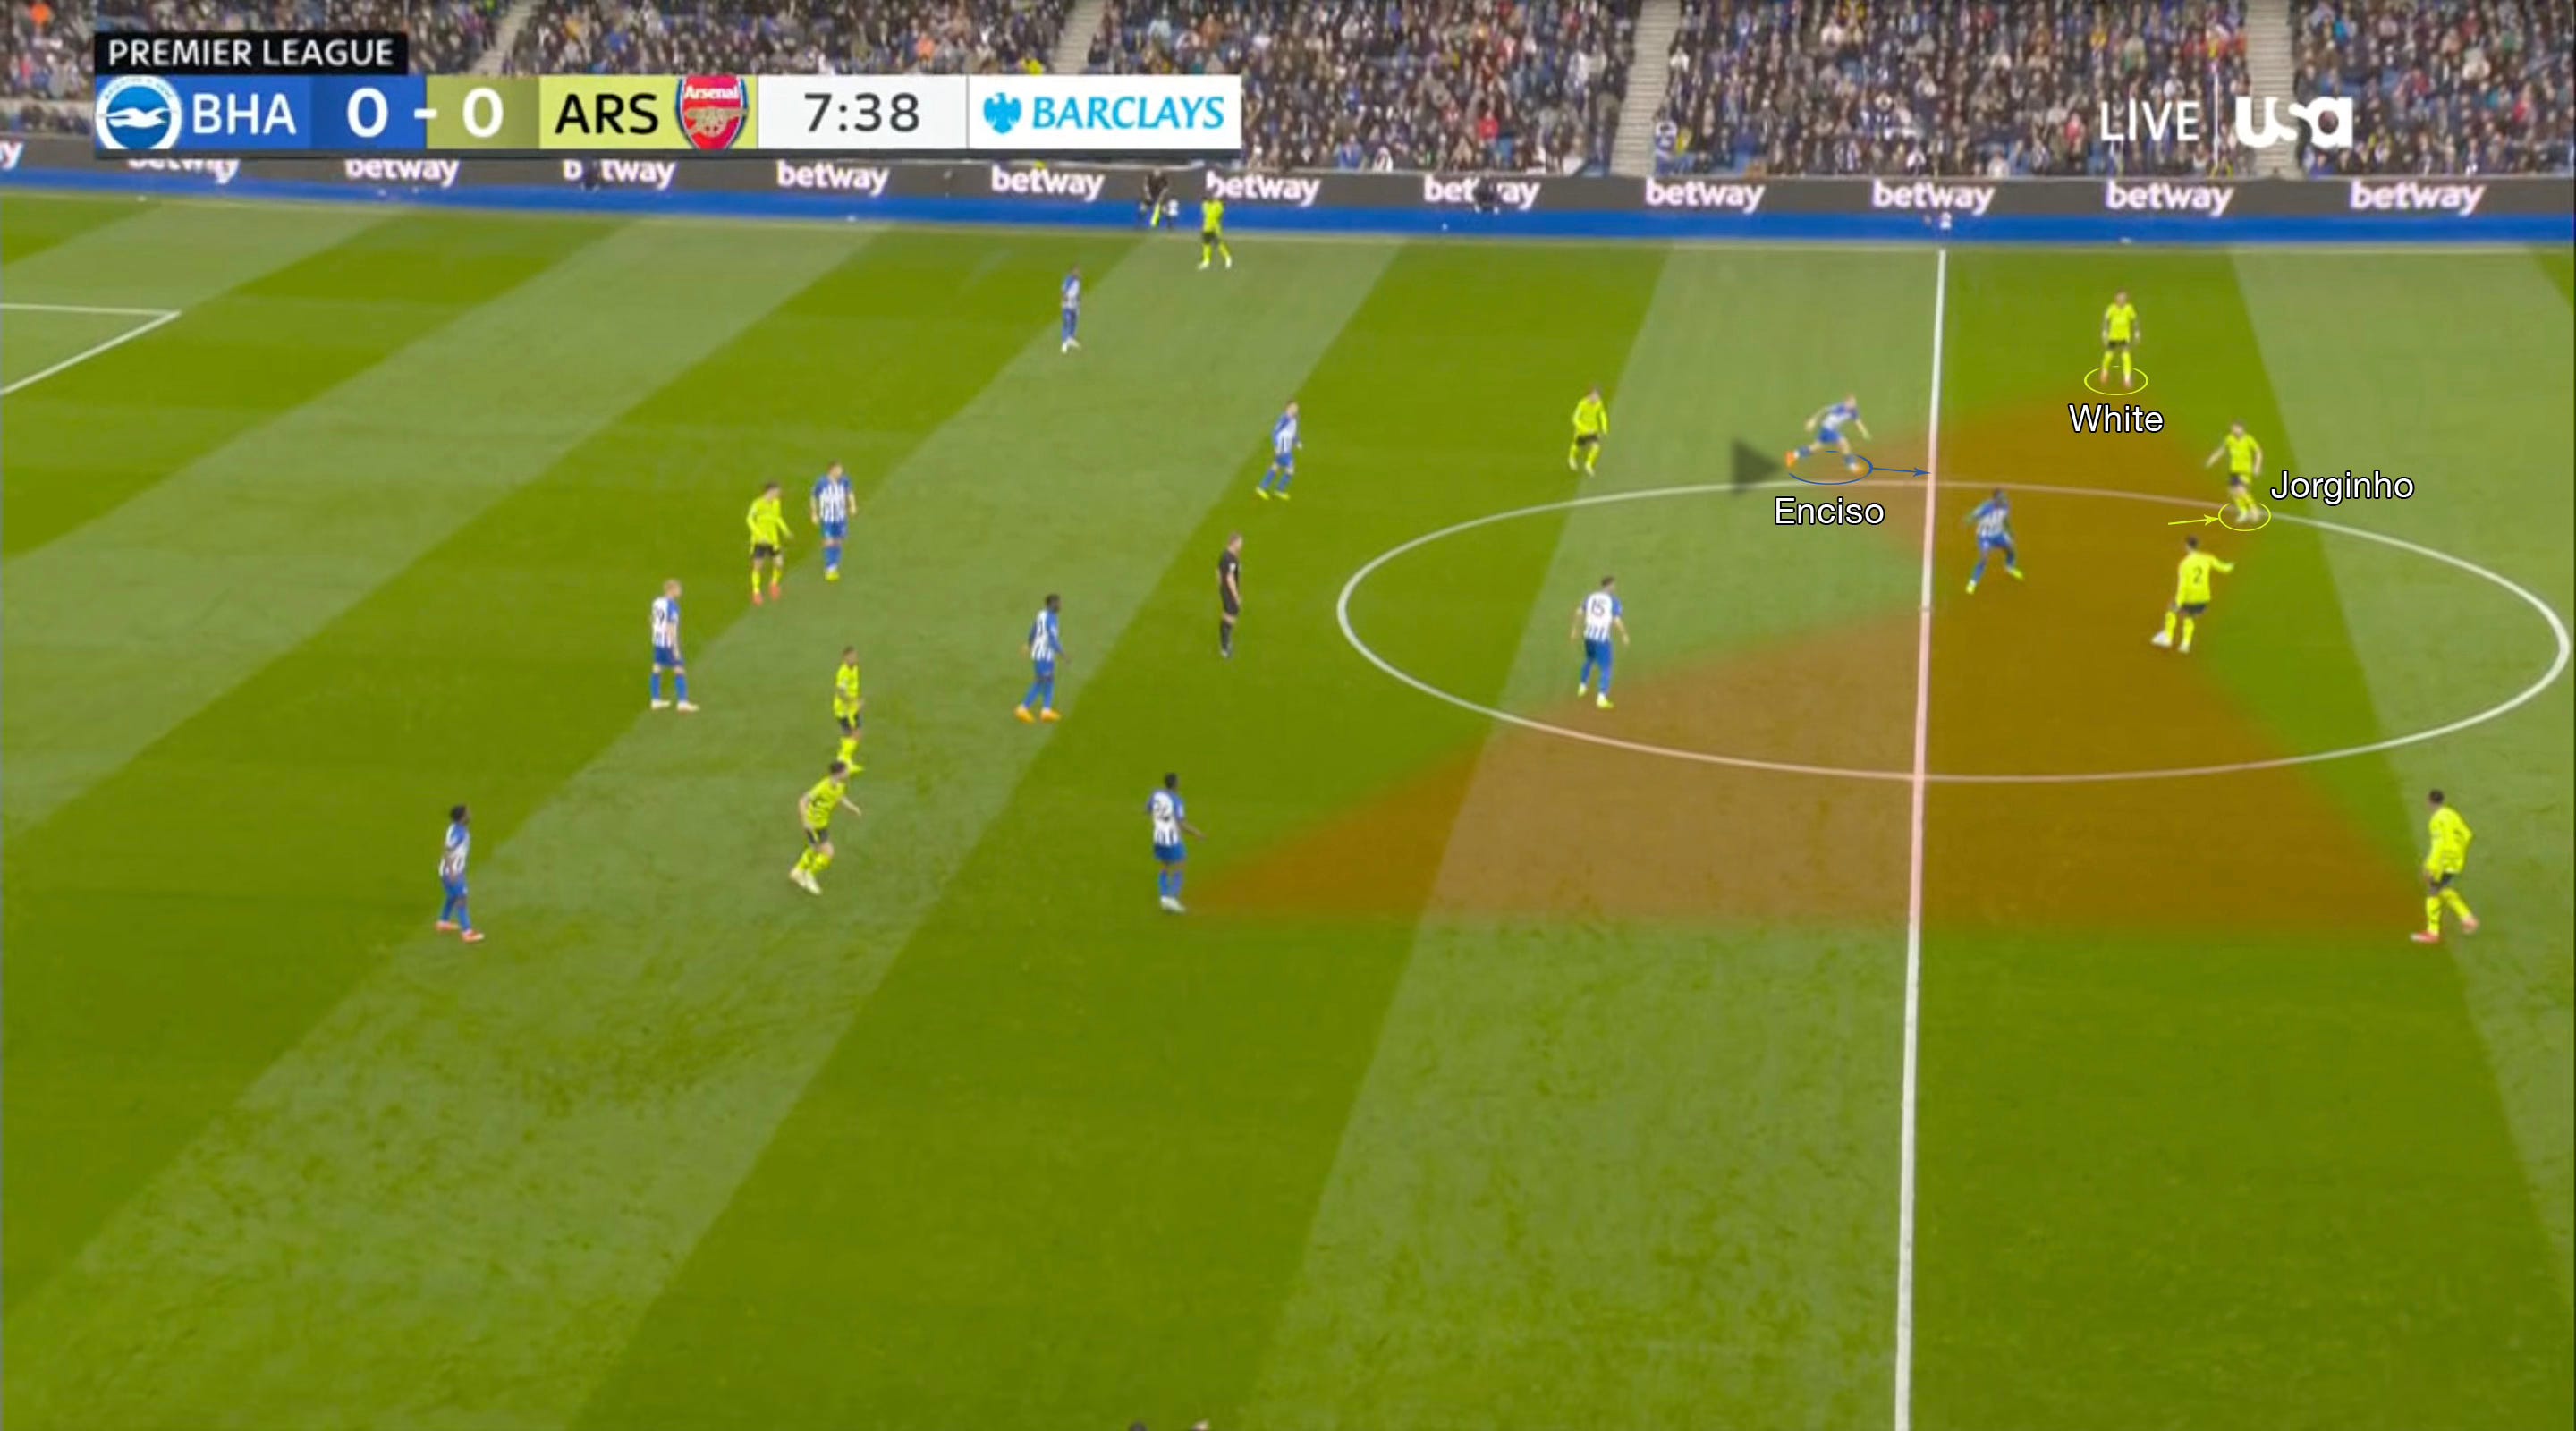
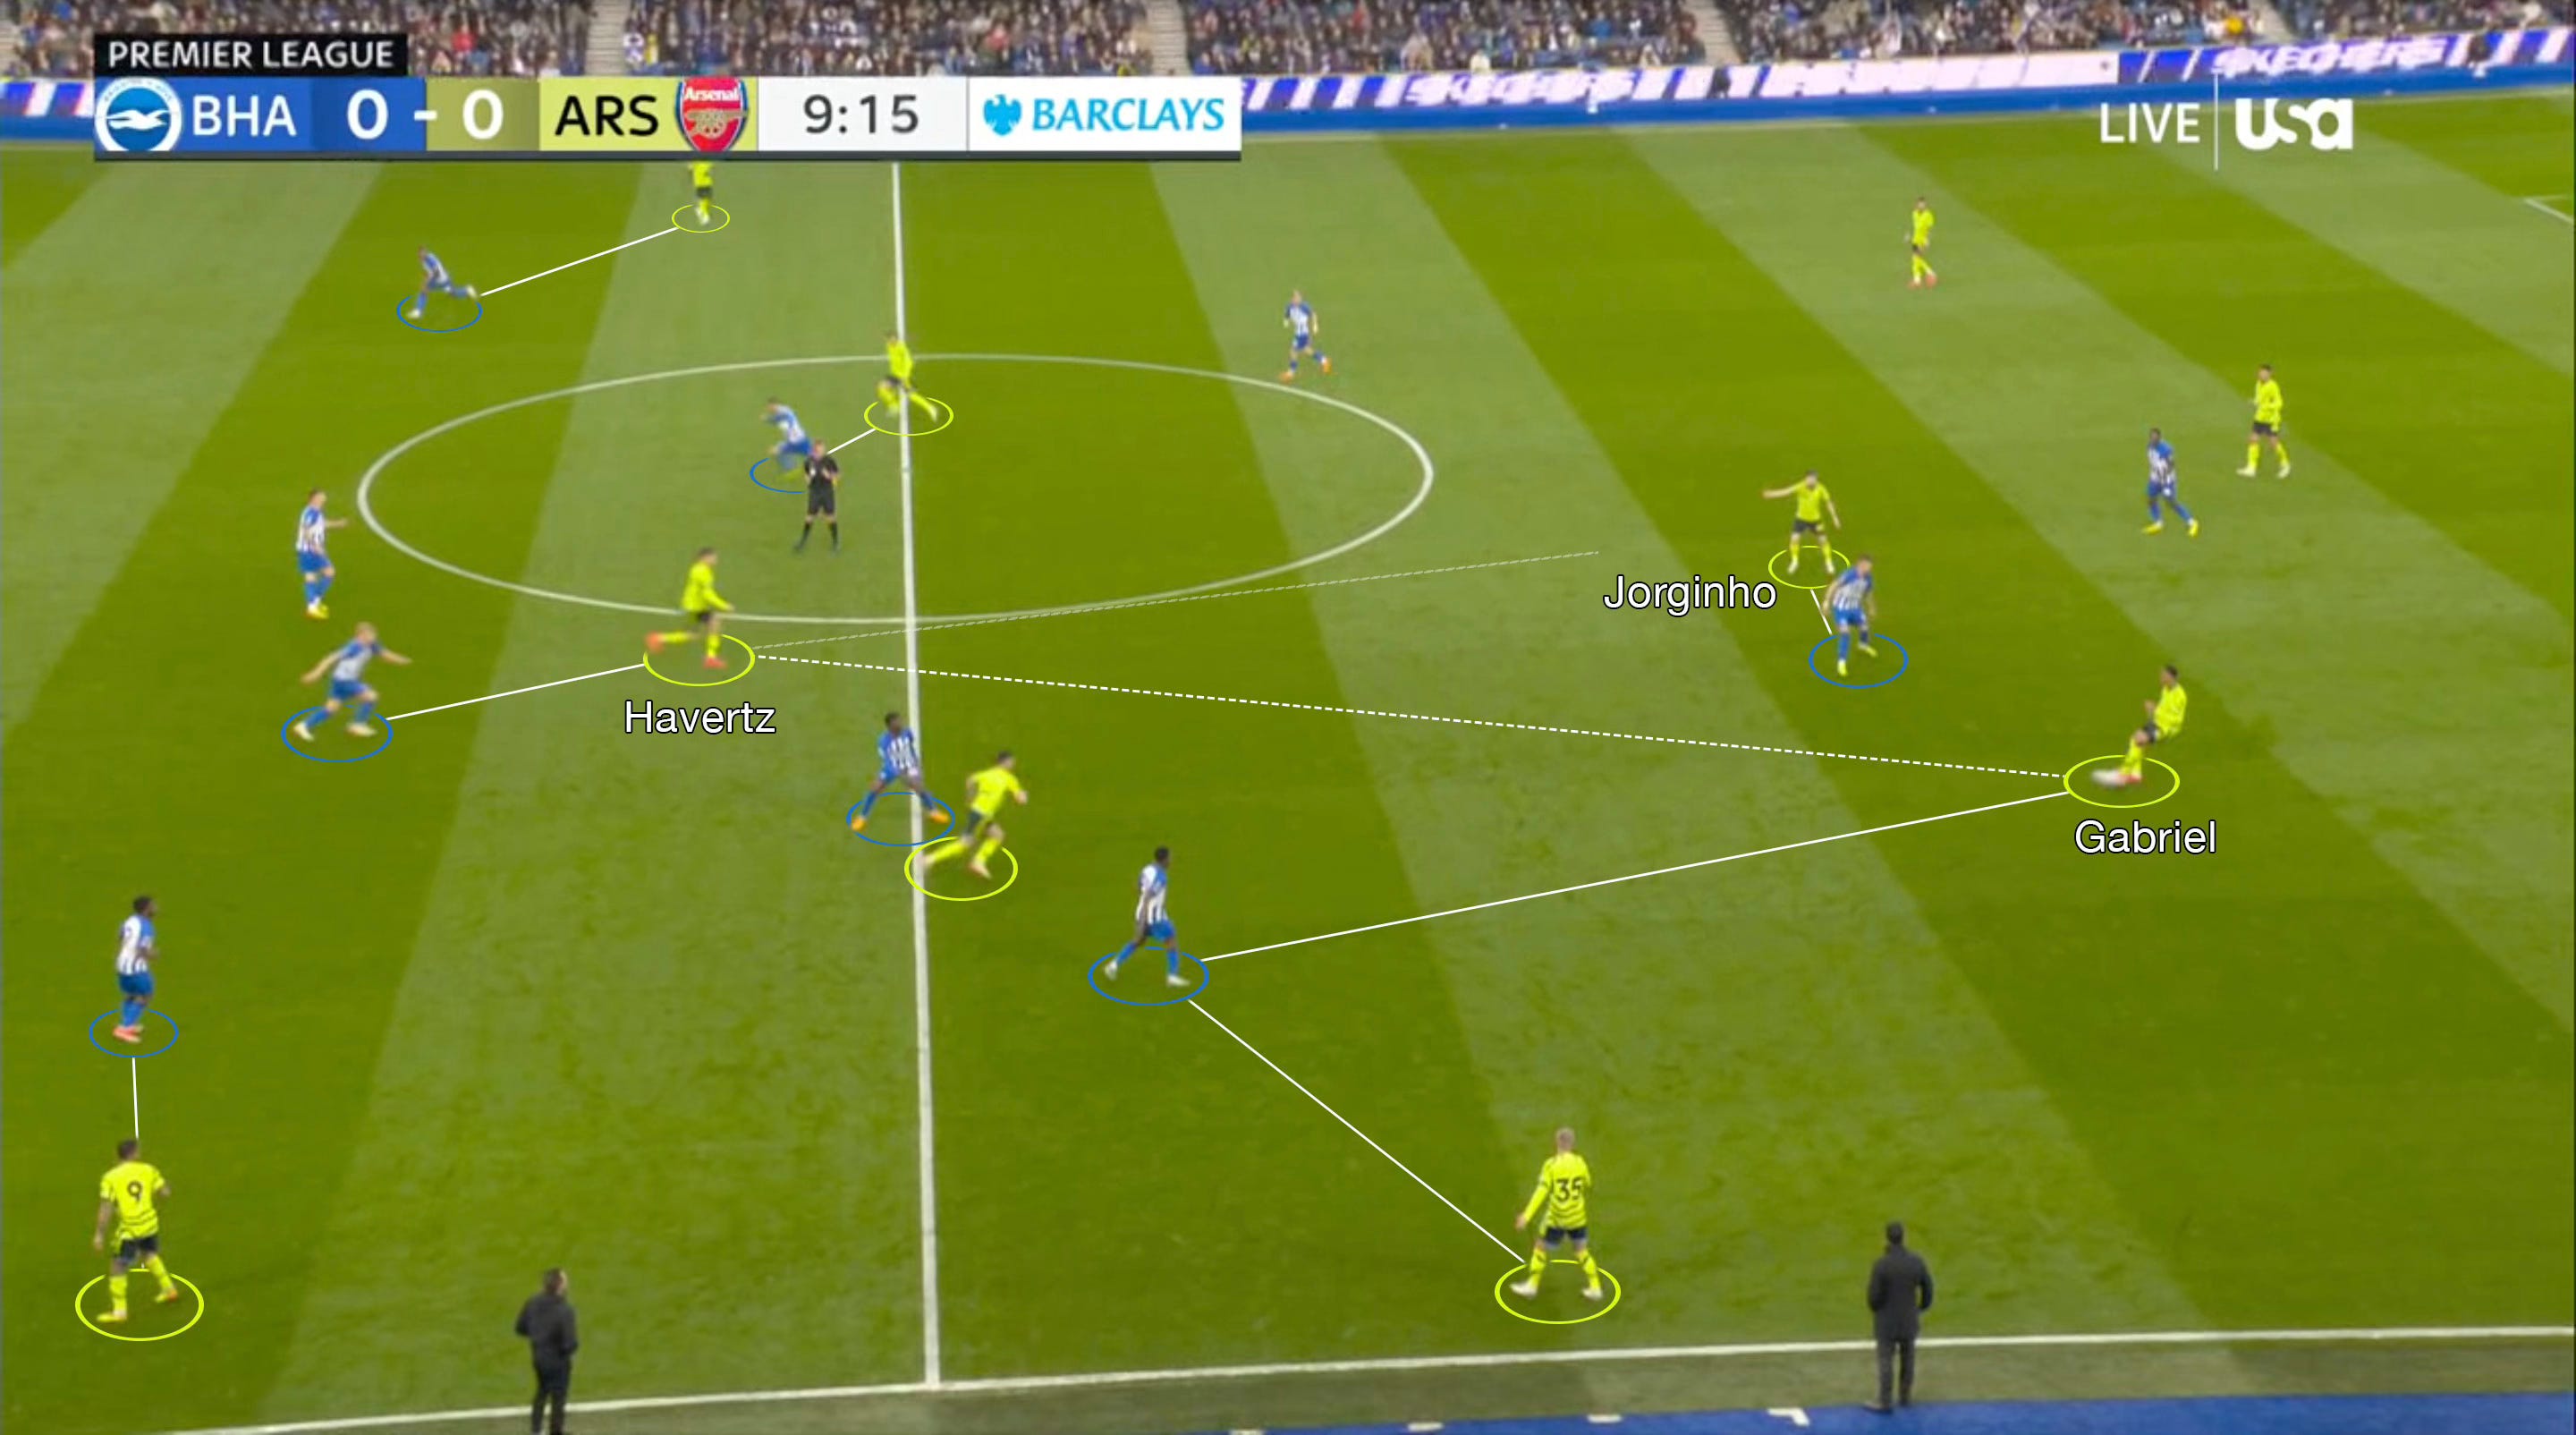
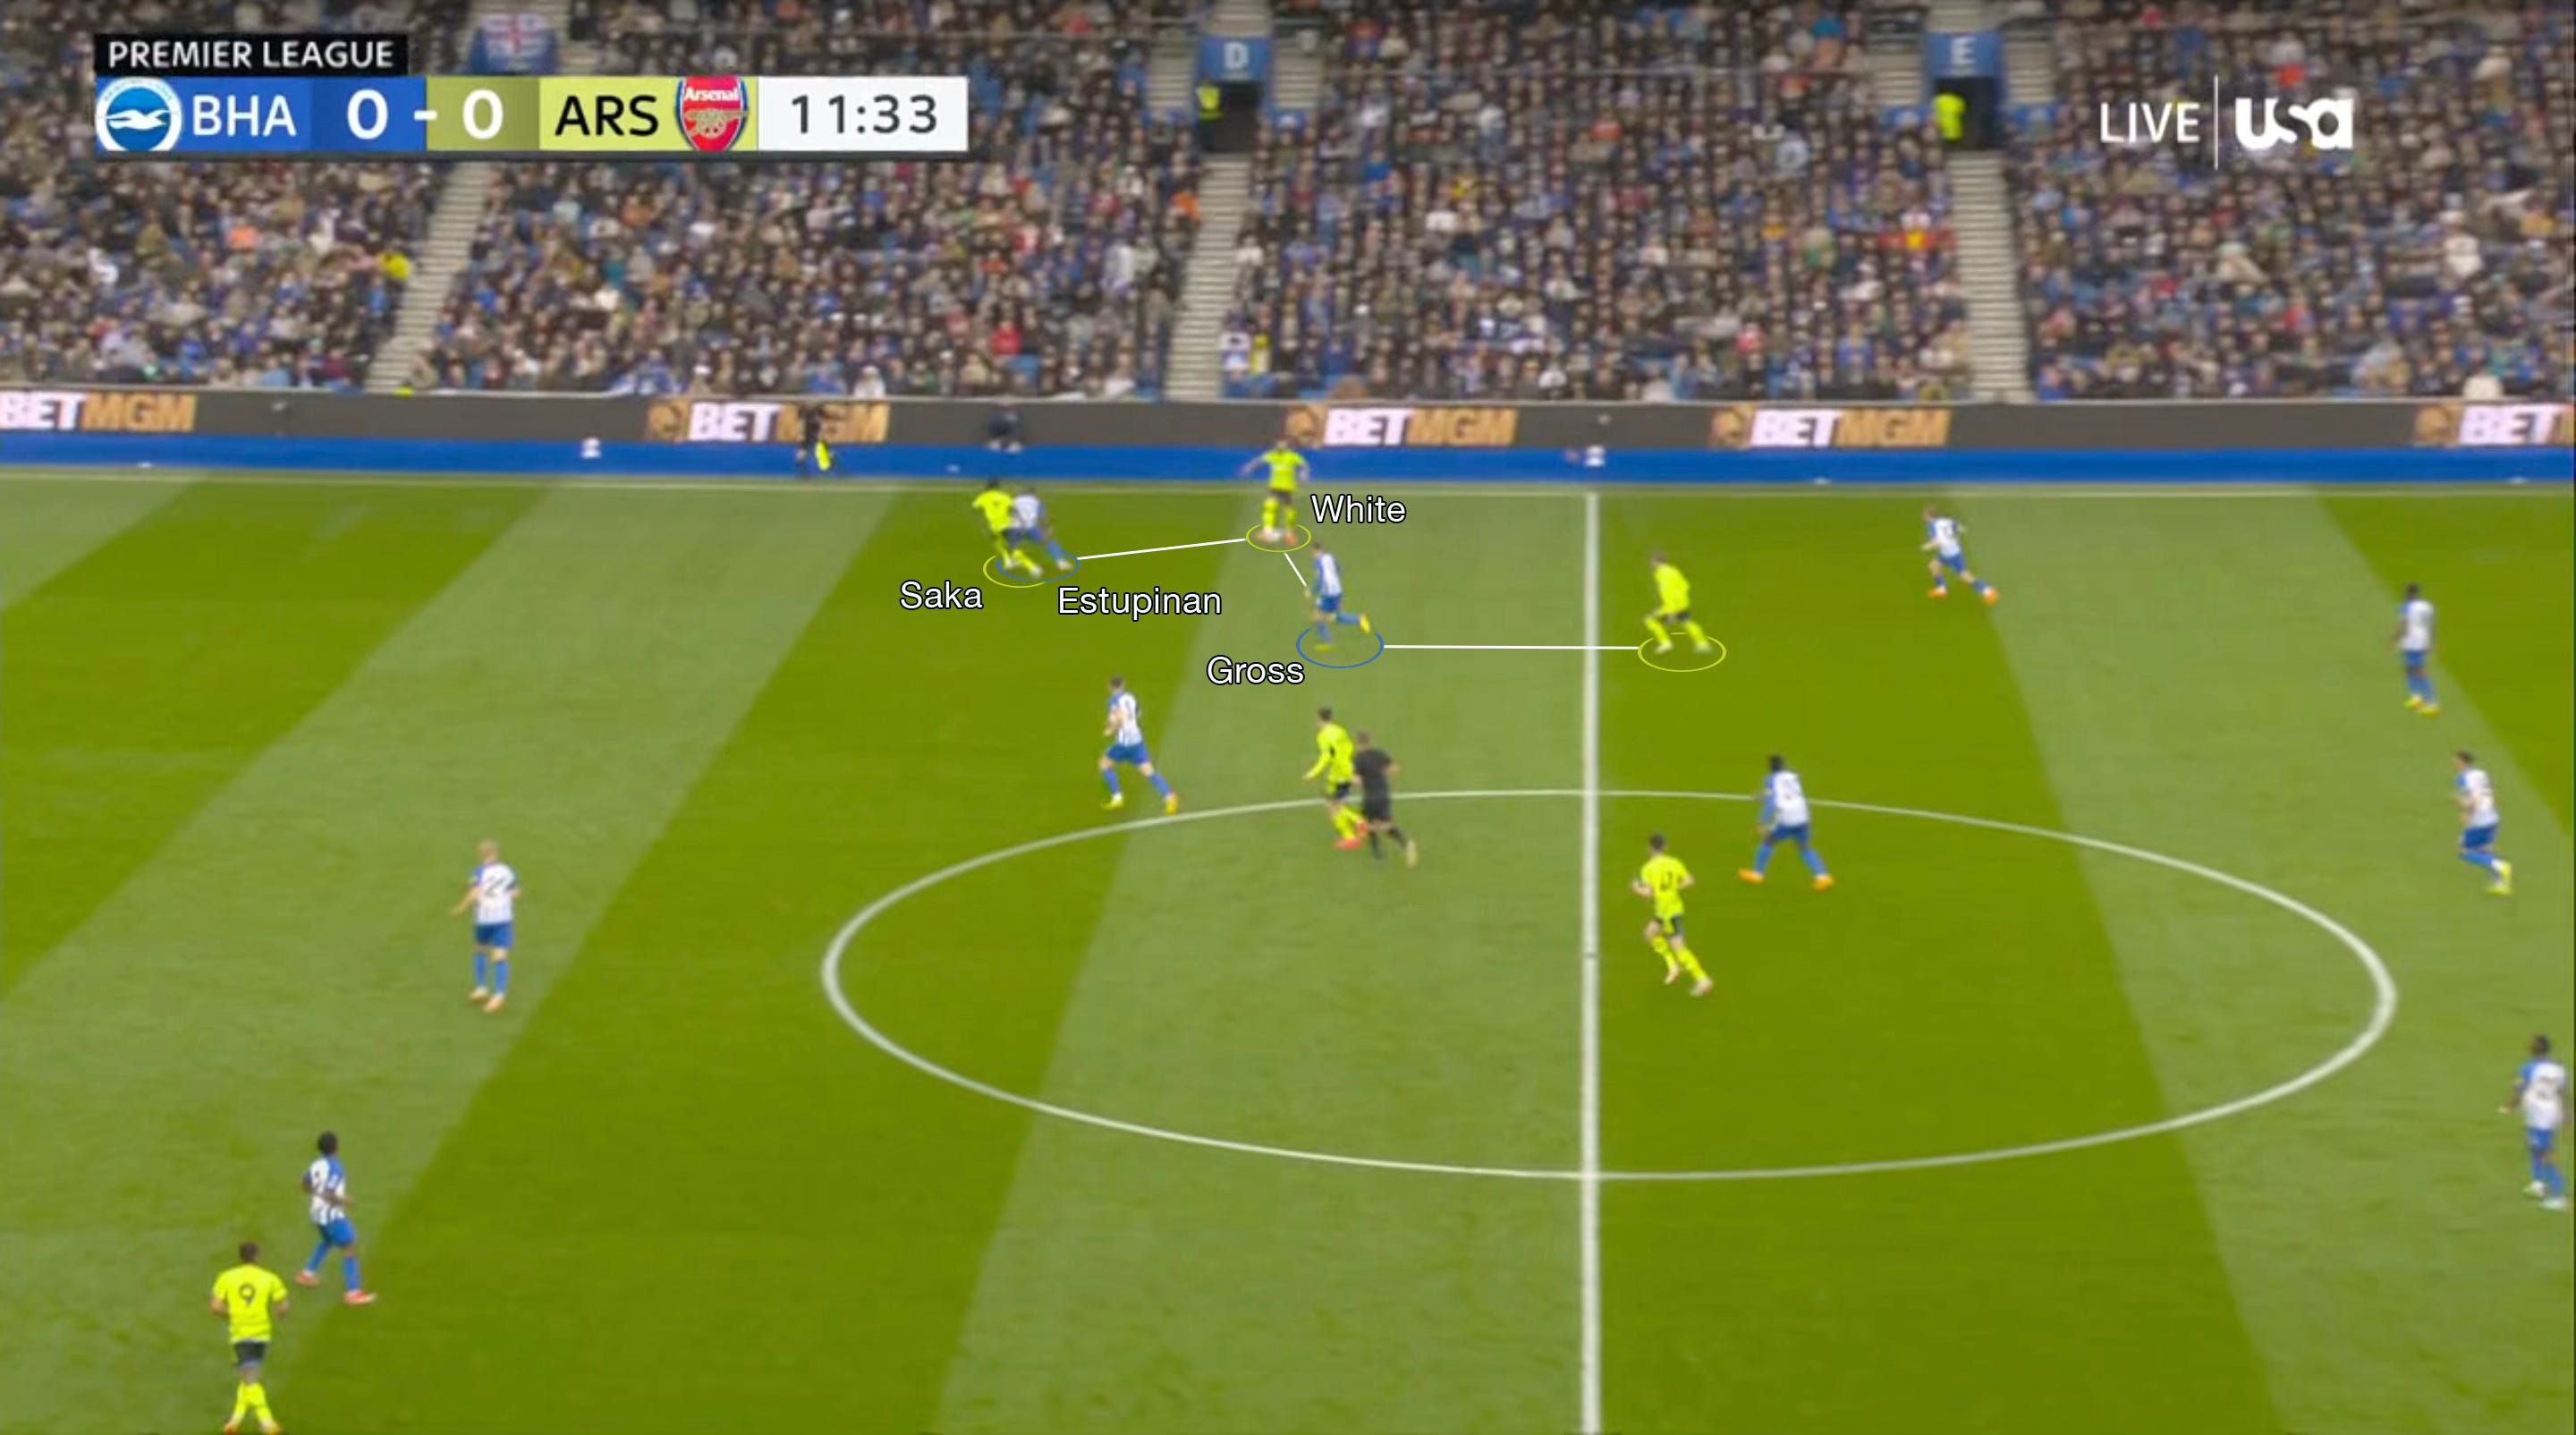
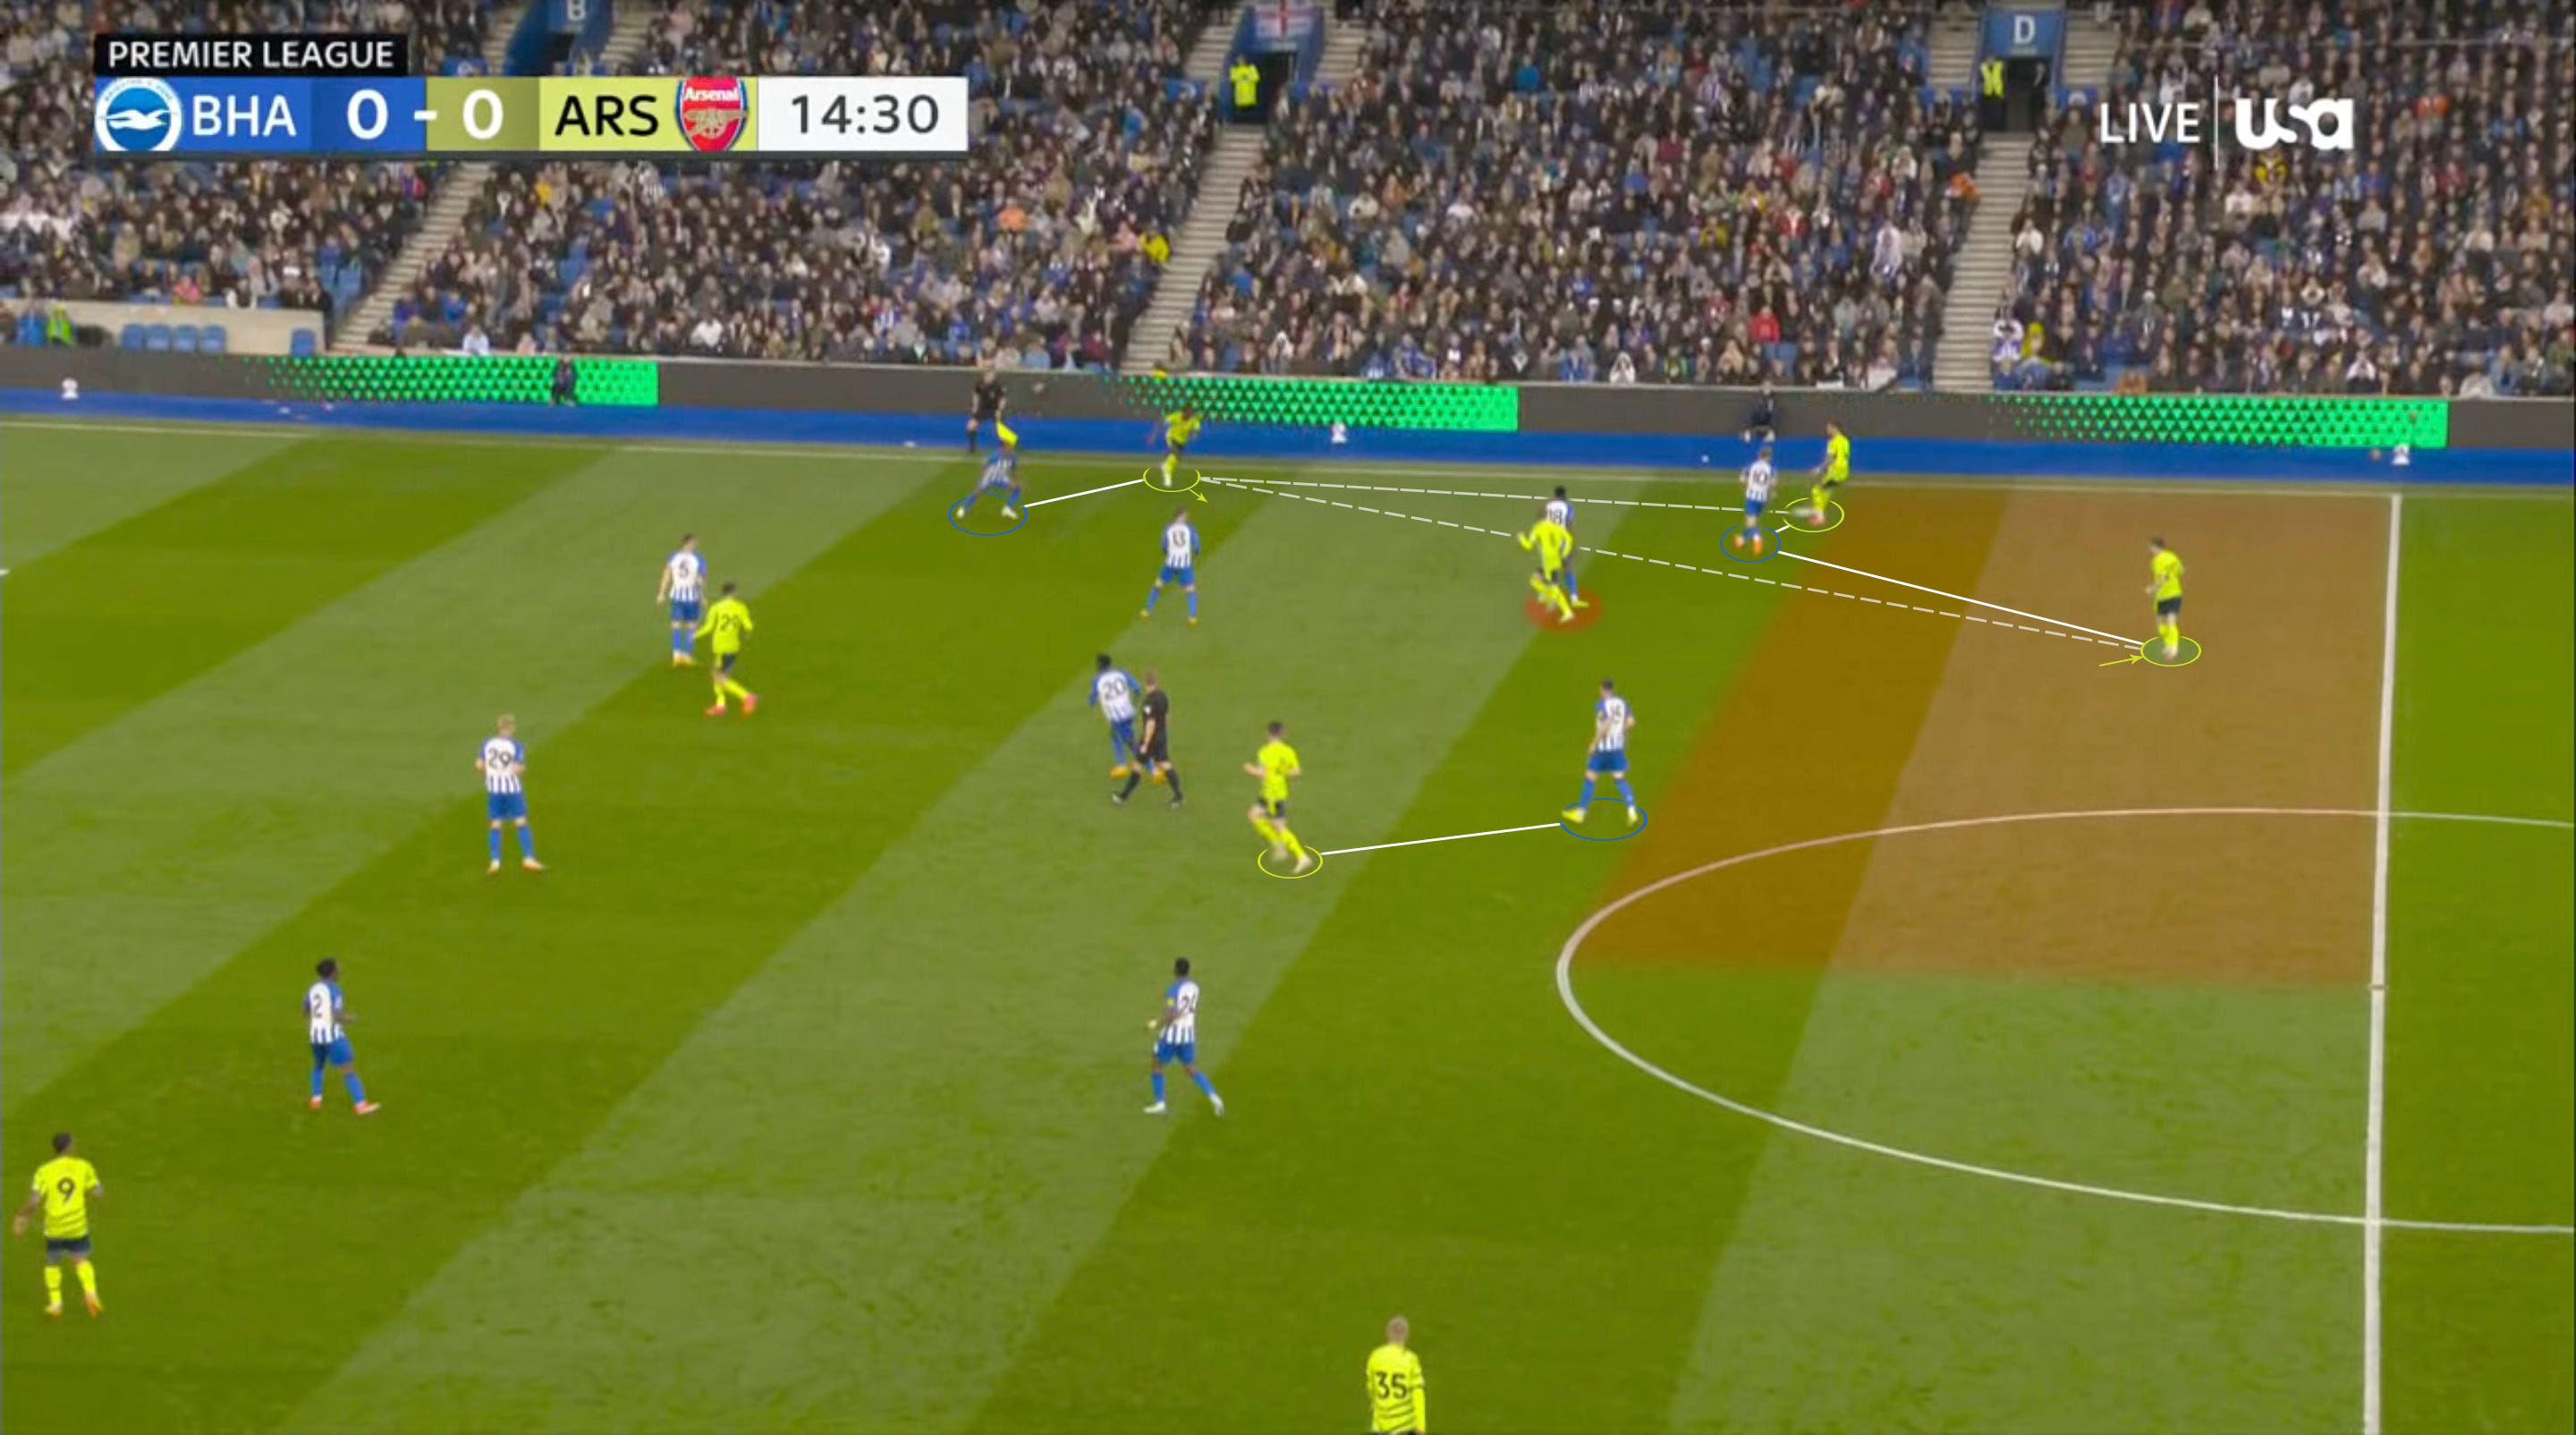
As a refresher, these were the lineups. The arrows on the Arsenal players indicate where they shifted towards initially from within the 4-3-3 starting shape, and the arrows on Brighton players (wingers in this case) indicate who they covered against.
Left-sided probing
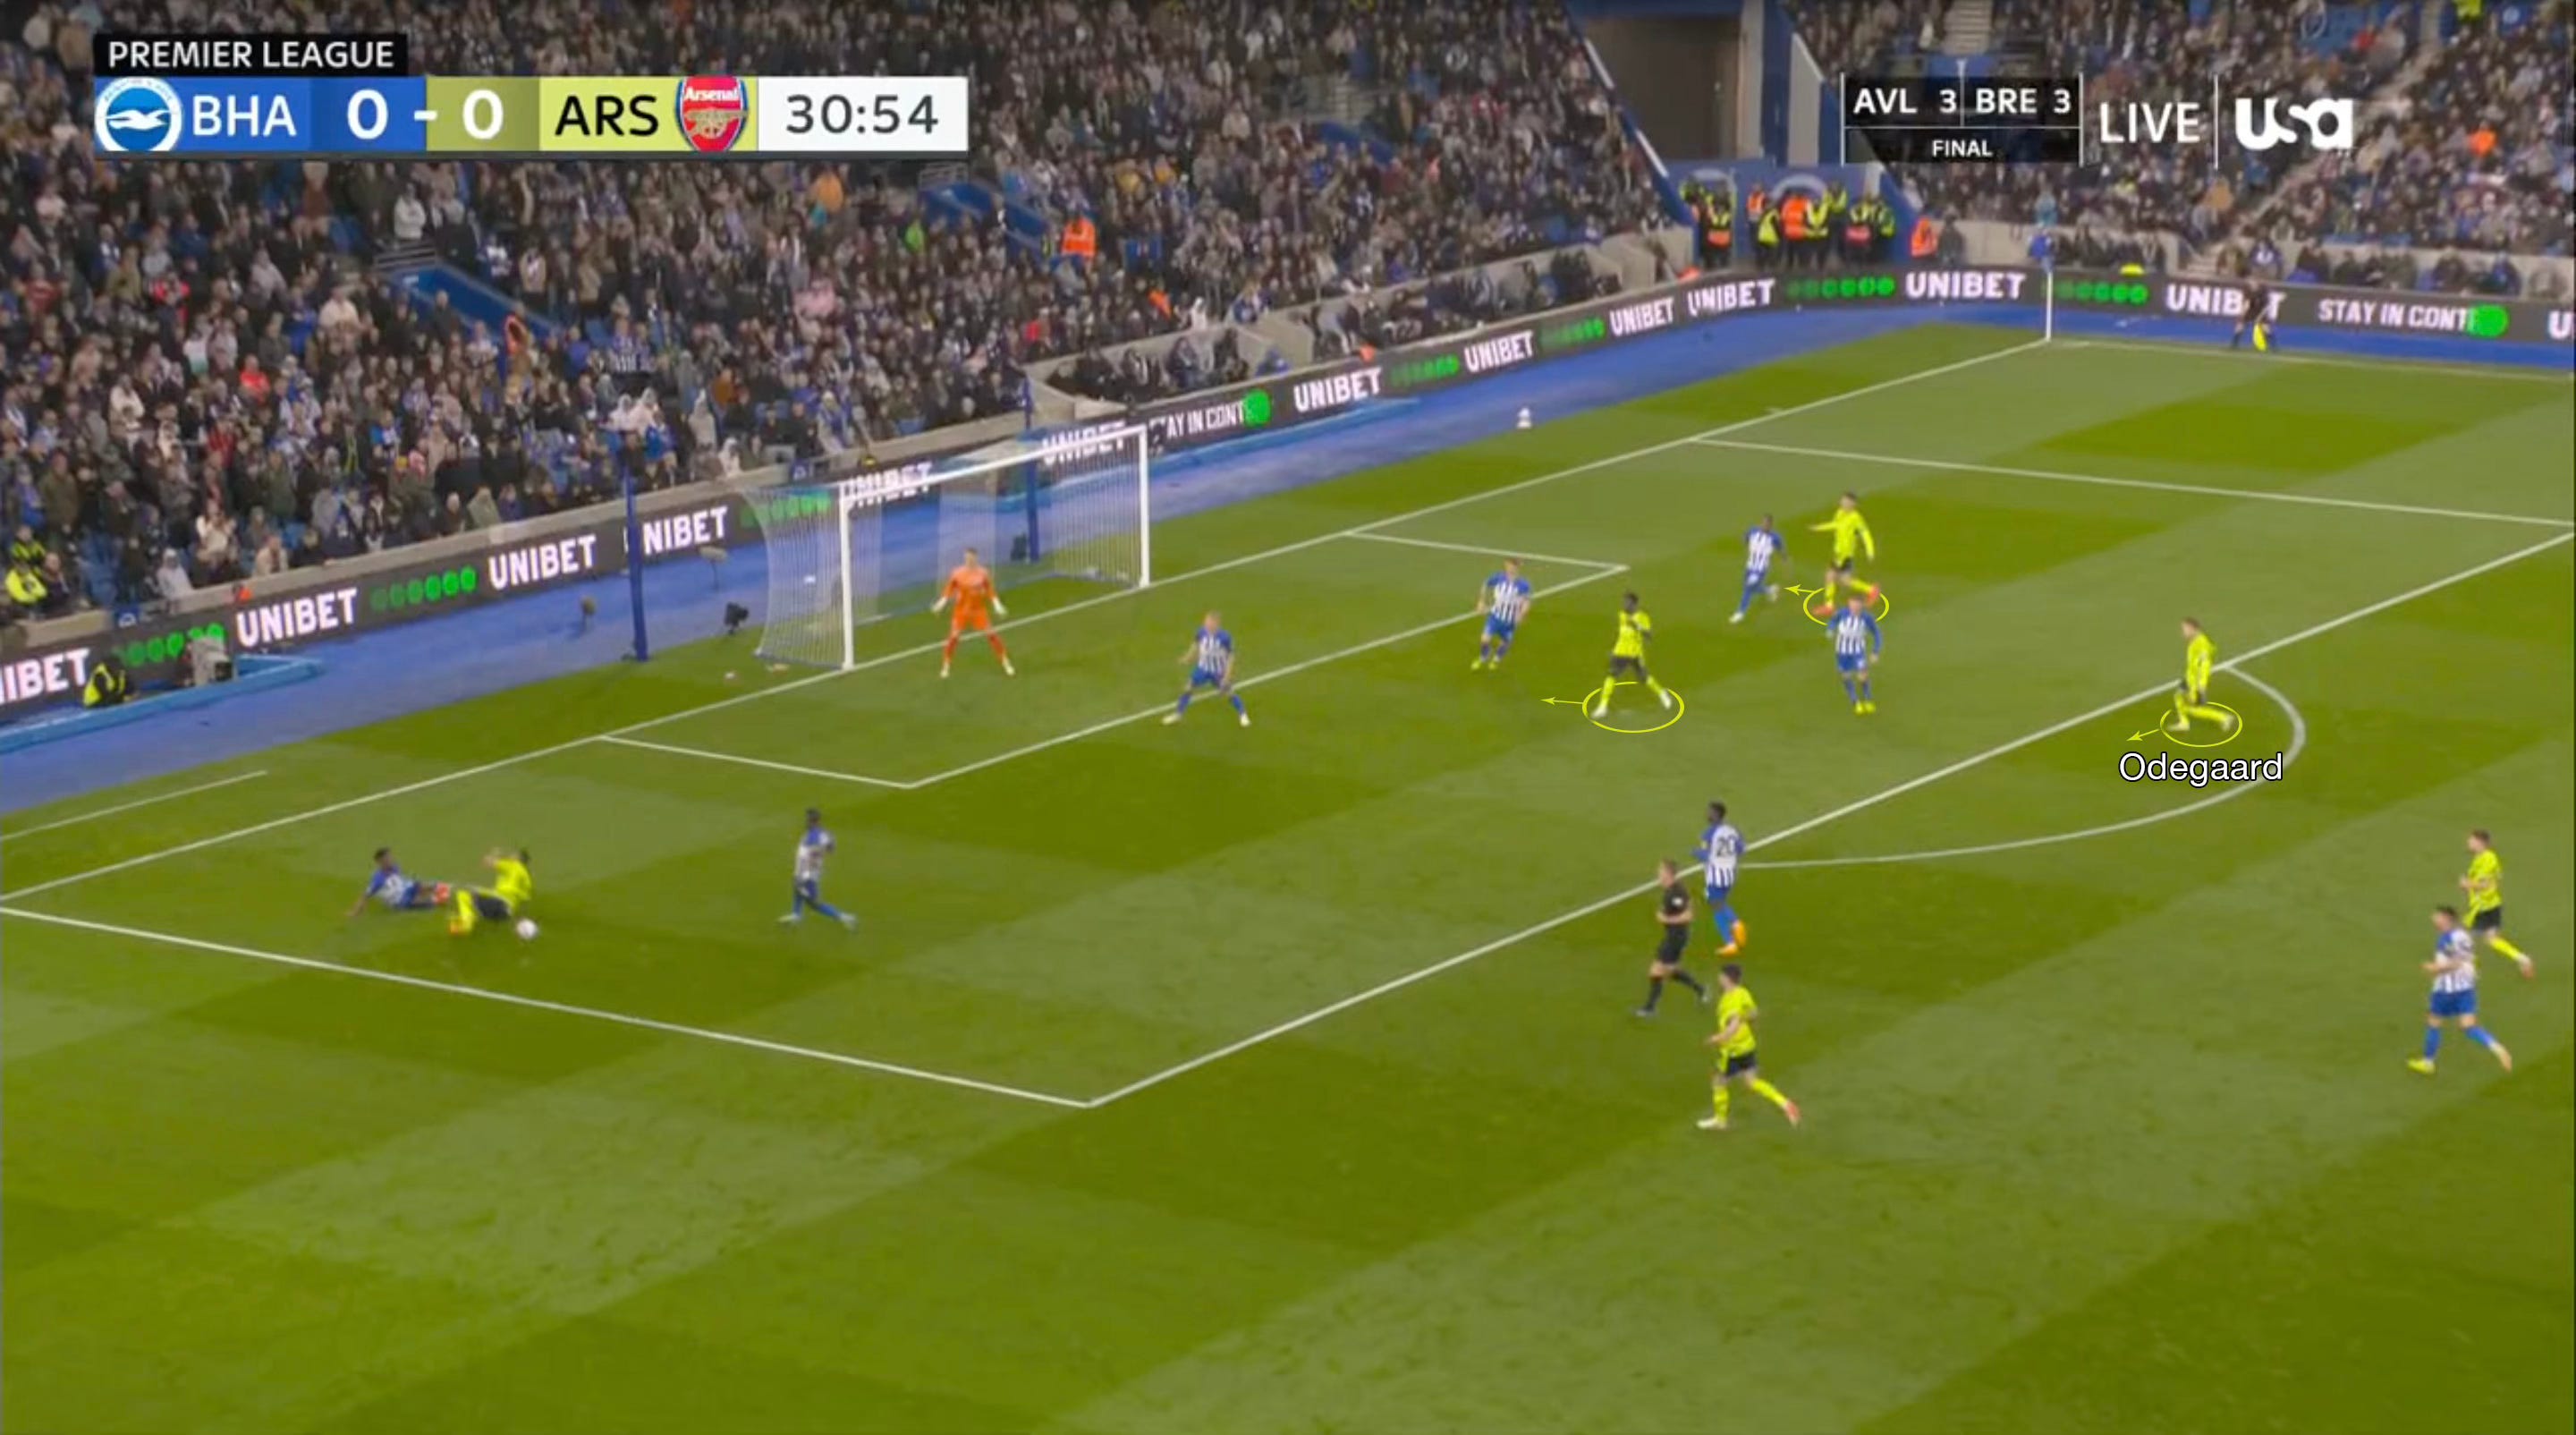
1st example
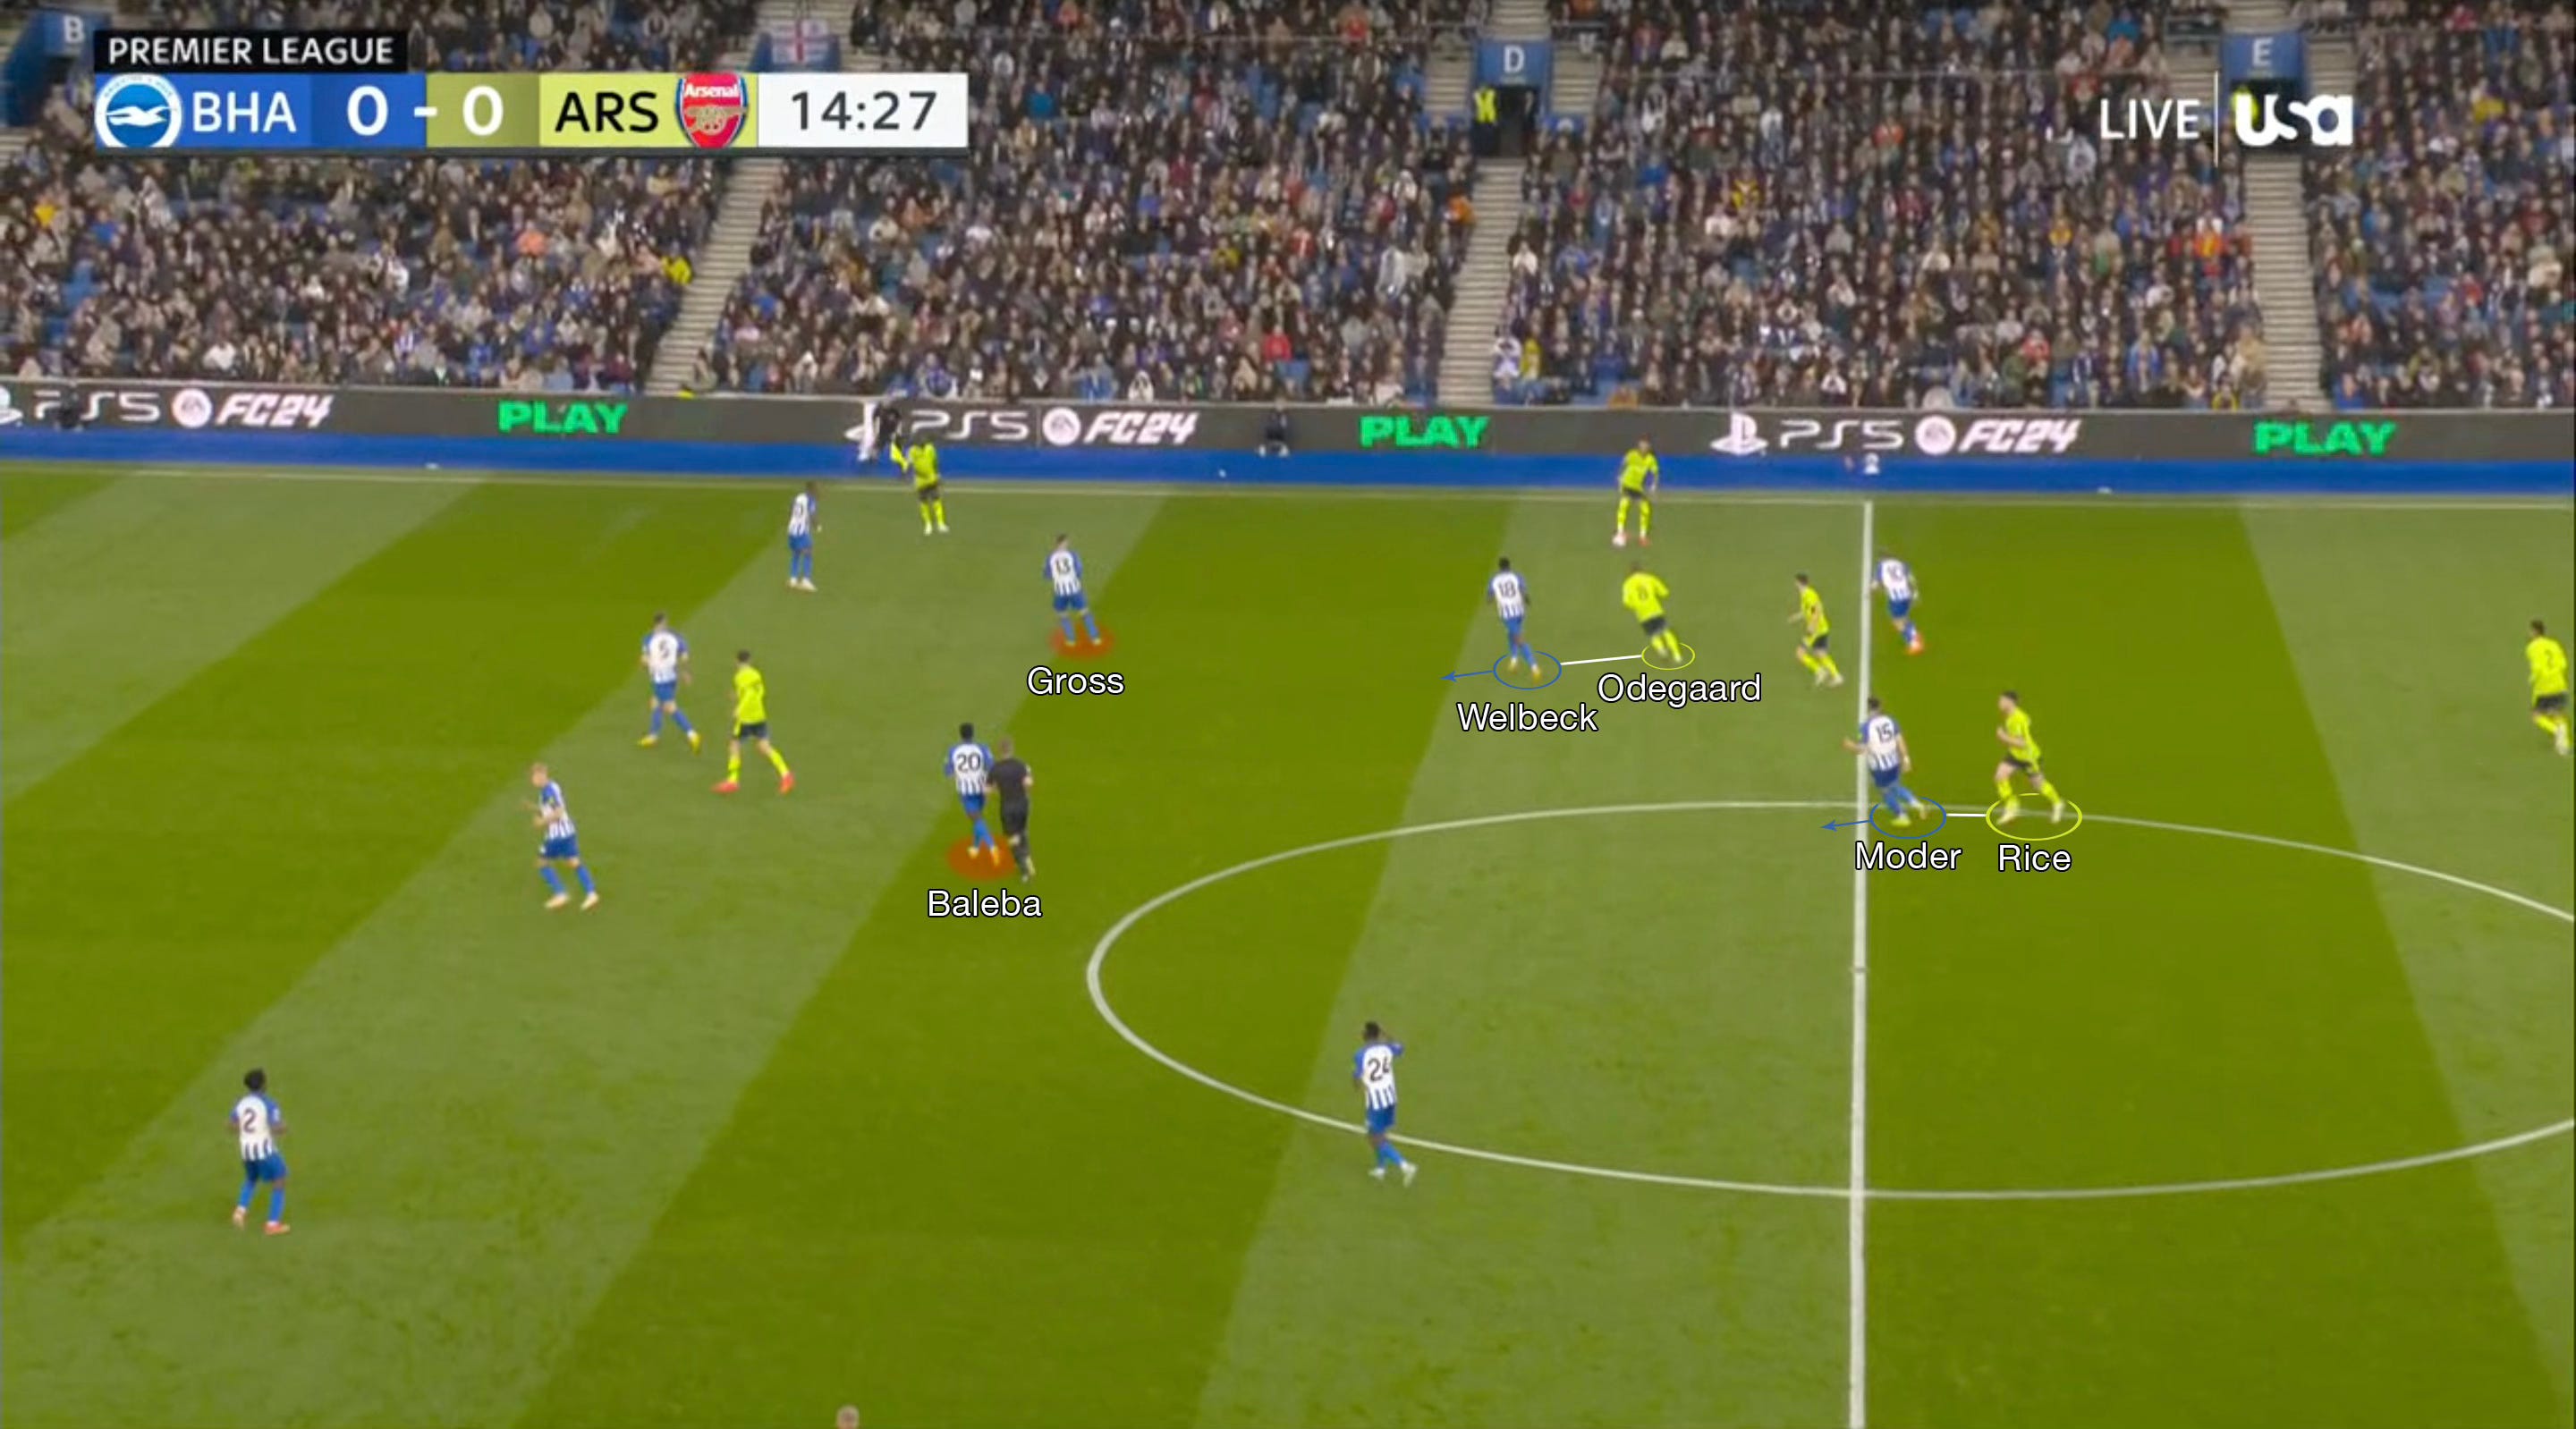
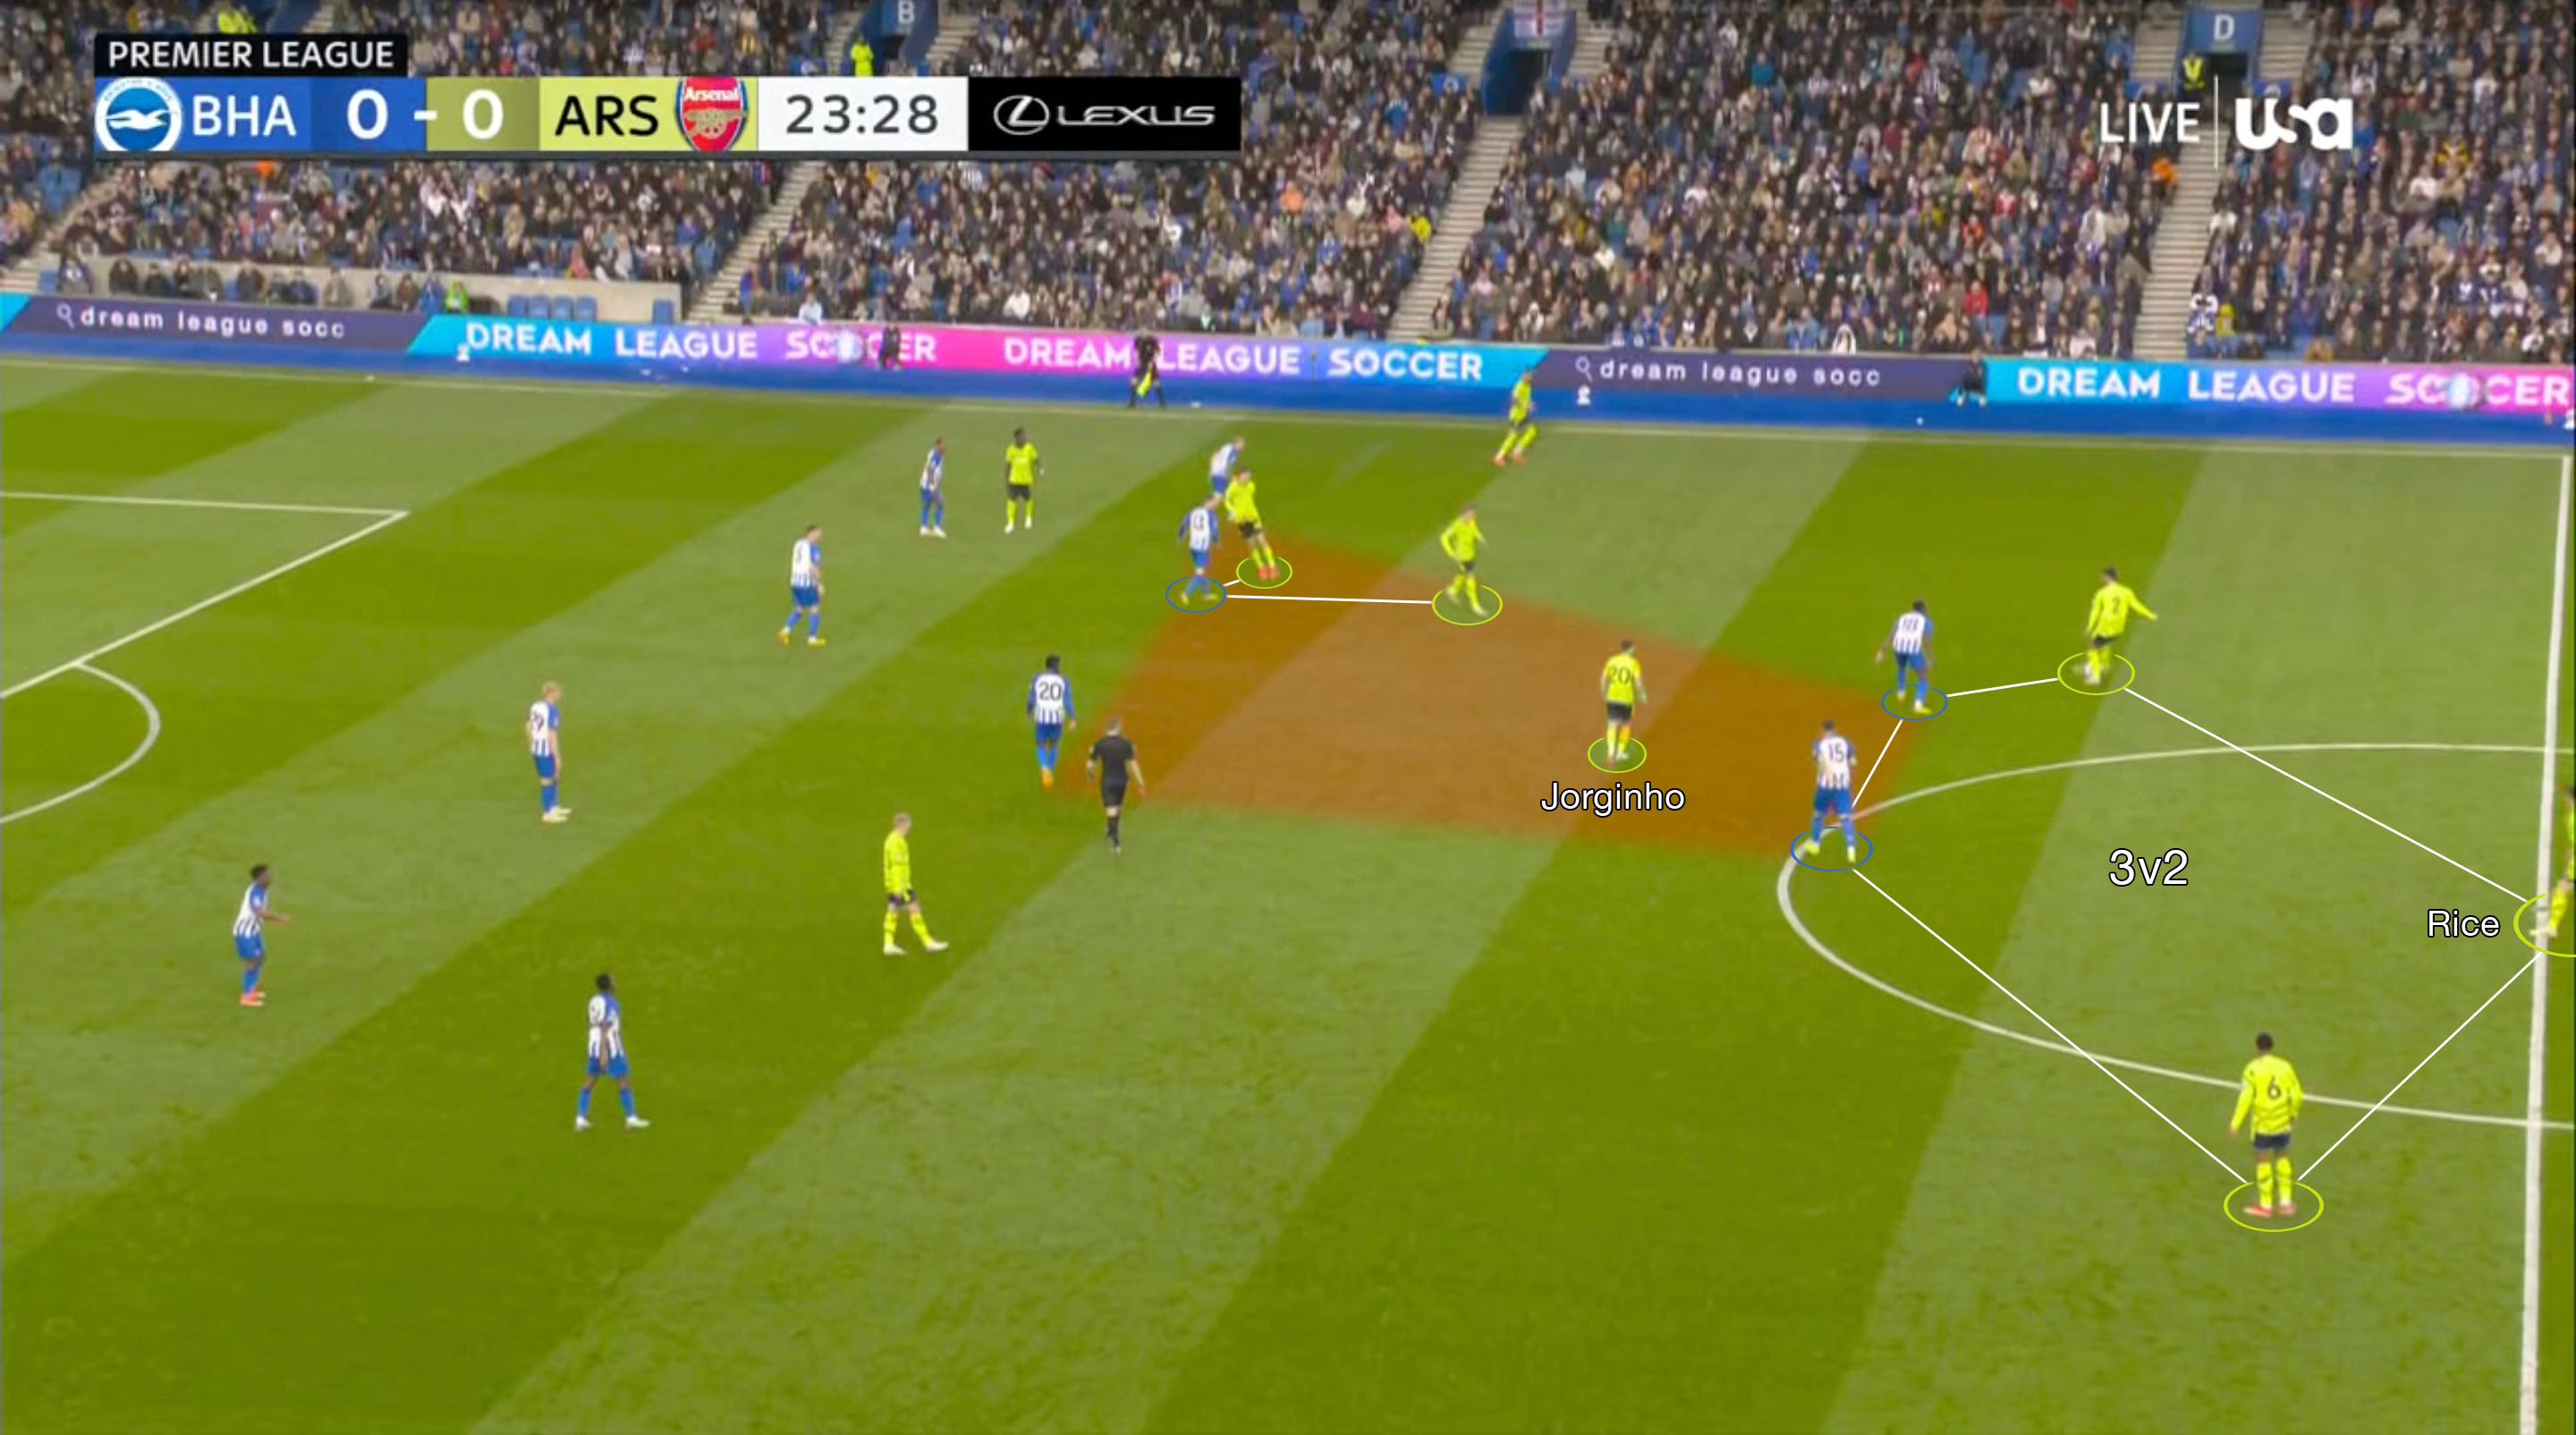
Here’s the Brighton press. They went man-for-man across the pitch, bar one, leaving a CB for cover. Unlike Luton, who were repeatedly punished for not squeezing the spaces horizontally and vertically, as well as the players themselves, Brighton’s double pivot acted like leaches against Rice & Ødegaard – tracking them pretty much wherever they went.
The same could be said for the coverage against Jorginho, which switched hands between Welbeck and Moder at times, with the other being joined by the wide players to match Arsenal’s 1st line of possession so that they could take away time on the ball. That time taken away and the intense coverage against options made it difficult to field easy out balls to the wingers, also.
So, the goal for Arsenal was to find and exploit the spare man afforded to them by the resting CB. In the early instance above, this is Zinchenko.
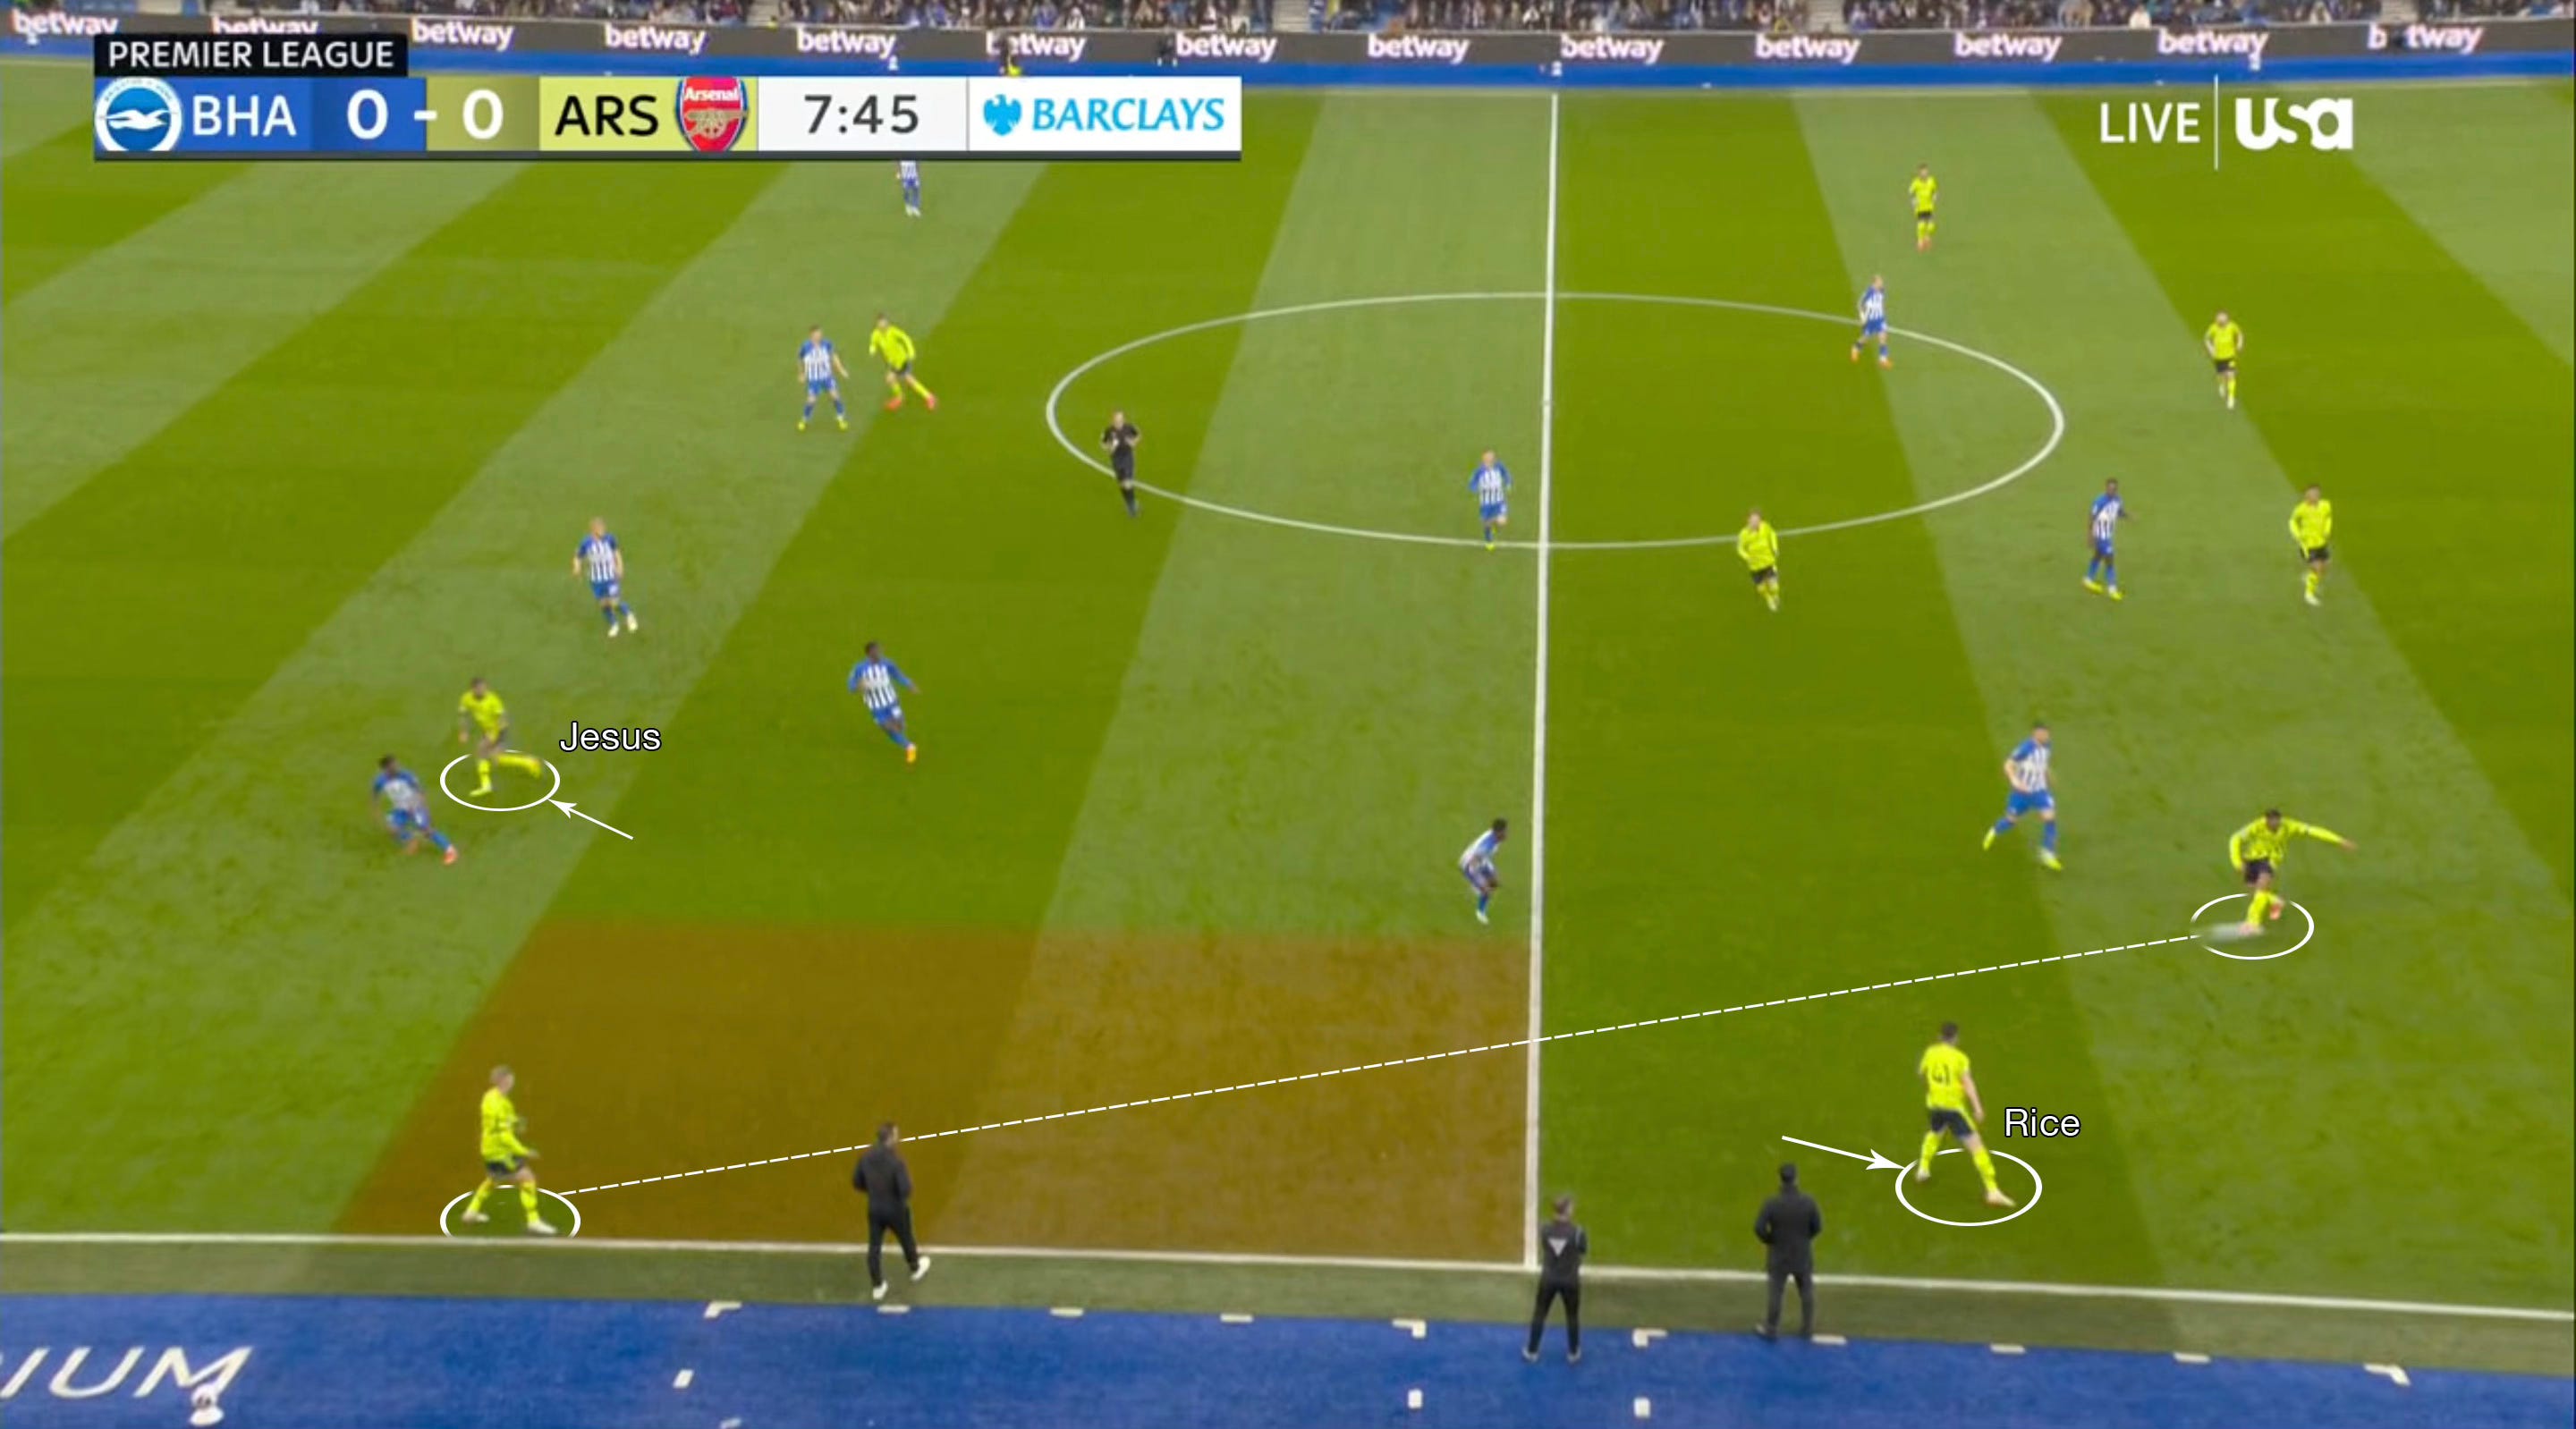
When Brighton’s wide players – Enciso (left) & Adingra (right) – were forced deep by overloads, they heavily prioritised dropping goal-side and staying narrow. As pictured above, Adingra’s narrow position vs Zinchenko means Rice can’t make an easily-accessible run off the back of his marker. So the risk of man-marking – where you’re reacting to your opponent’s actions, which can you leave you a step behind – is mitigated. With the FBs tucked in, as well, it reduces the margins for error if Arsenal want to commit to playing to the overloading runs through the halfspaces.
Equally, the extremes of the marking against Ødegaard also pays off, here, in the sense that he is now congesting the area in which Havertz would otherwise be looking to drop into in order to to receive to feet.
With Zinchenko not being a particularly adventurous player in 1v1 situations, he’s more interested in the passing options, which on this occasion are cancelled out as Rice & Jesus’ runs collide. With the rest marked up, Adingra can press wide without fear of being caught out.
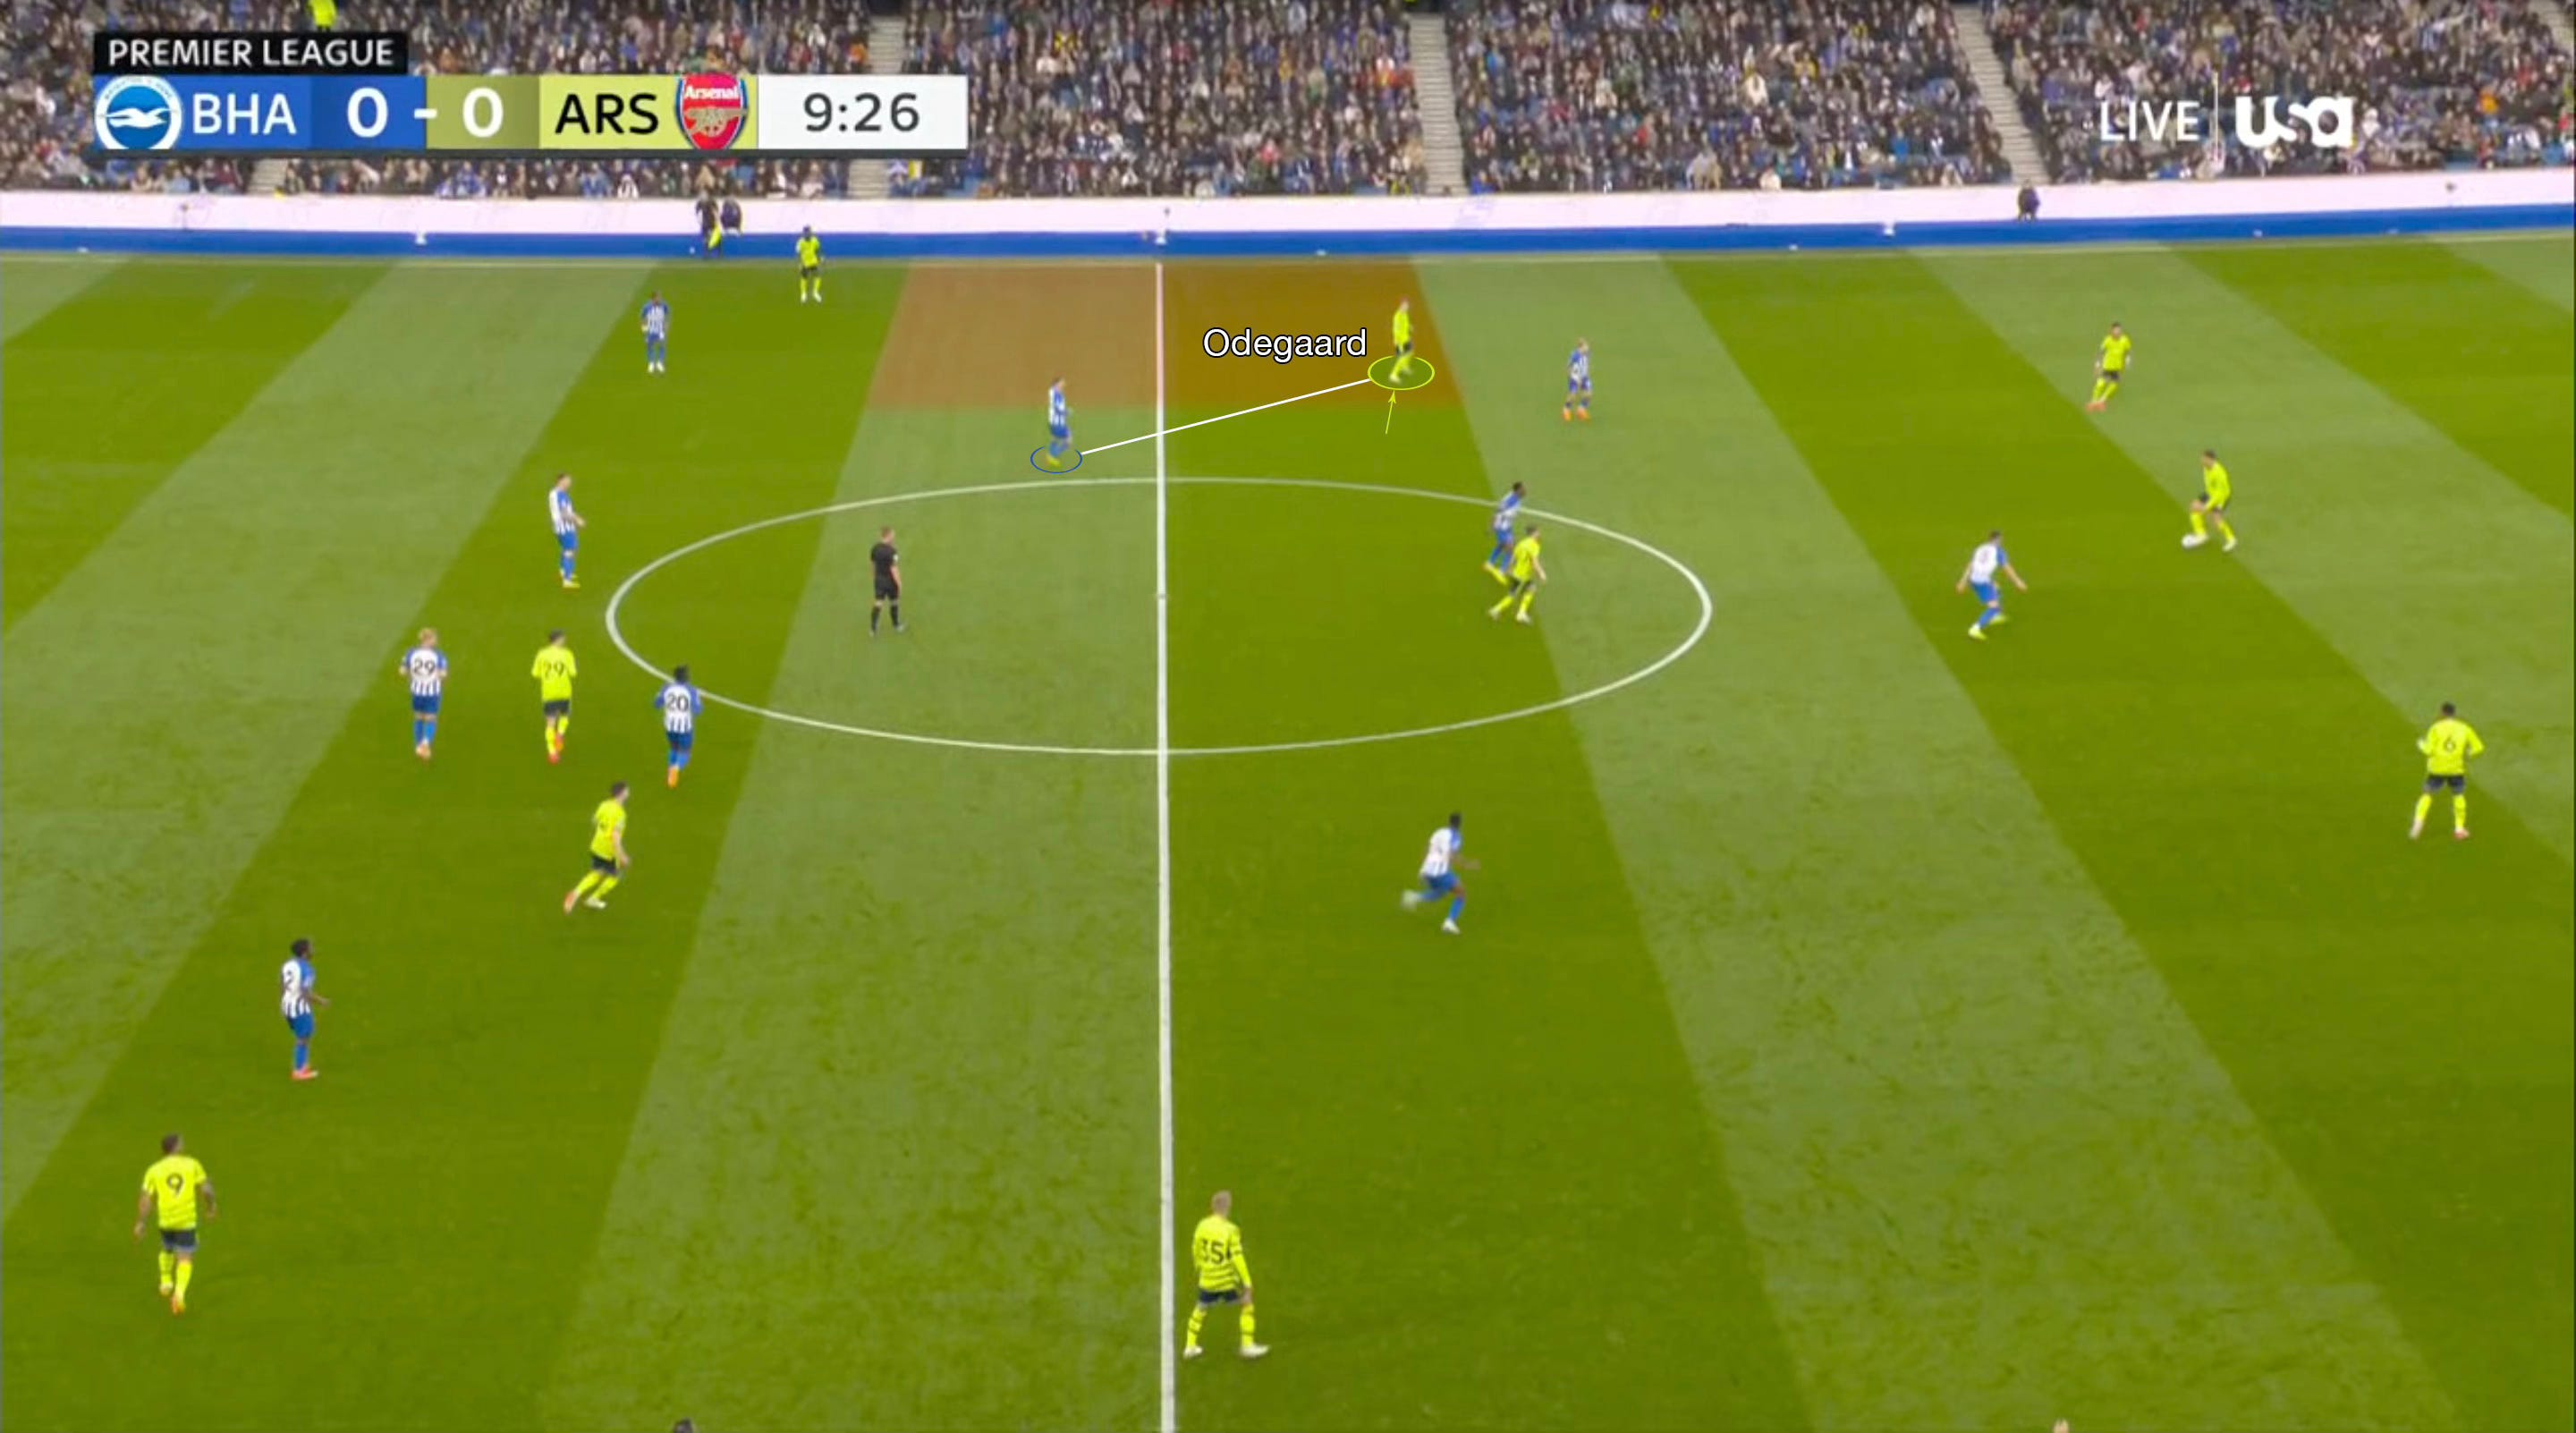
As play resets, Ødegaard, this time, looks for a different solution. The natural one is to create a numerical advantage in the 1st line.
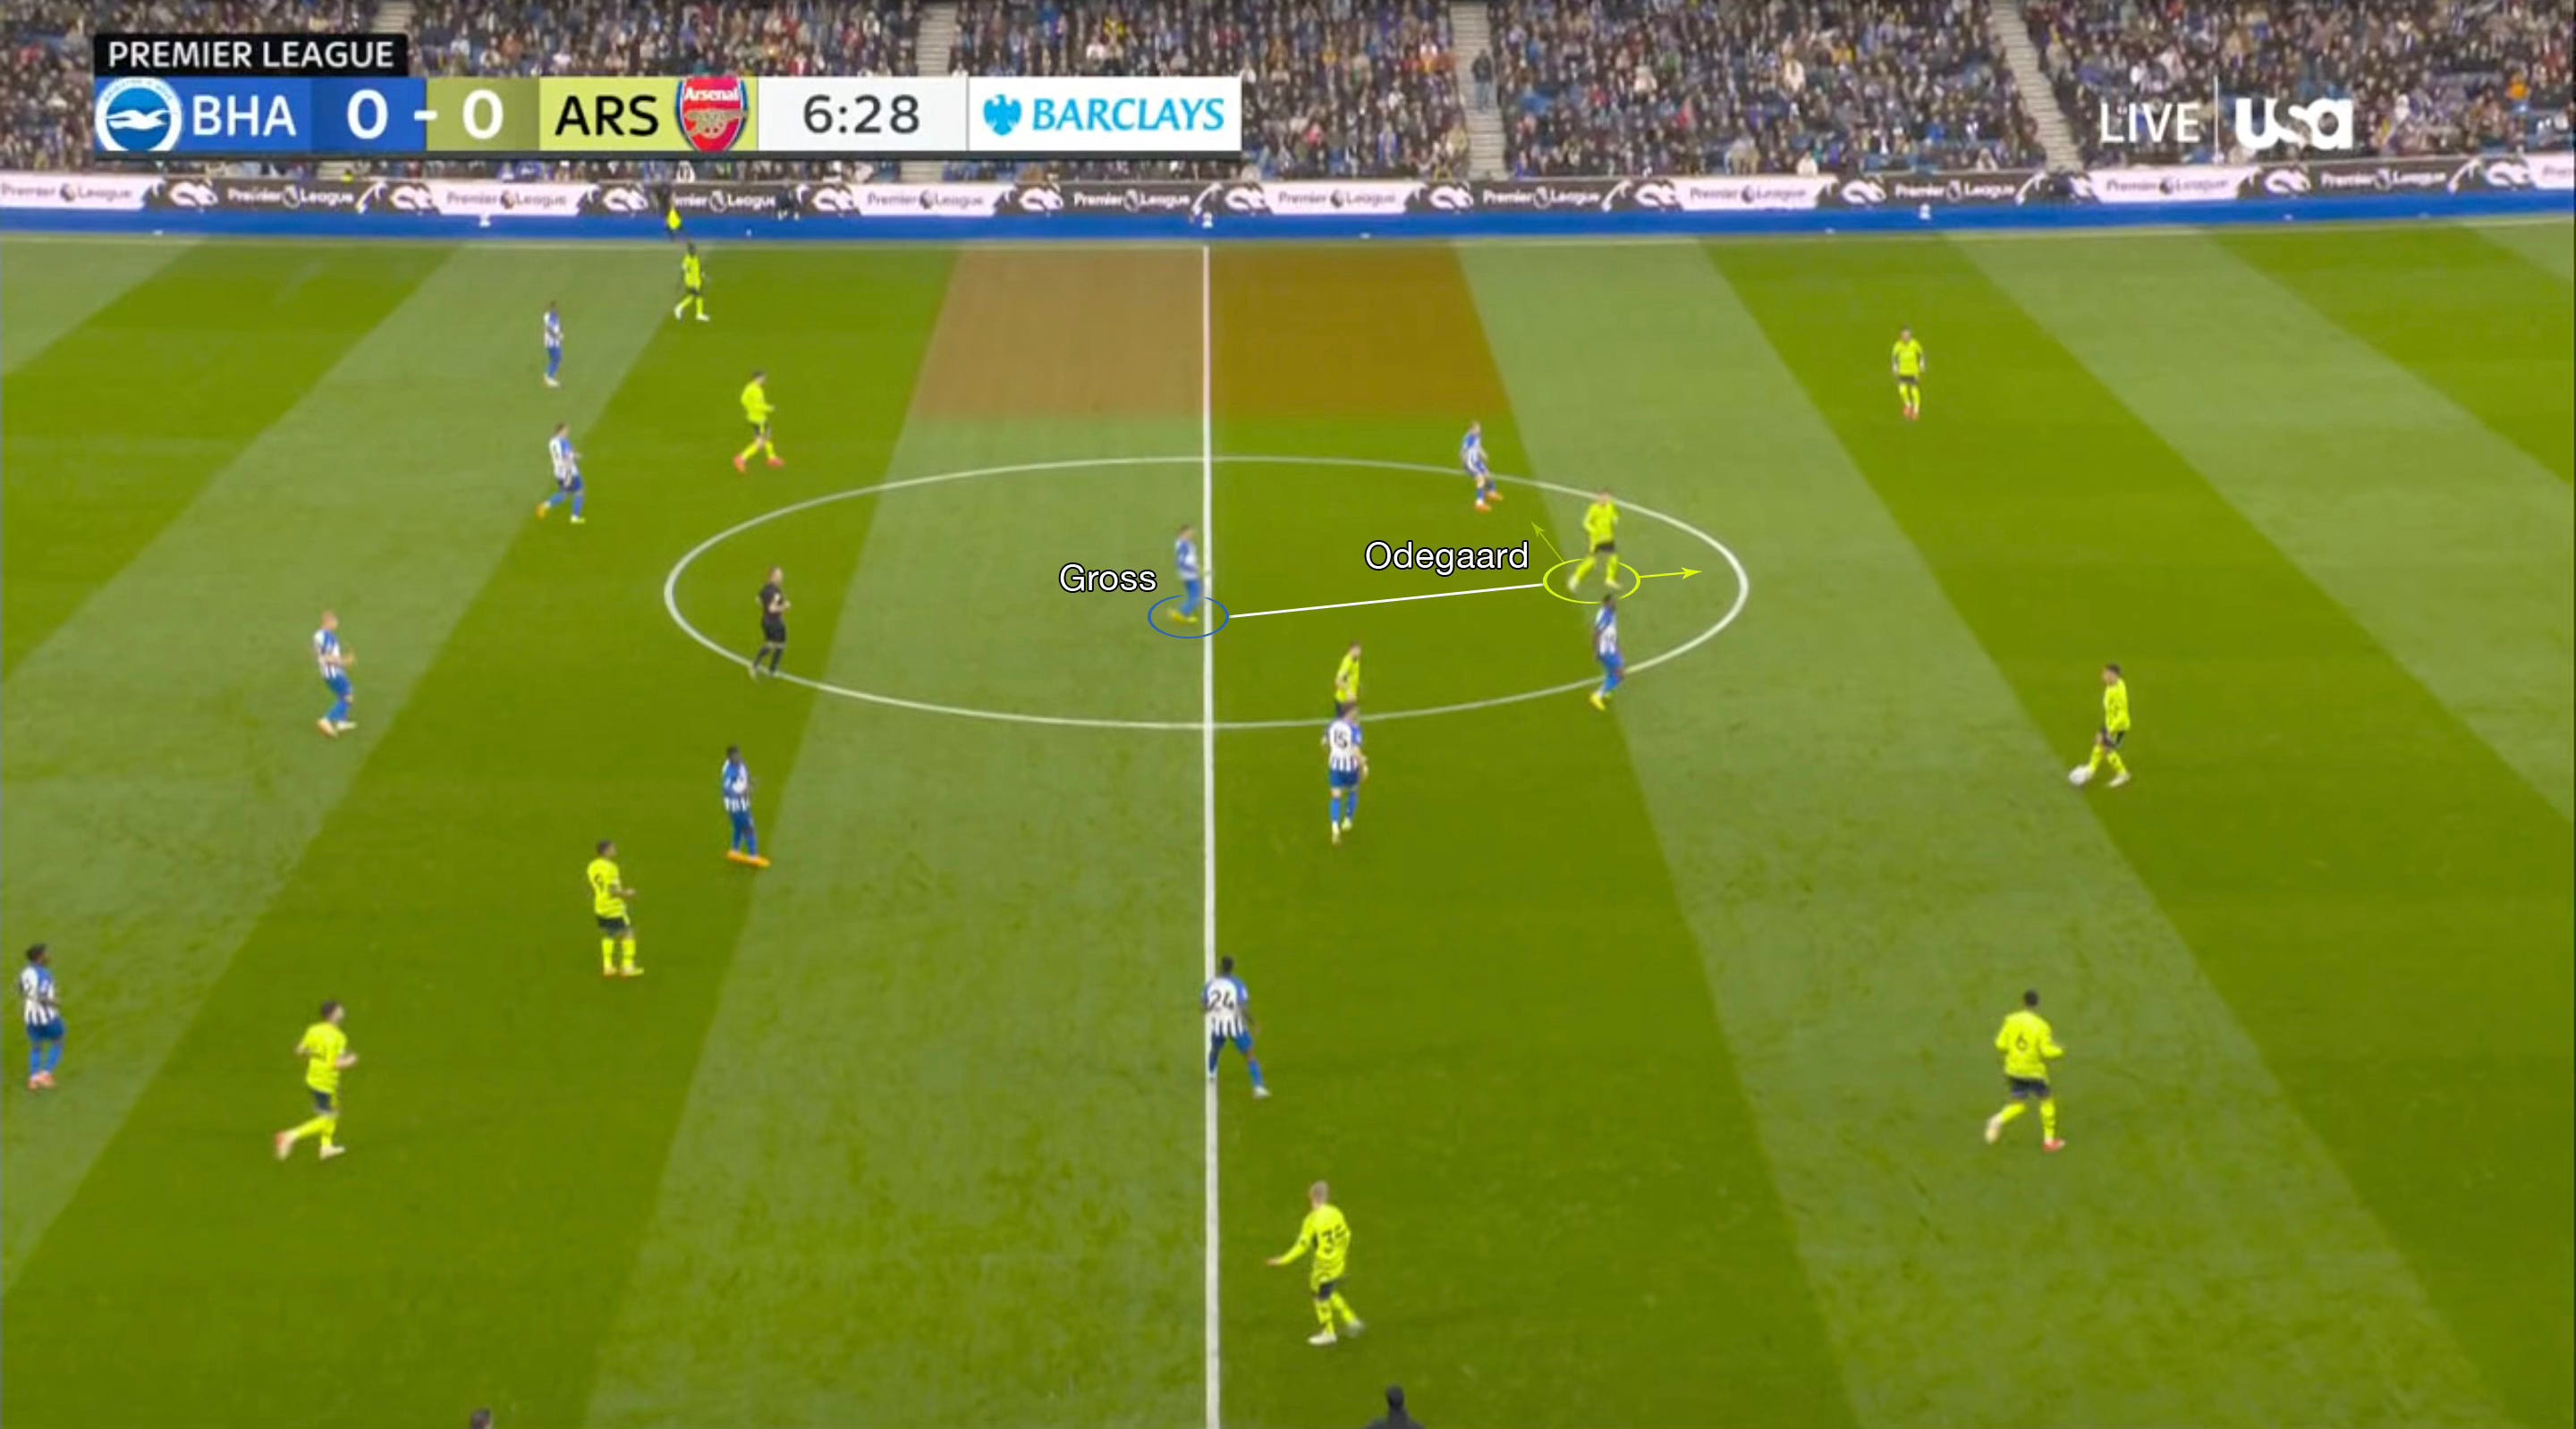
However, with the persistent man-to-man pressing, the Norwegian’s drop-in only serves to flatten the angles of buildup without creating an overload that can prevent Brighton from continuing to press Arsenal’s back-line.

As the right side is marked up, Ødegaard turns back left. The pressure once again halts the potential direct ball out to the wide targets and allows Brighton to enforce more horizontal passes within the flattened structure.
Now both sides know what’s happening here. Brighton are able to use these passes as triggers that allow their wingers to press up whilst effectively blocking the blind-sided option(s).
Arsenal expect that, hence why the pass, here, is to Gabriel so he can lay it off to the then-goal-facing Saliba. By doing so, Adingra won’t have had time to cover the space and Saliba is able to create distance between him and his man (Welbeck) whilst looking to receive goal-facing for a potential first-time forwards pass.
However, this doesn’t eliminate the pressure element. Beyond how tricky it is to access the lone accessible player, Welbeck is well ahead of the move’s direction, so the weight of pass has to be perfect to avoid interception… which it wasn’t.
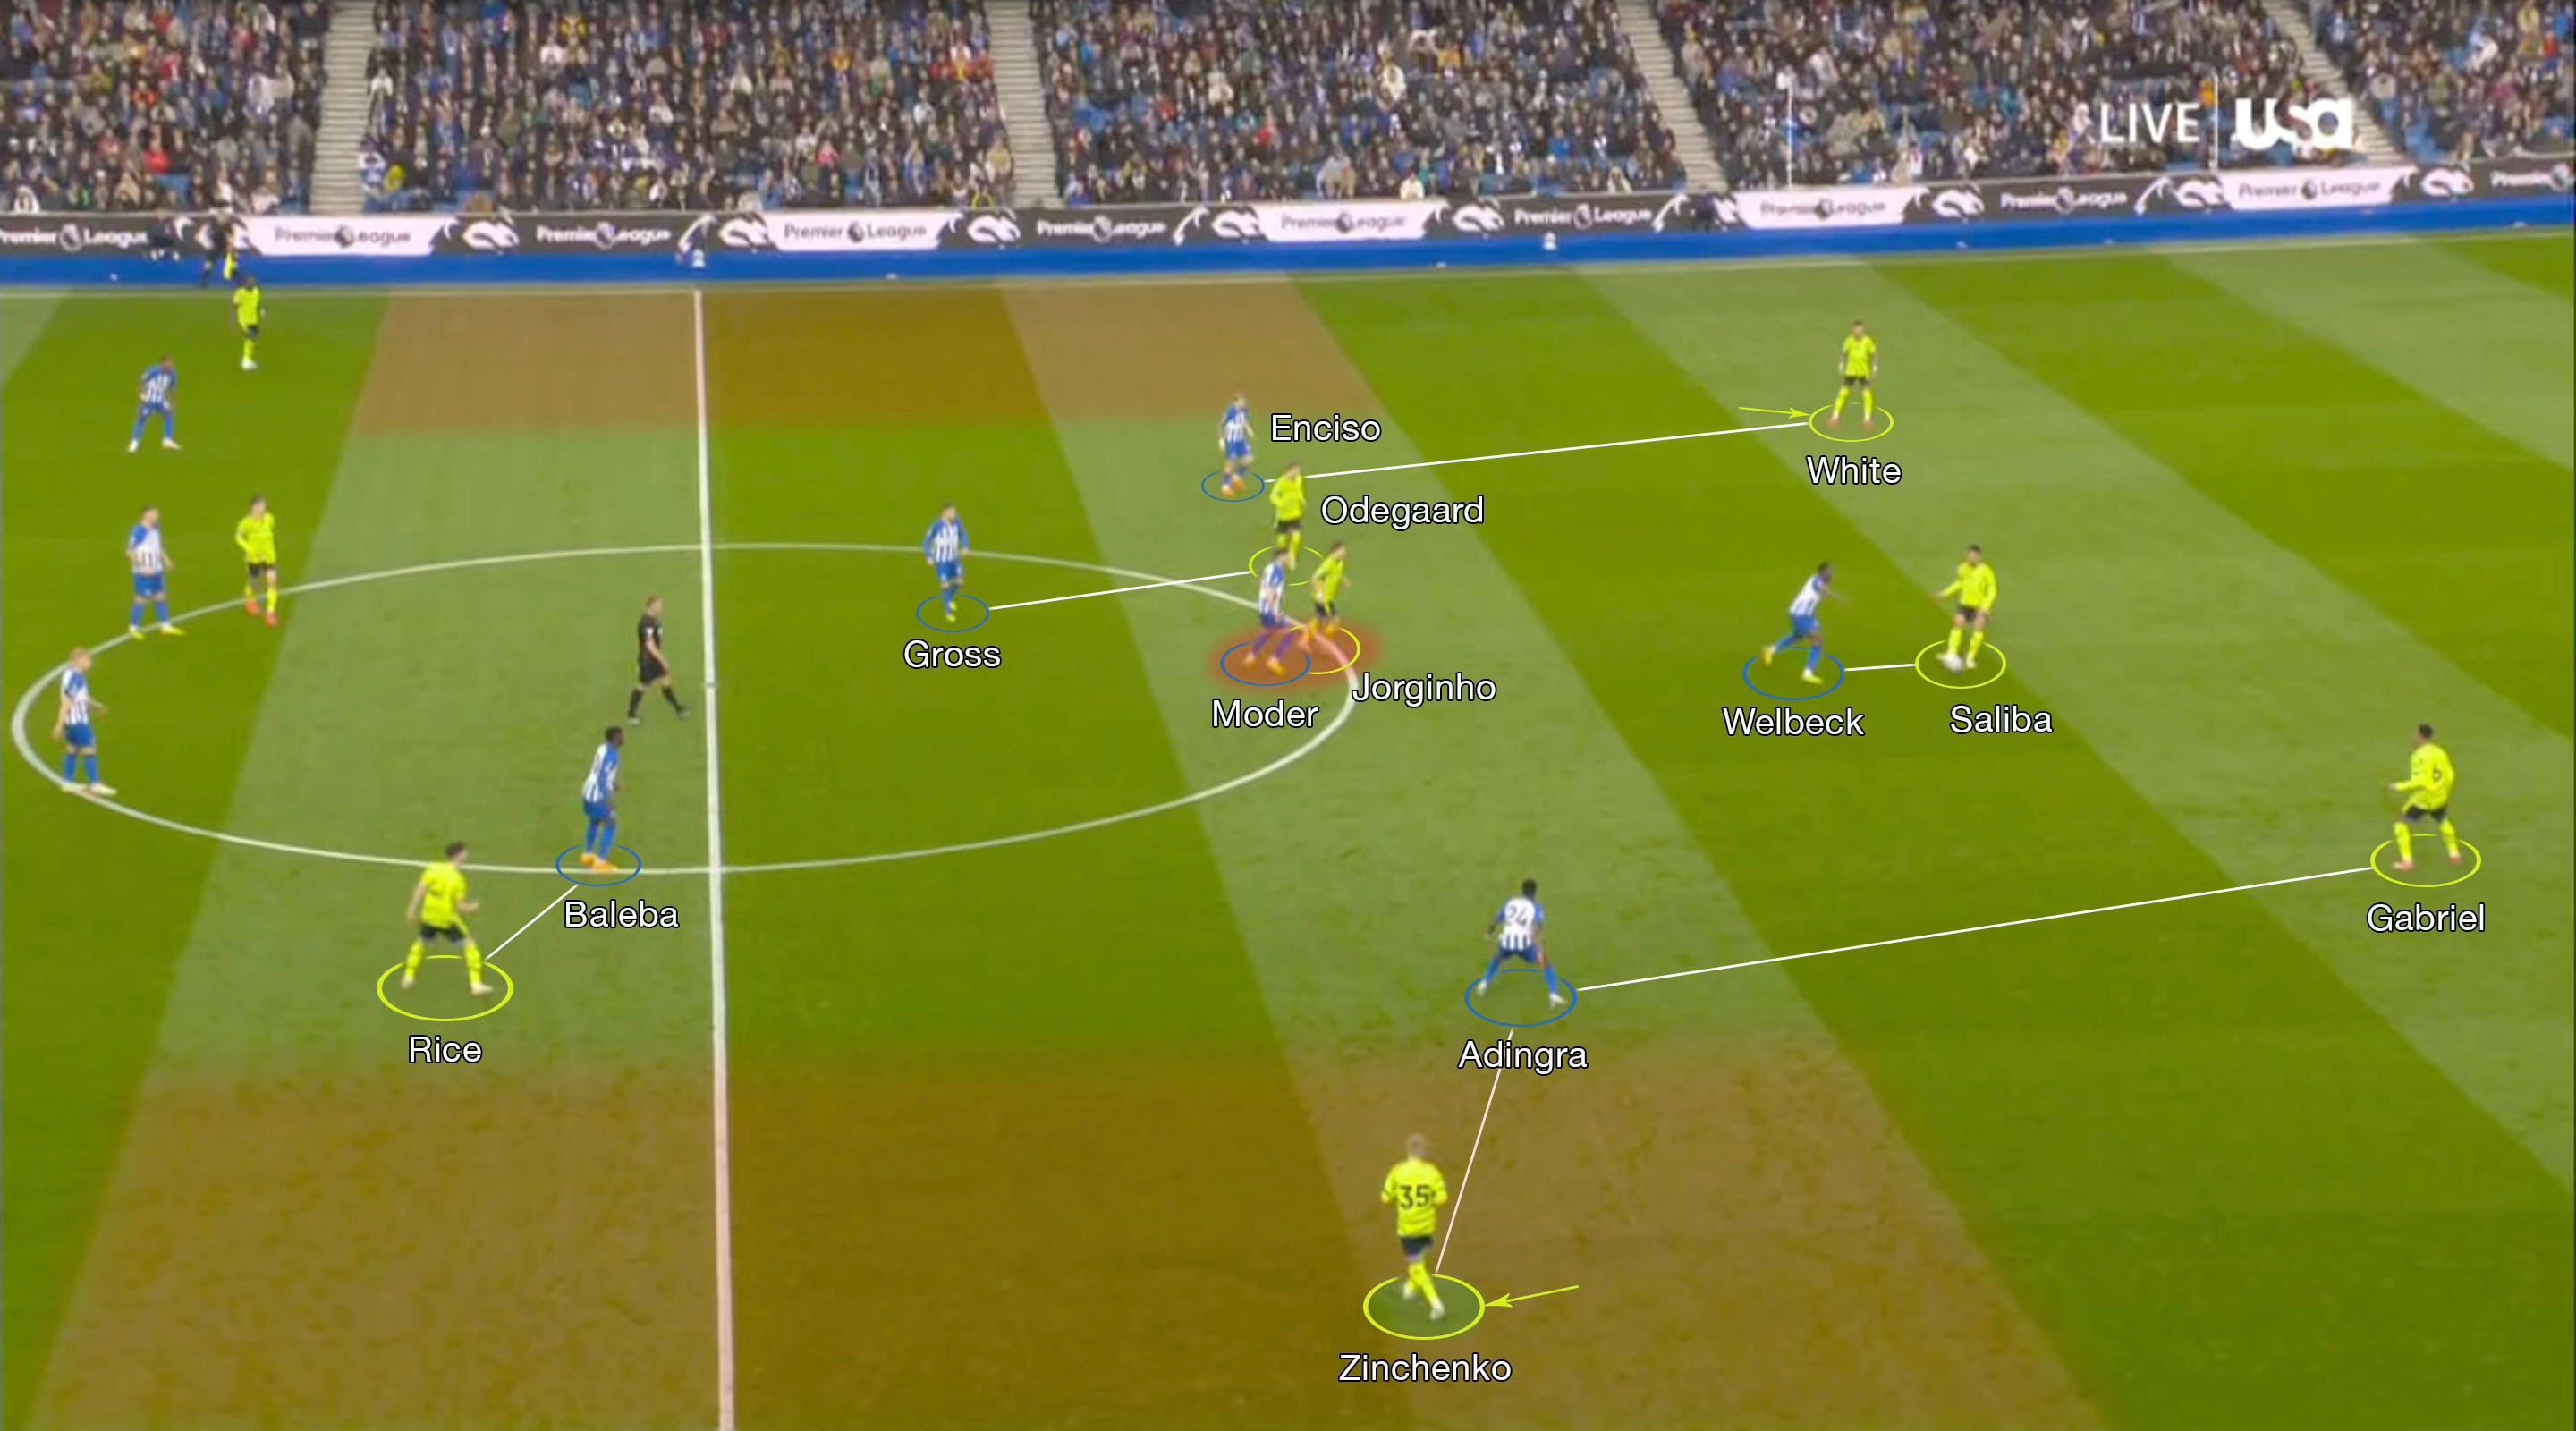
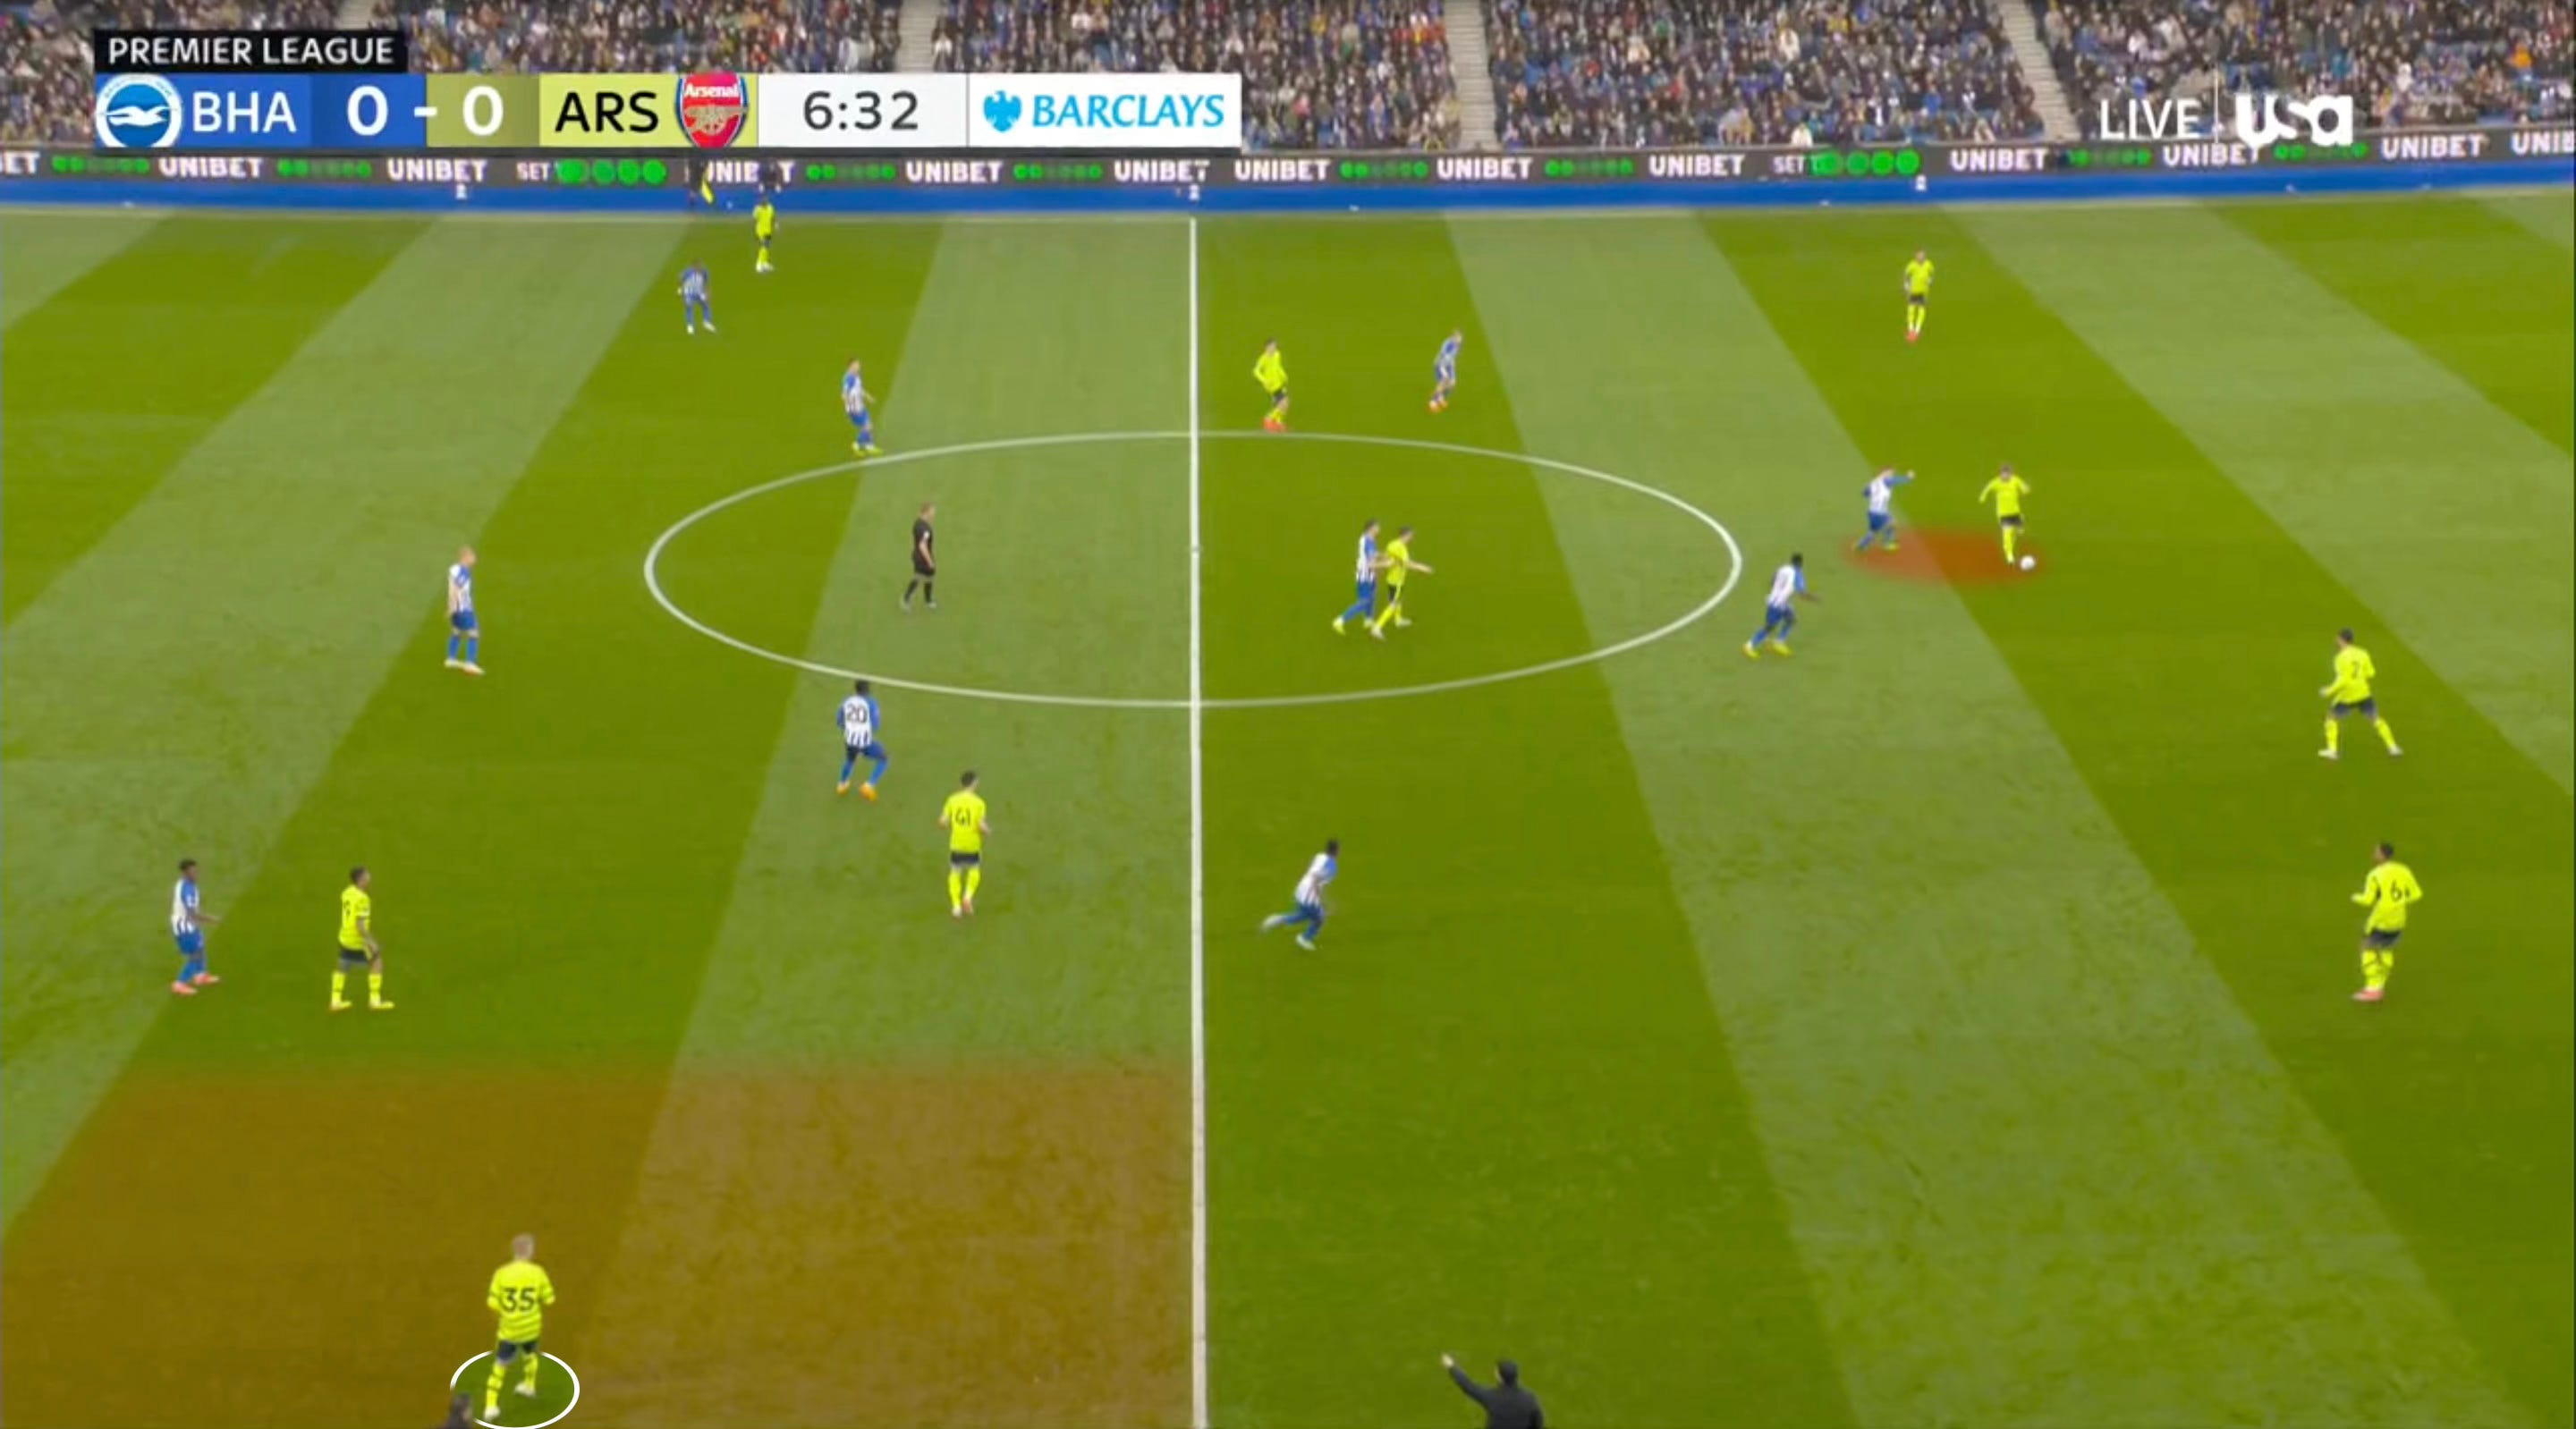
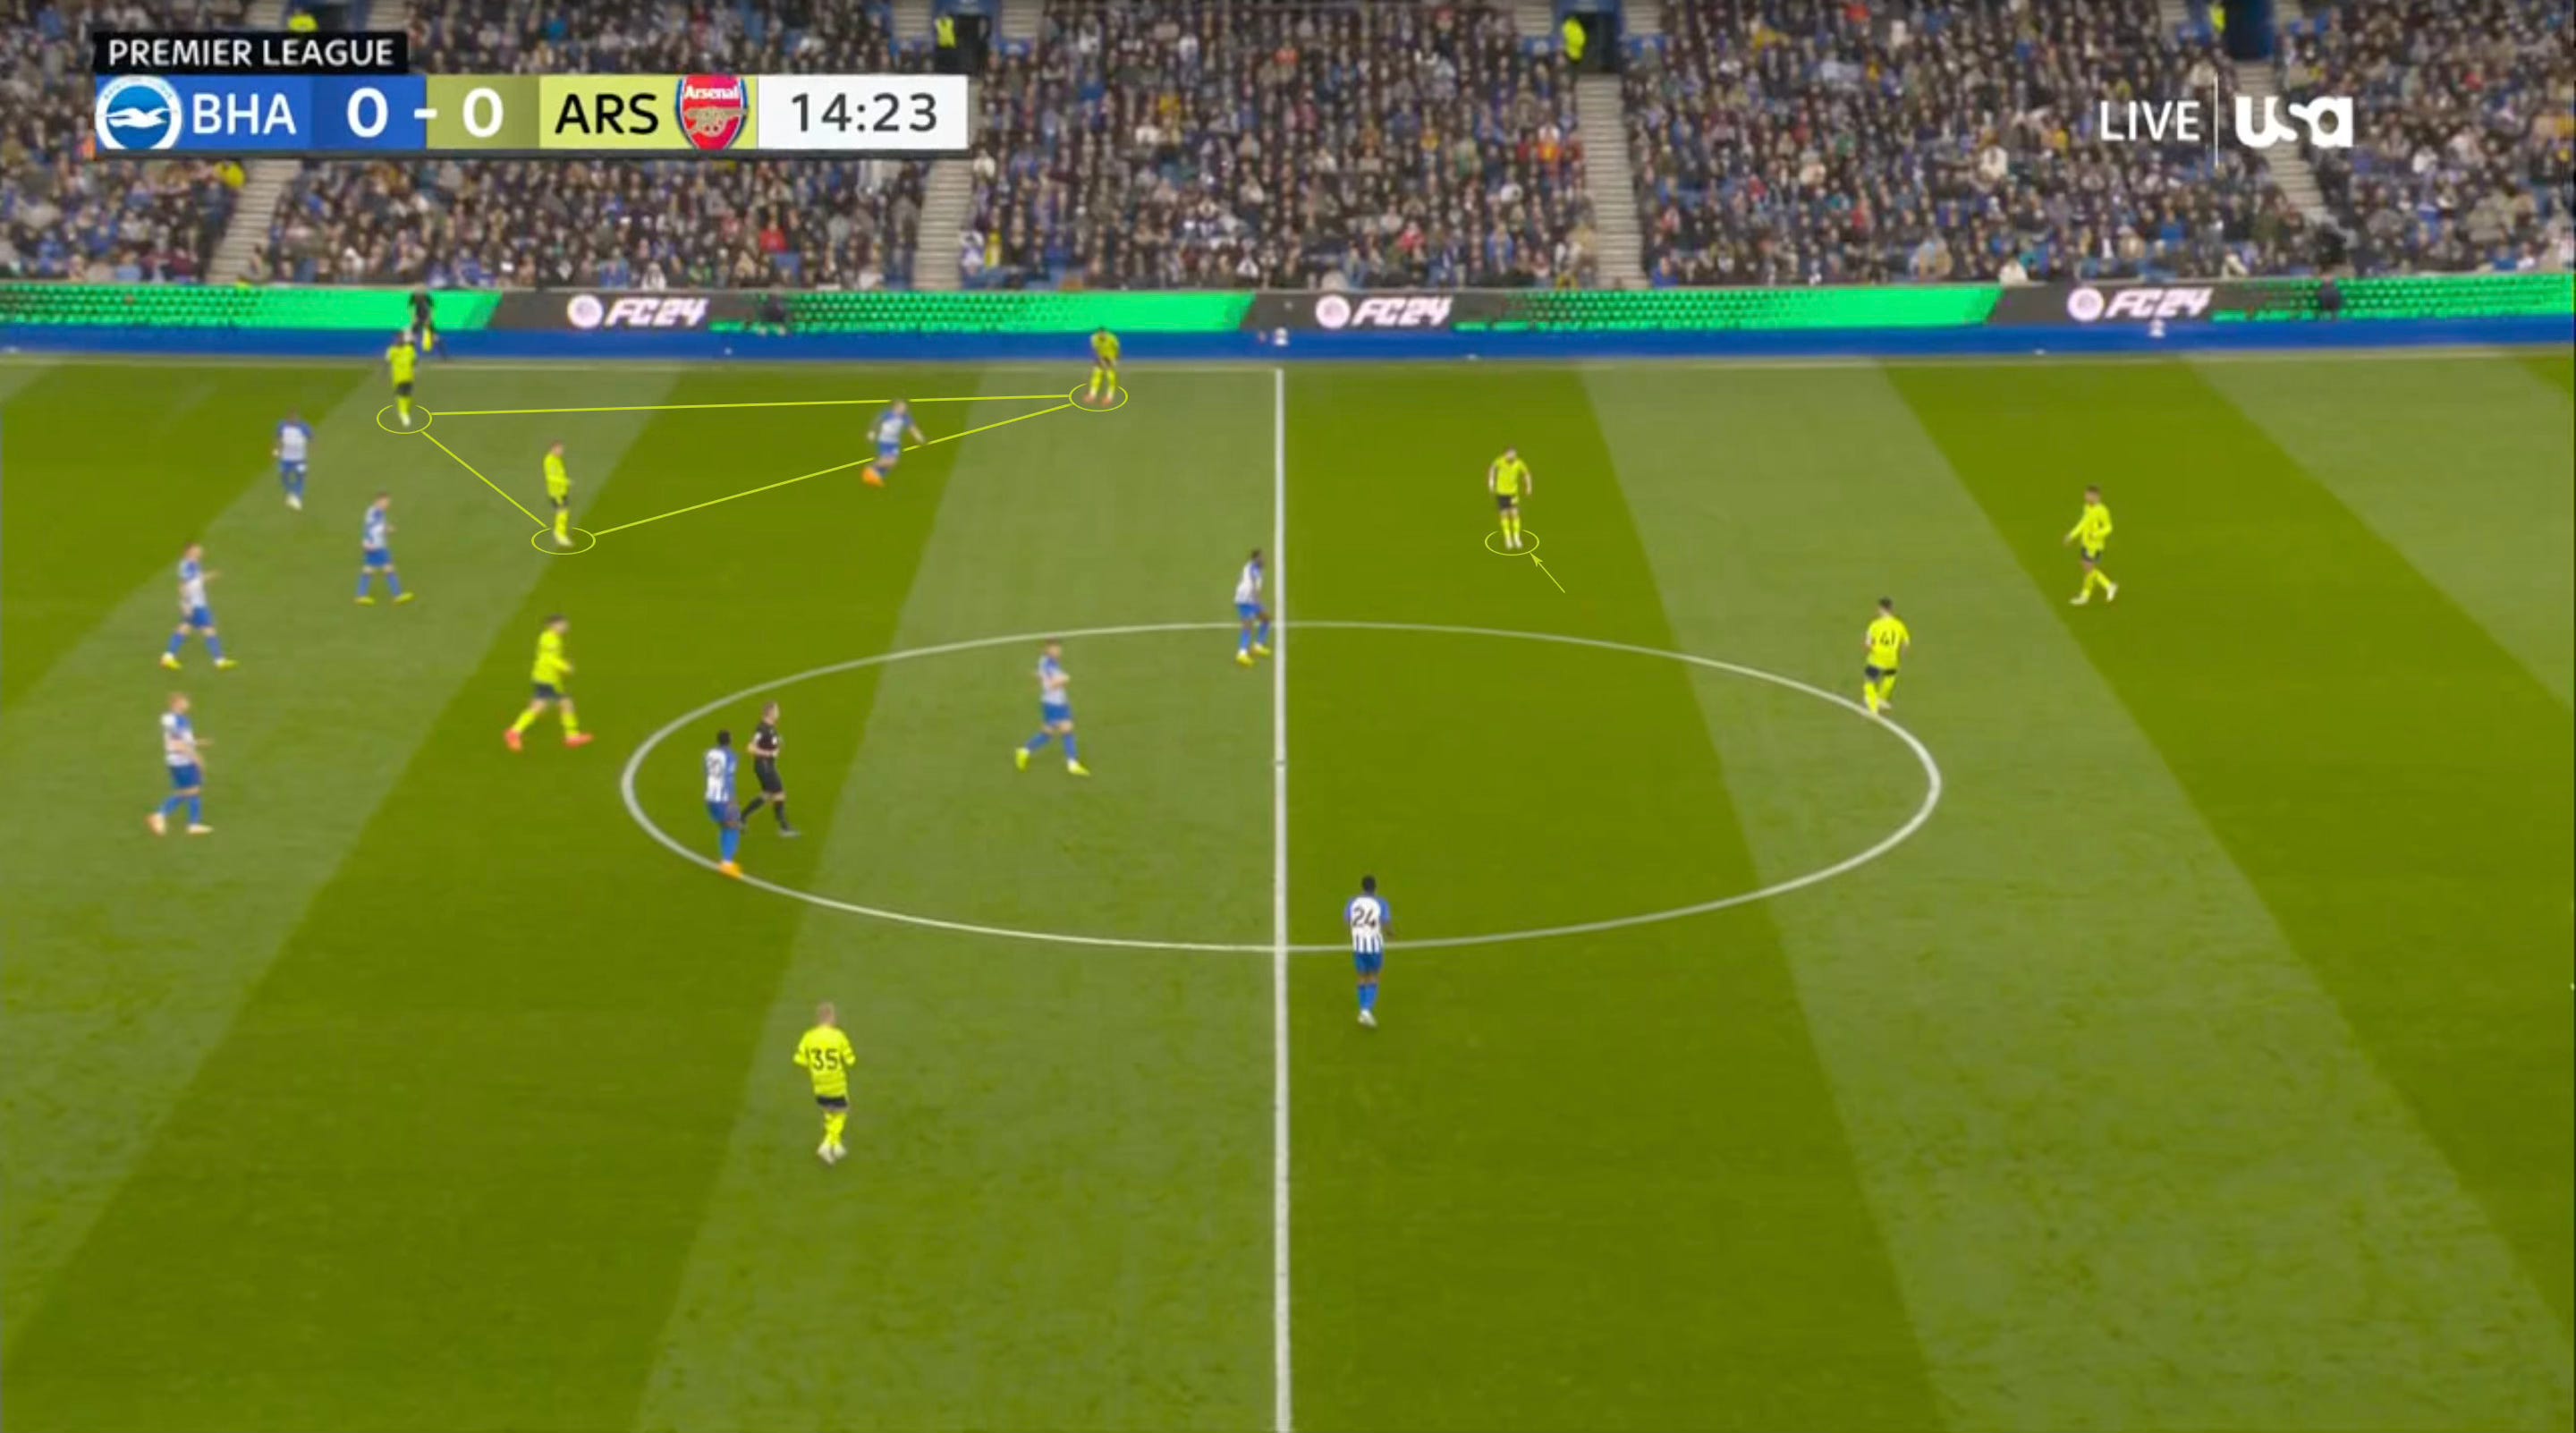
2nd example
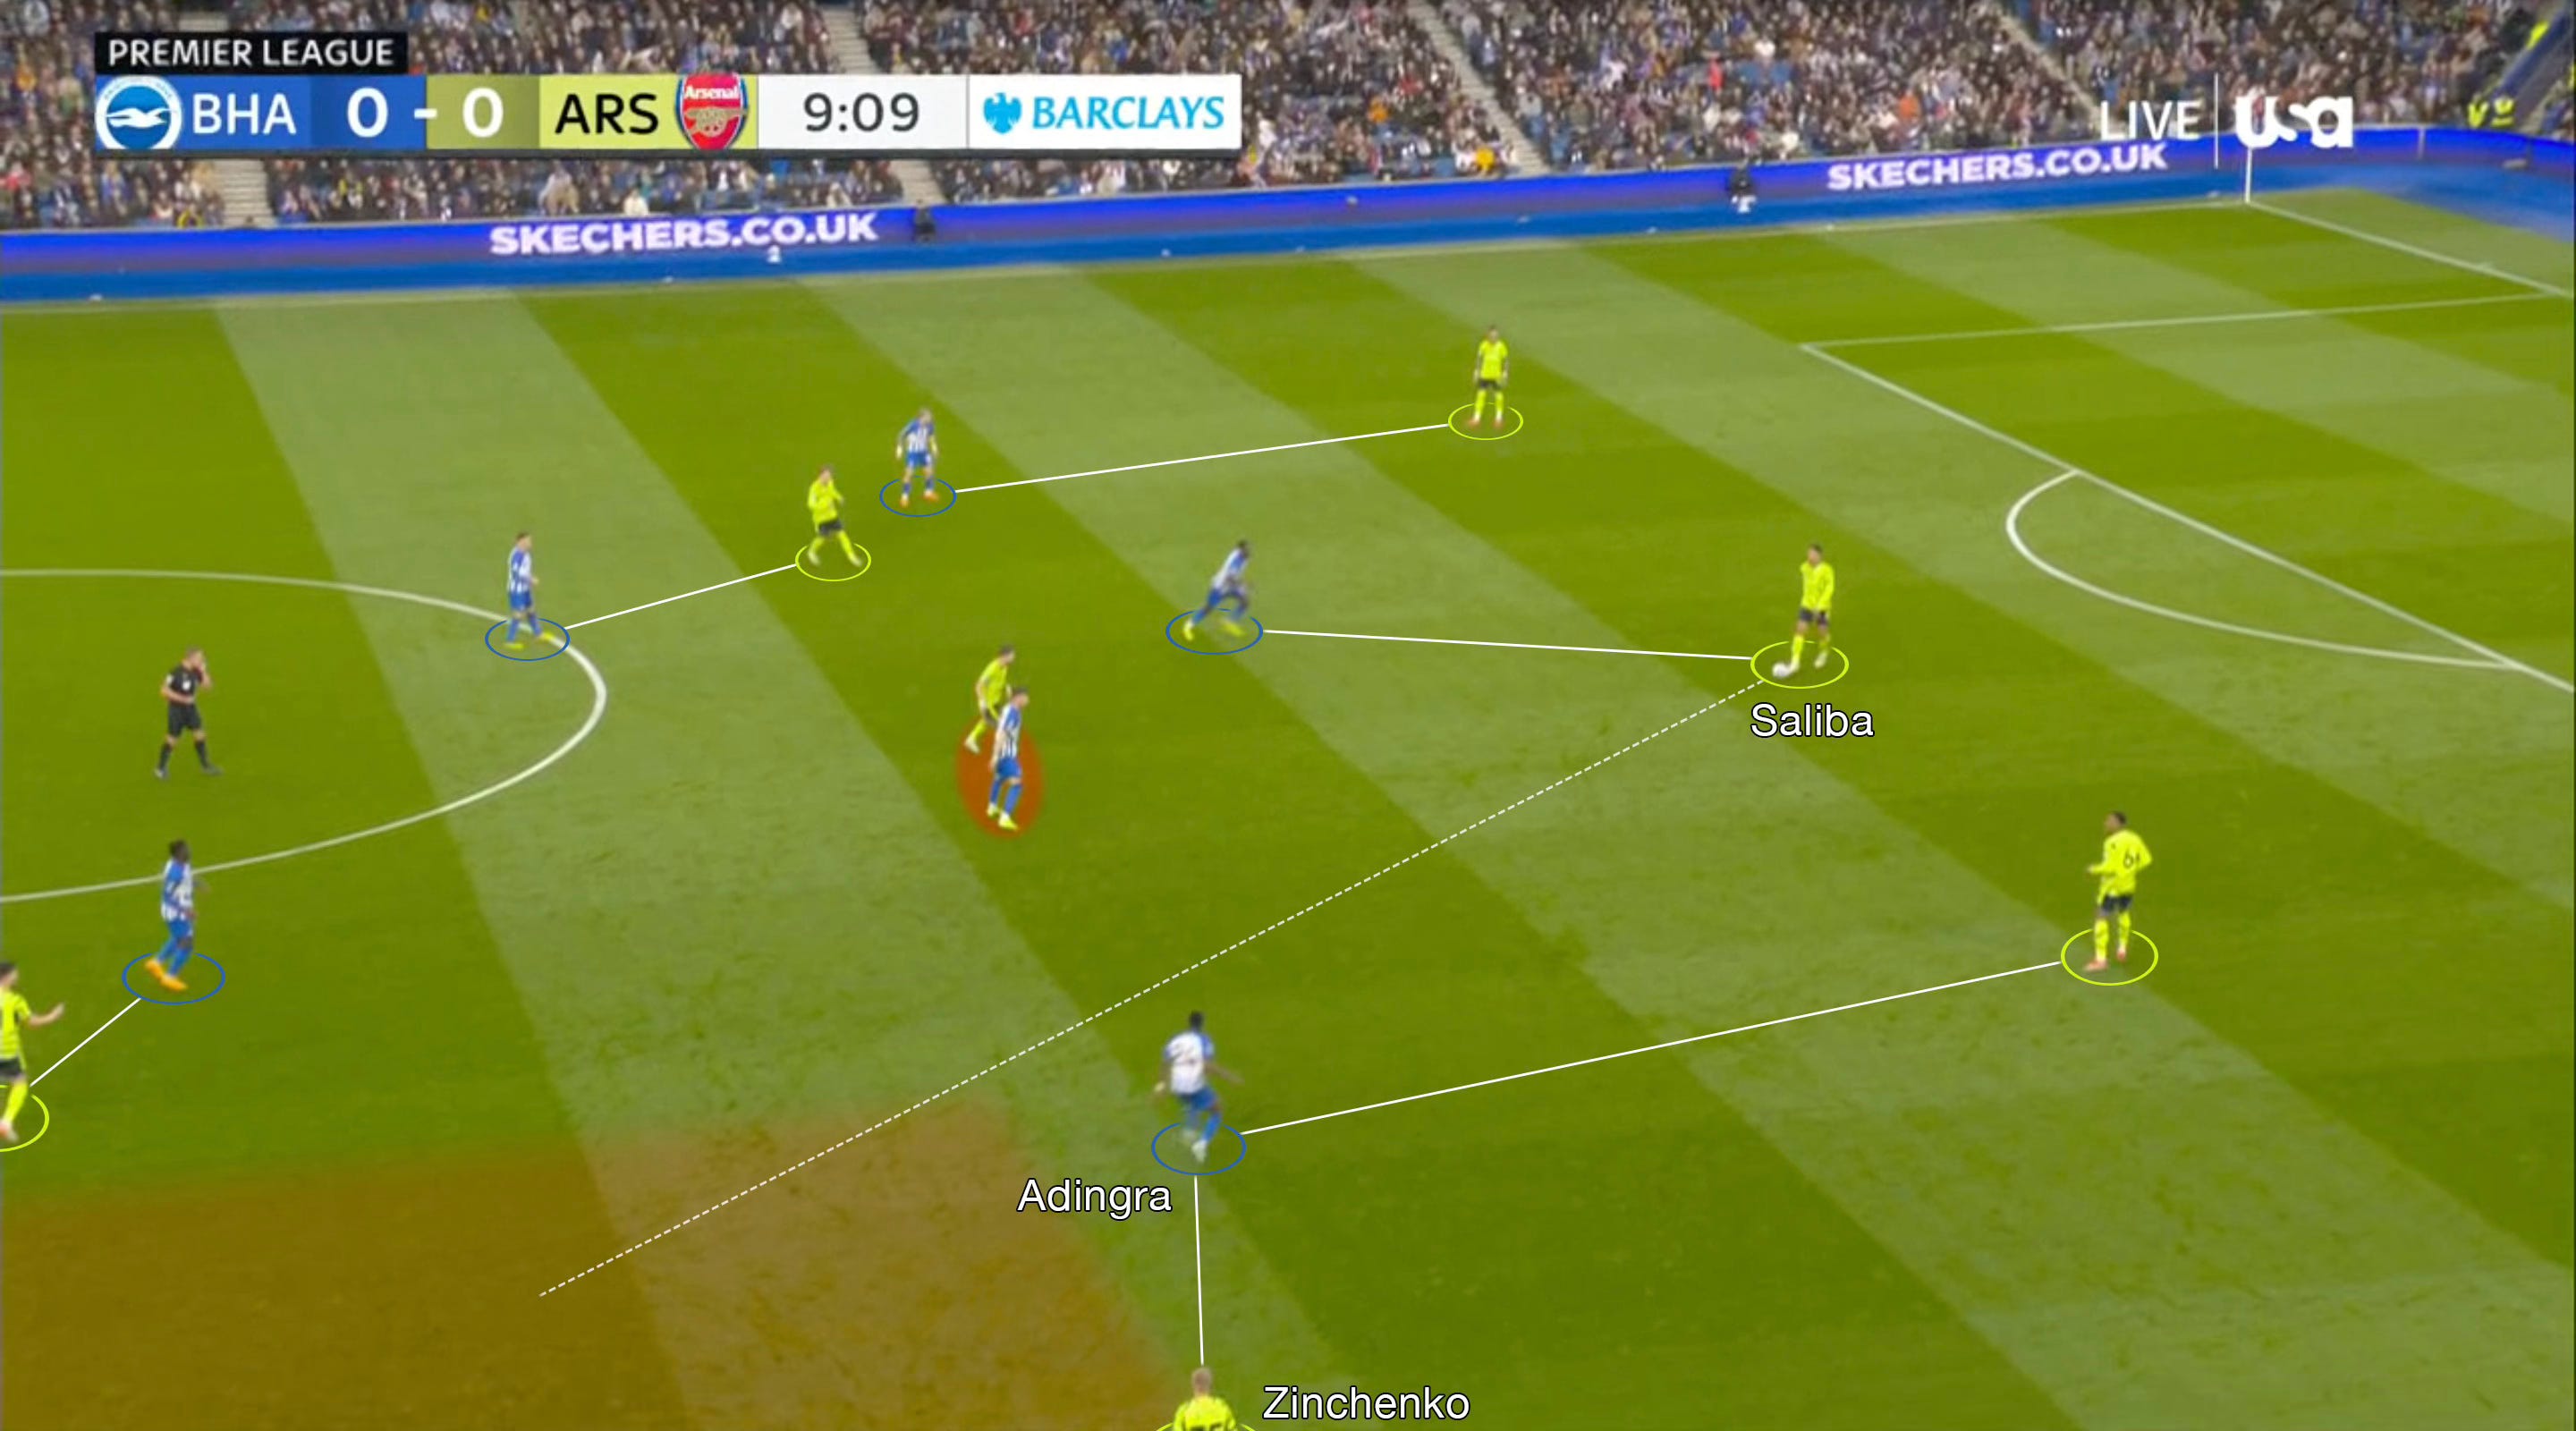
Once again, the focus is on the spare man being down the left side. So, Ødegaard is still tucking in, which congests the middle the way Brighton want and makes Enciso’s decision to act on the trigger (Jesus’ distant pass across) very straightforward here.
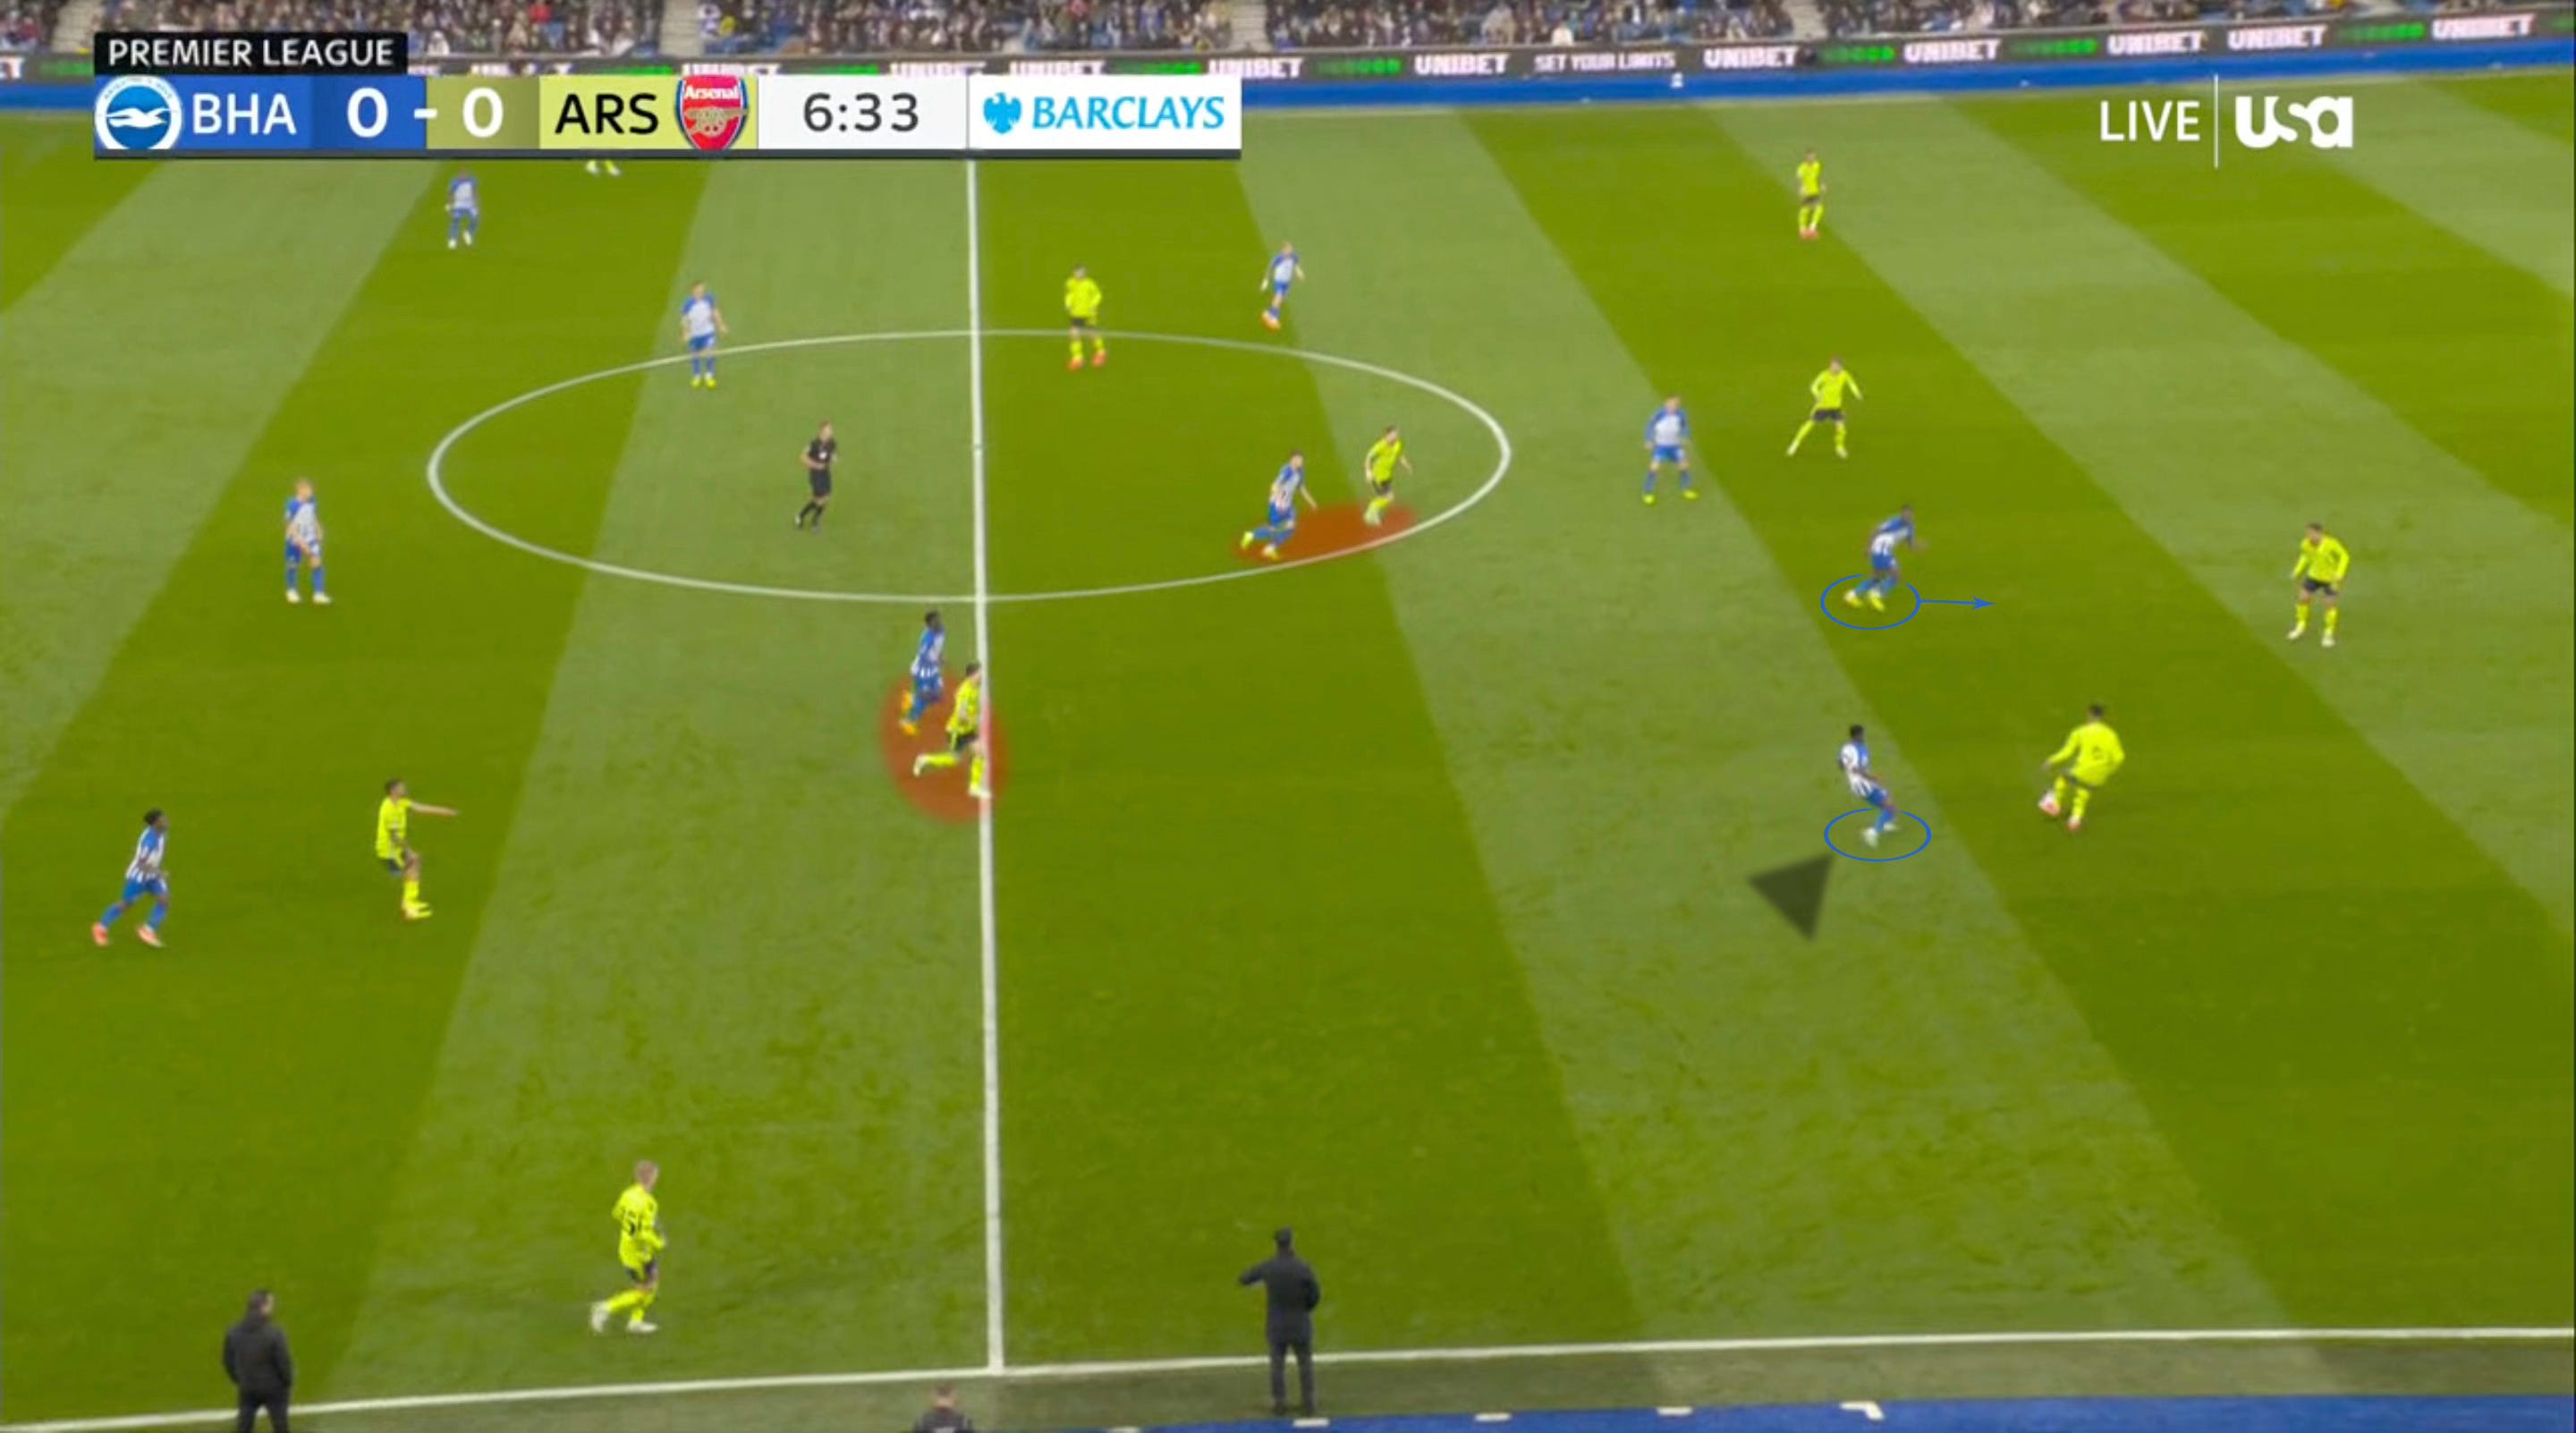
This time Jorginho drops in to try and create an overload instead, but with White still tucked fairly close in, this just leaves Moder to join the 1st line of the press, so Brighton can still go man-to-man.
What can also be seen is Enciso reading the short pass into Jorginho, and therefore moving out early and effectively curving his run from the left to easily funnel play back towards the [technically] weaker left side.
This time, Rice and Jesus’ movements work together to pin the space into the free man. It also highlights the point that Brighton’s tracking #6’s (Baleba, in this case) have limits – they won’t follow their men wide in sacrifice of central compactness.
In spite of the better access, it’s also tighter access coming off the back of a compromised attacking shape. Not only is it a difficult pass to thread and receive perfectly, which Zinchenko does an ok job with, but half of the outfield players are in the back-line, with the rest well accounted for. So, Zinchenko can only play into isolated teammates who are ready to be pressured without any follow-on options nearby.
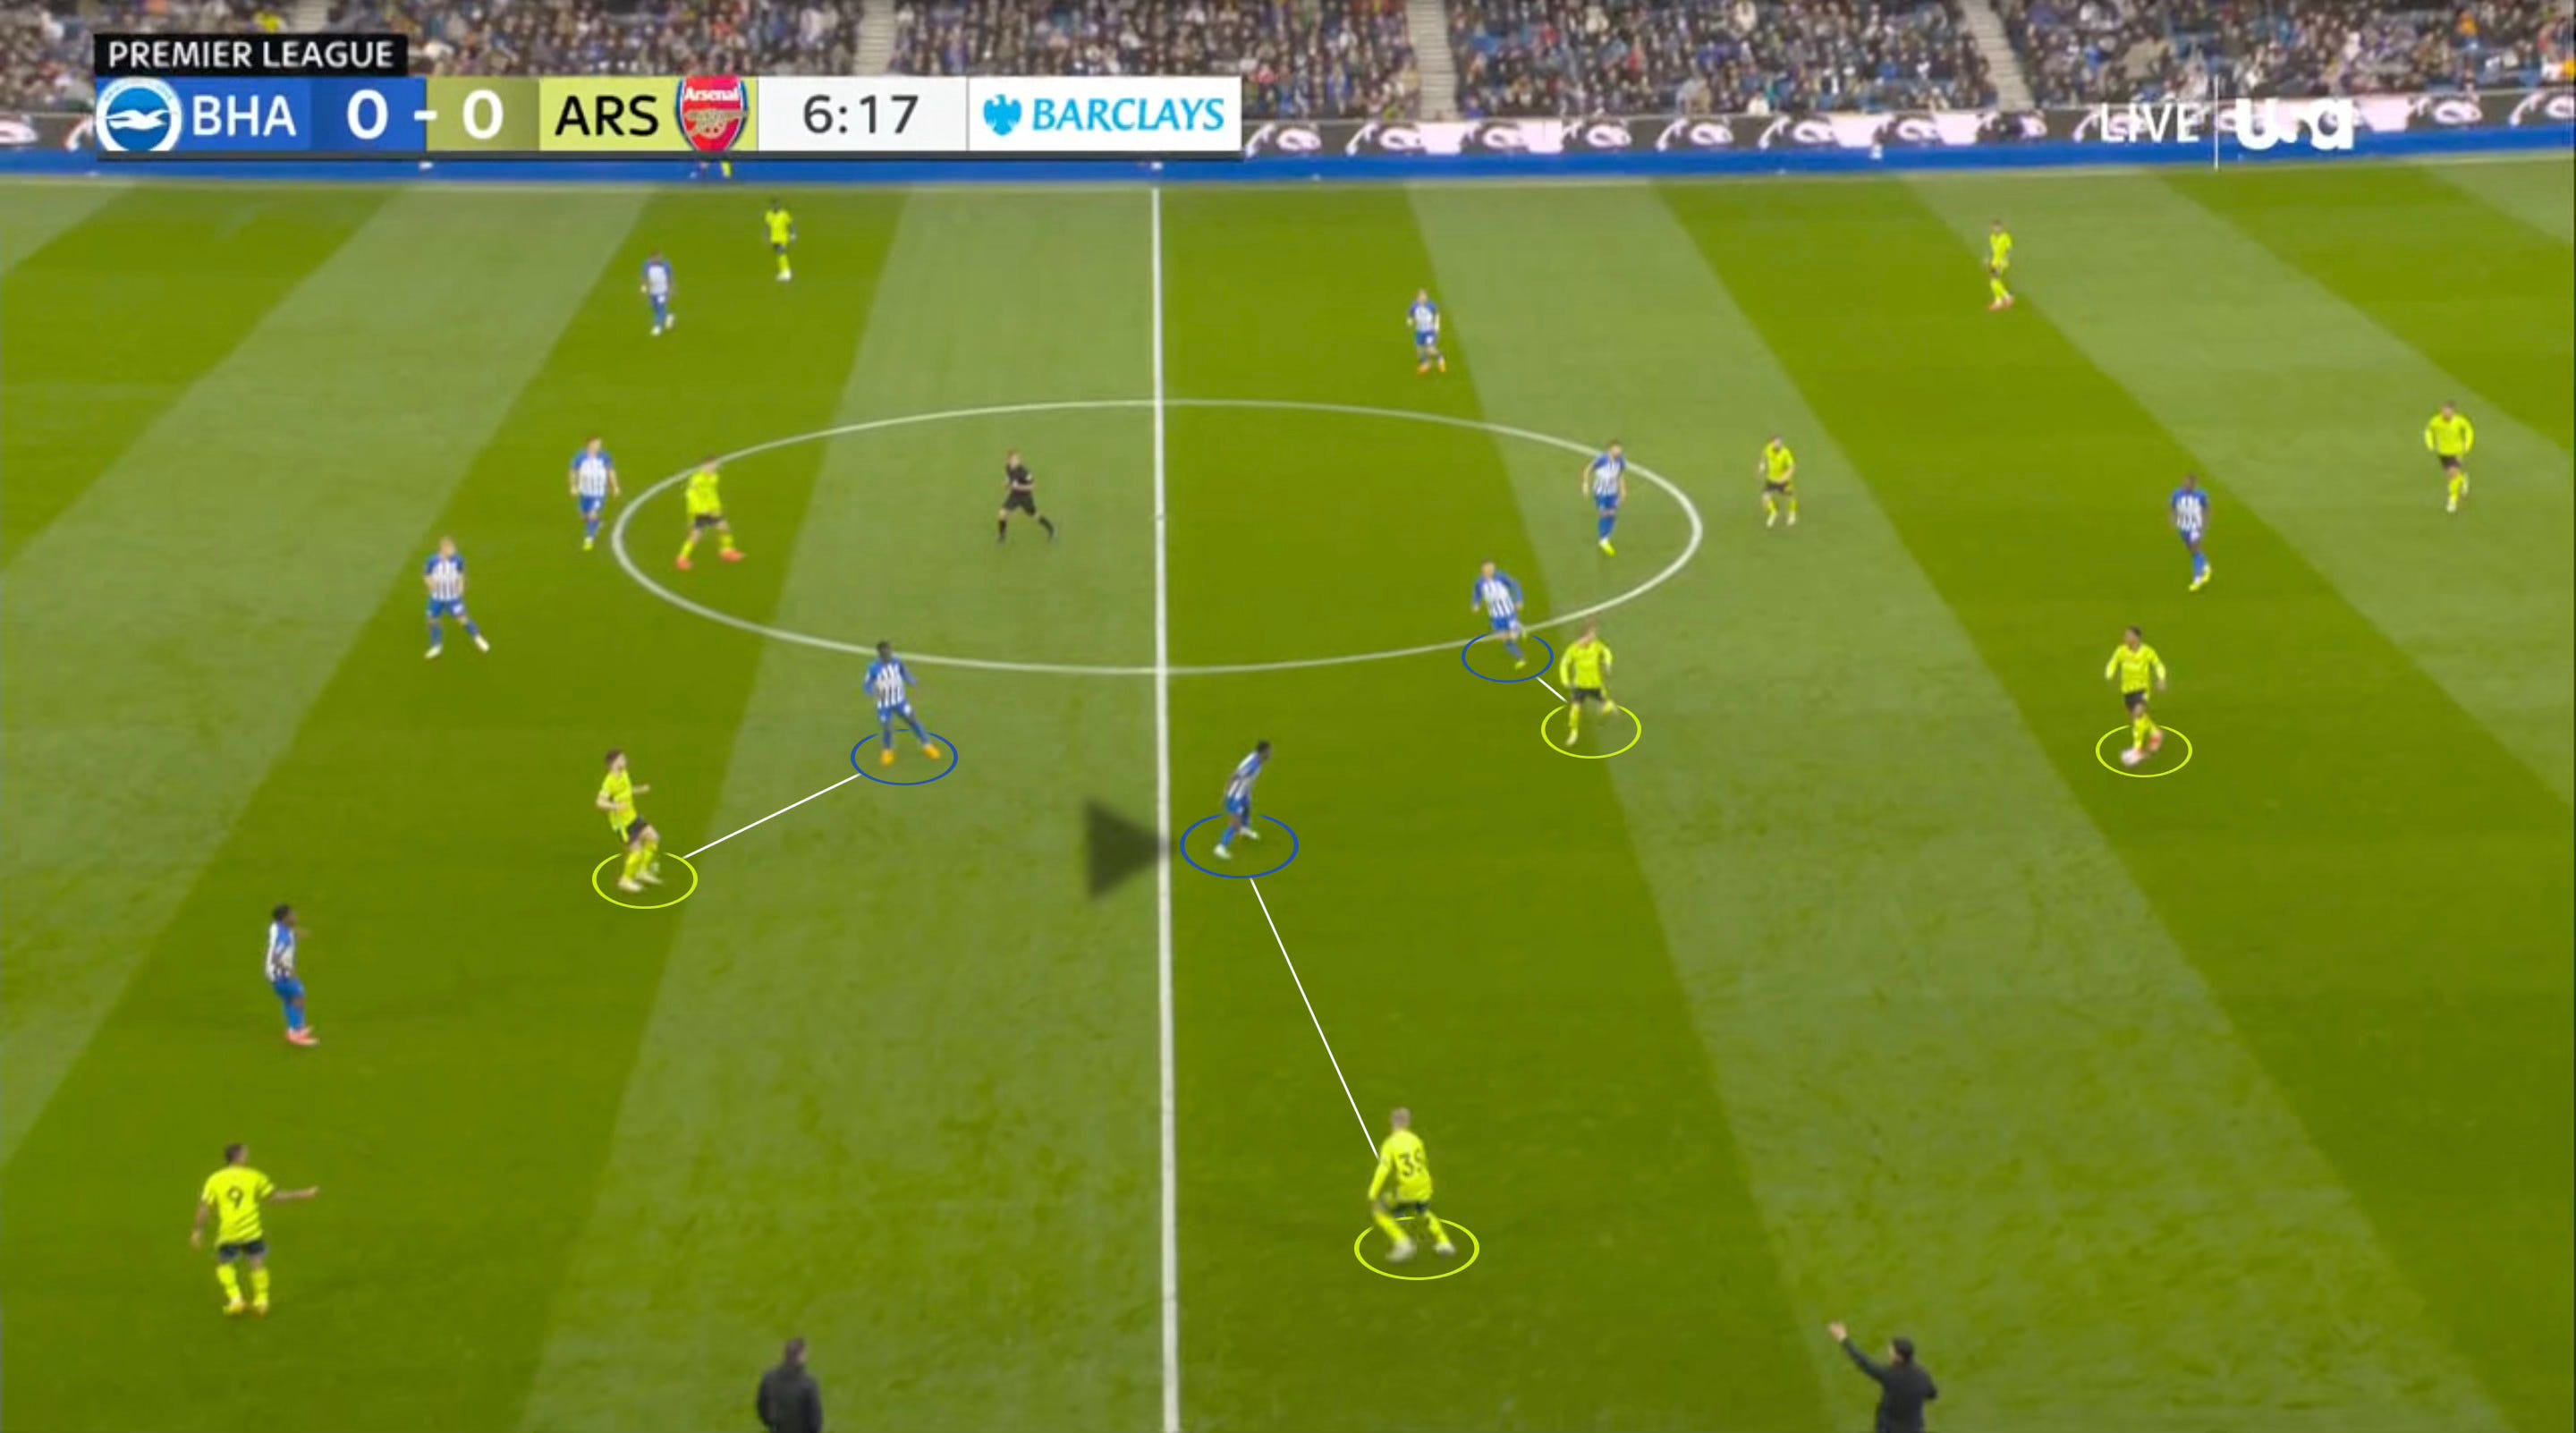
Testing the waters down the right side
1st example
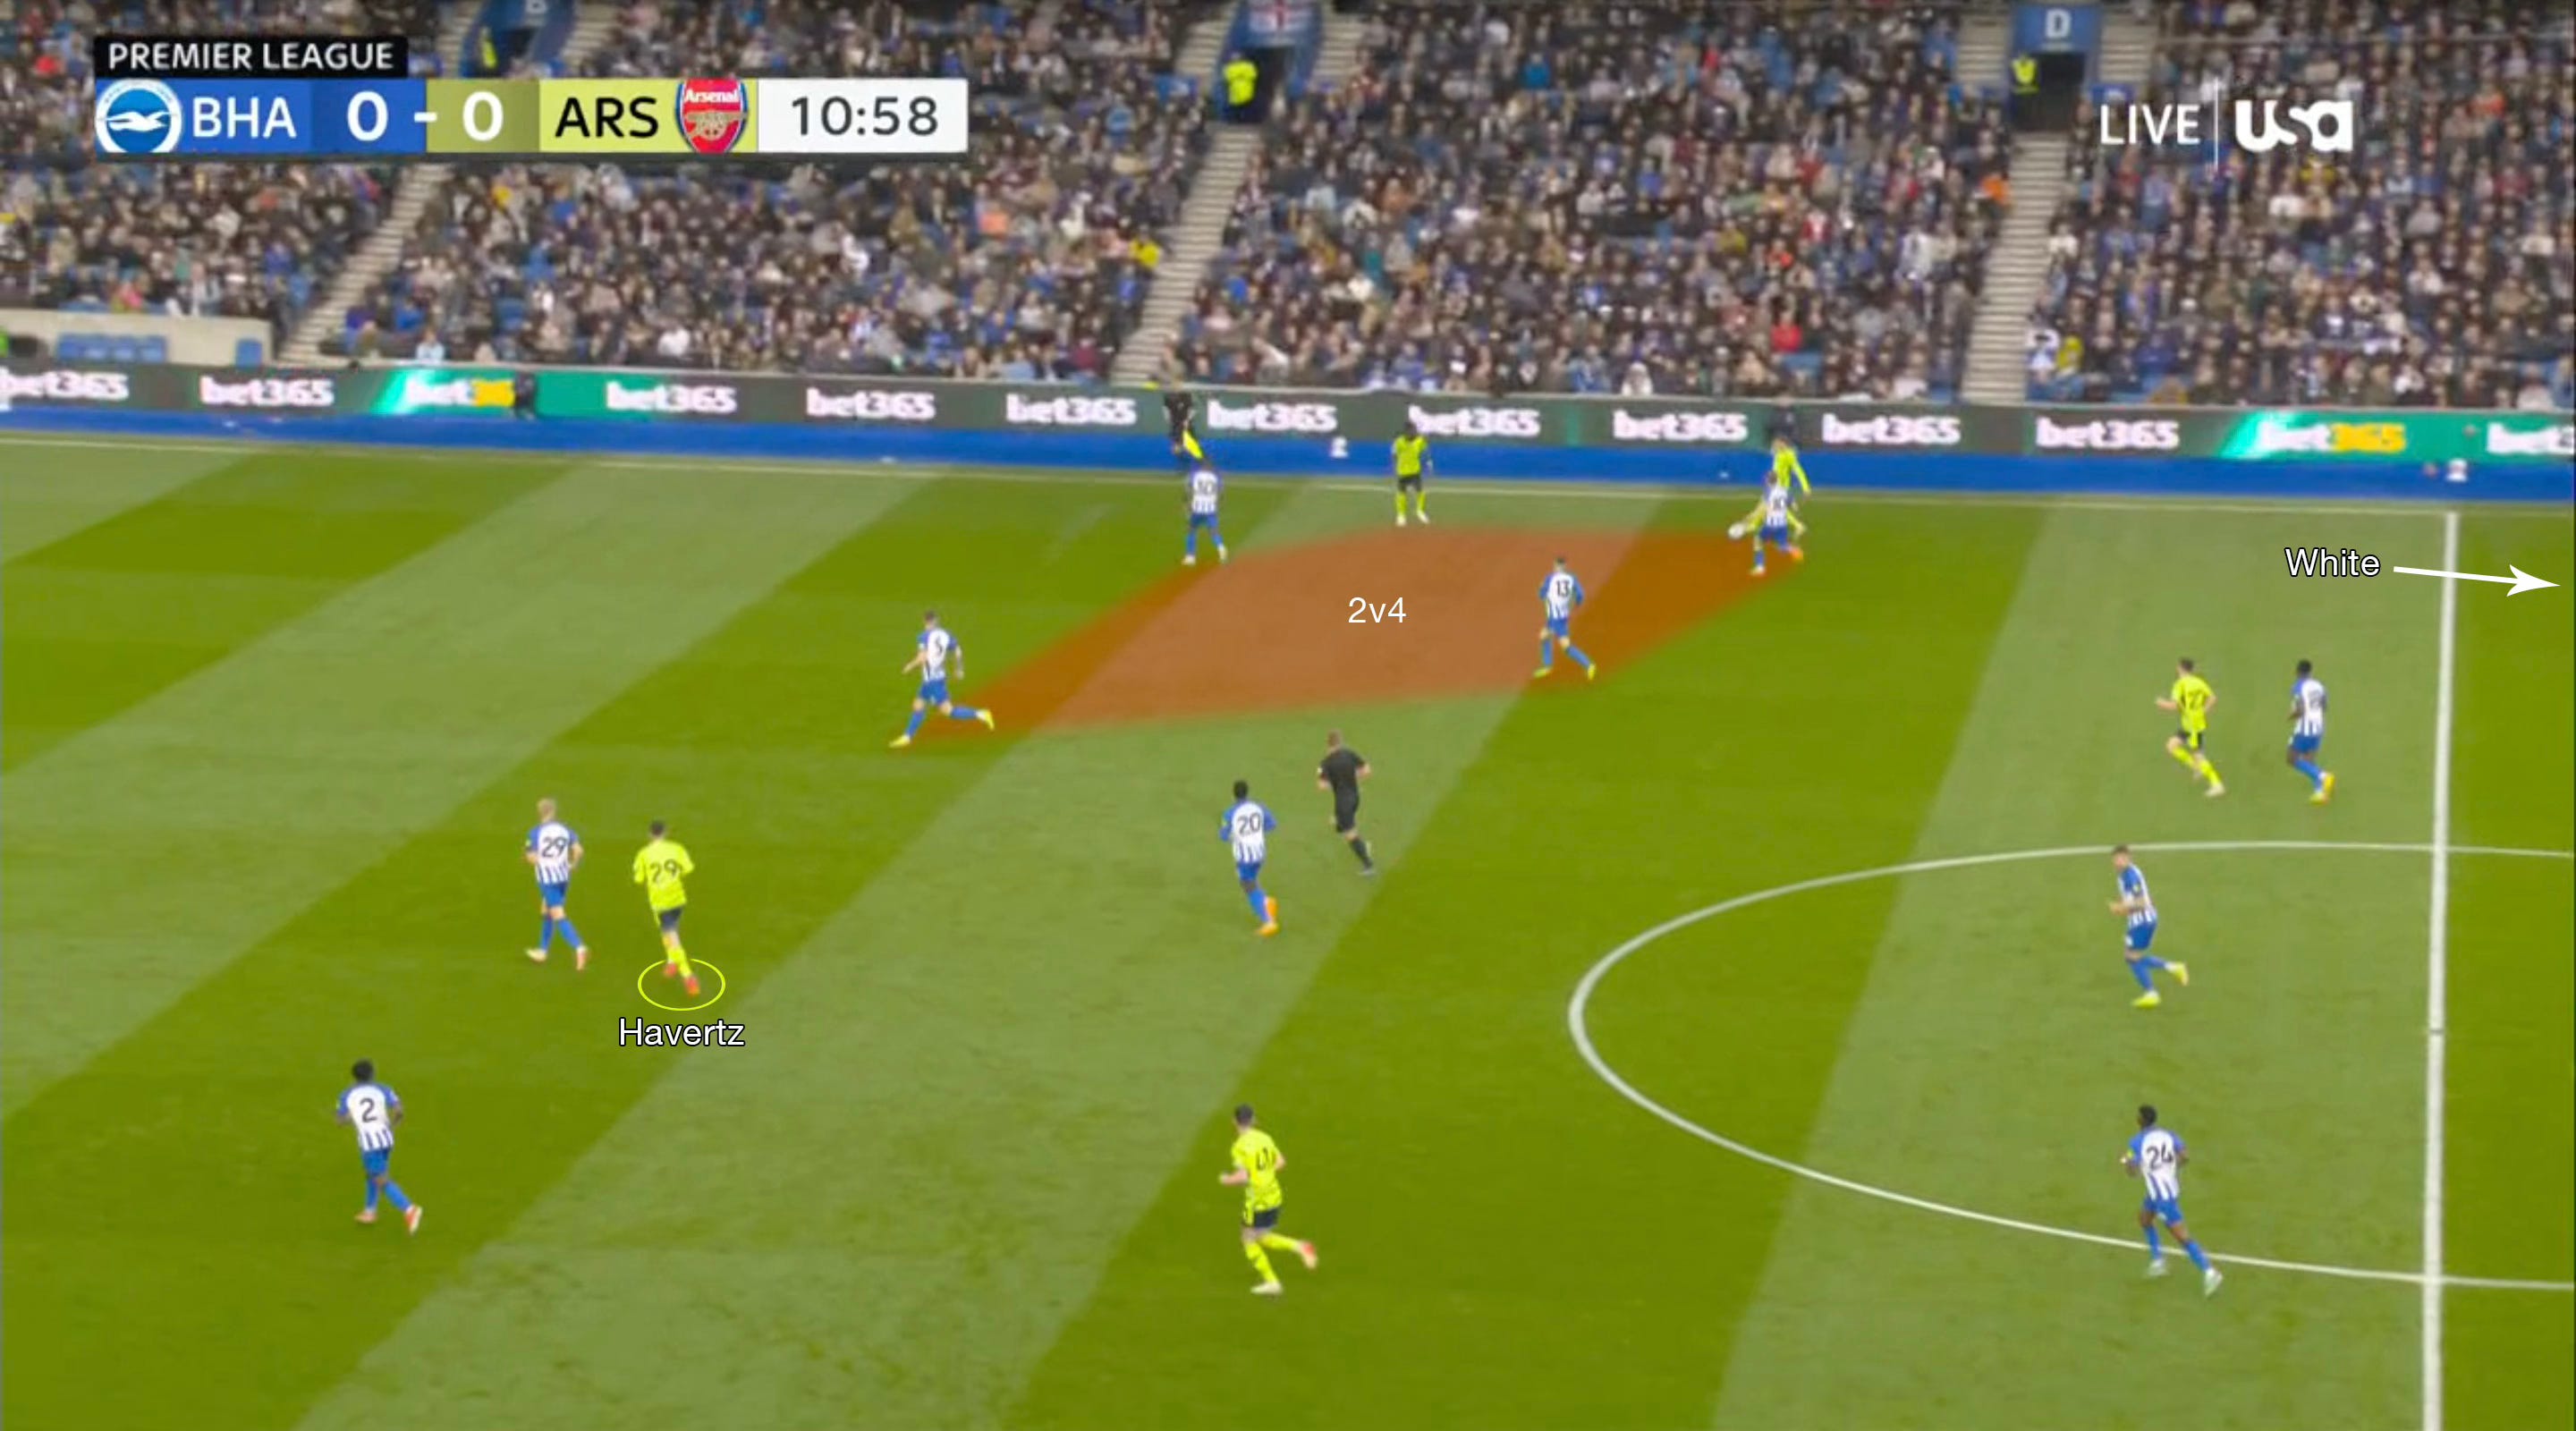
The start of this clip just highlights some minor limitations in certain areas, situationally. Like, here, Saliba not being a player you’d expect to pick out Zinchenko, who is, for once, beyond Adingra.
Playing short does still access the overload, and thus the spare man at hand (Gabriel). In this instance, Ødegaard changes up his movement to run into depth on the far side, which allows Havertz to finally drop through an open centre. It’s props to his double movement – first pushing into depth himself – that creates such a separation when dropping short, here.
But, like with Saliba in the previous case, the personnel in position to exploit this isn’t quite fit to do so. Jorginho isn’t like Rice, who would step onto the ball here and stride through the heart of the Brighton shape, whilst also being able to shrug off the backwards pressure from the strikers. So play goes back.
It’s not a huge missed chance, though, as it buys the ball-holders across the back a bit more time after the strikers pressed backwards so keenly.
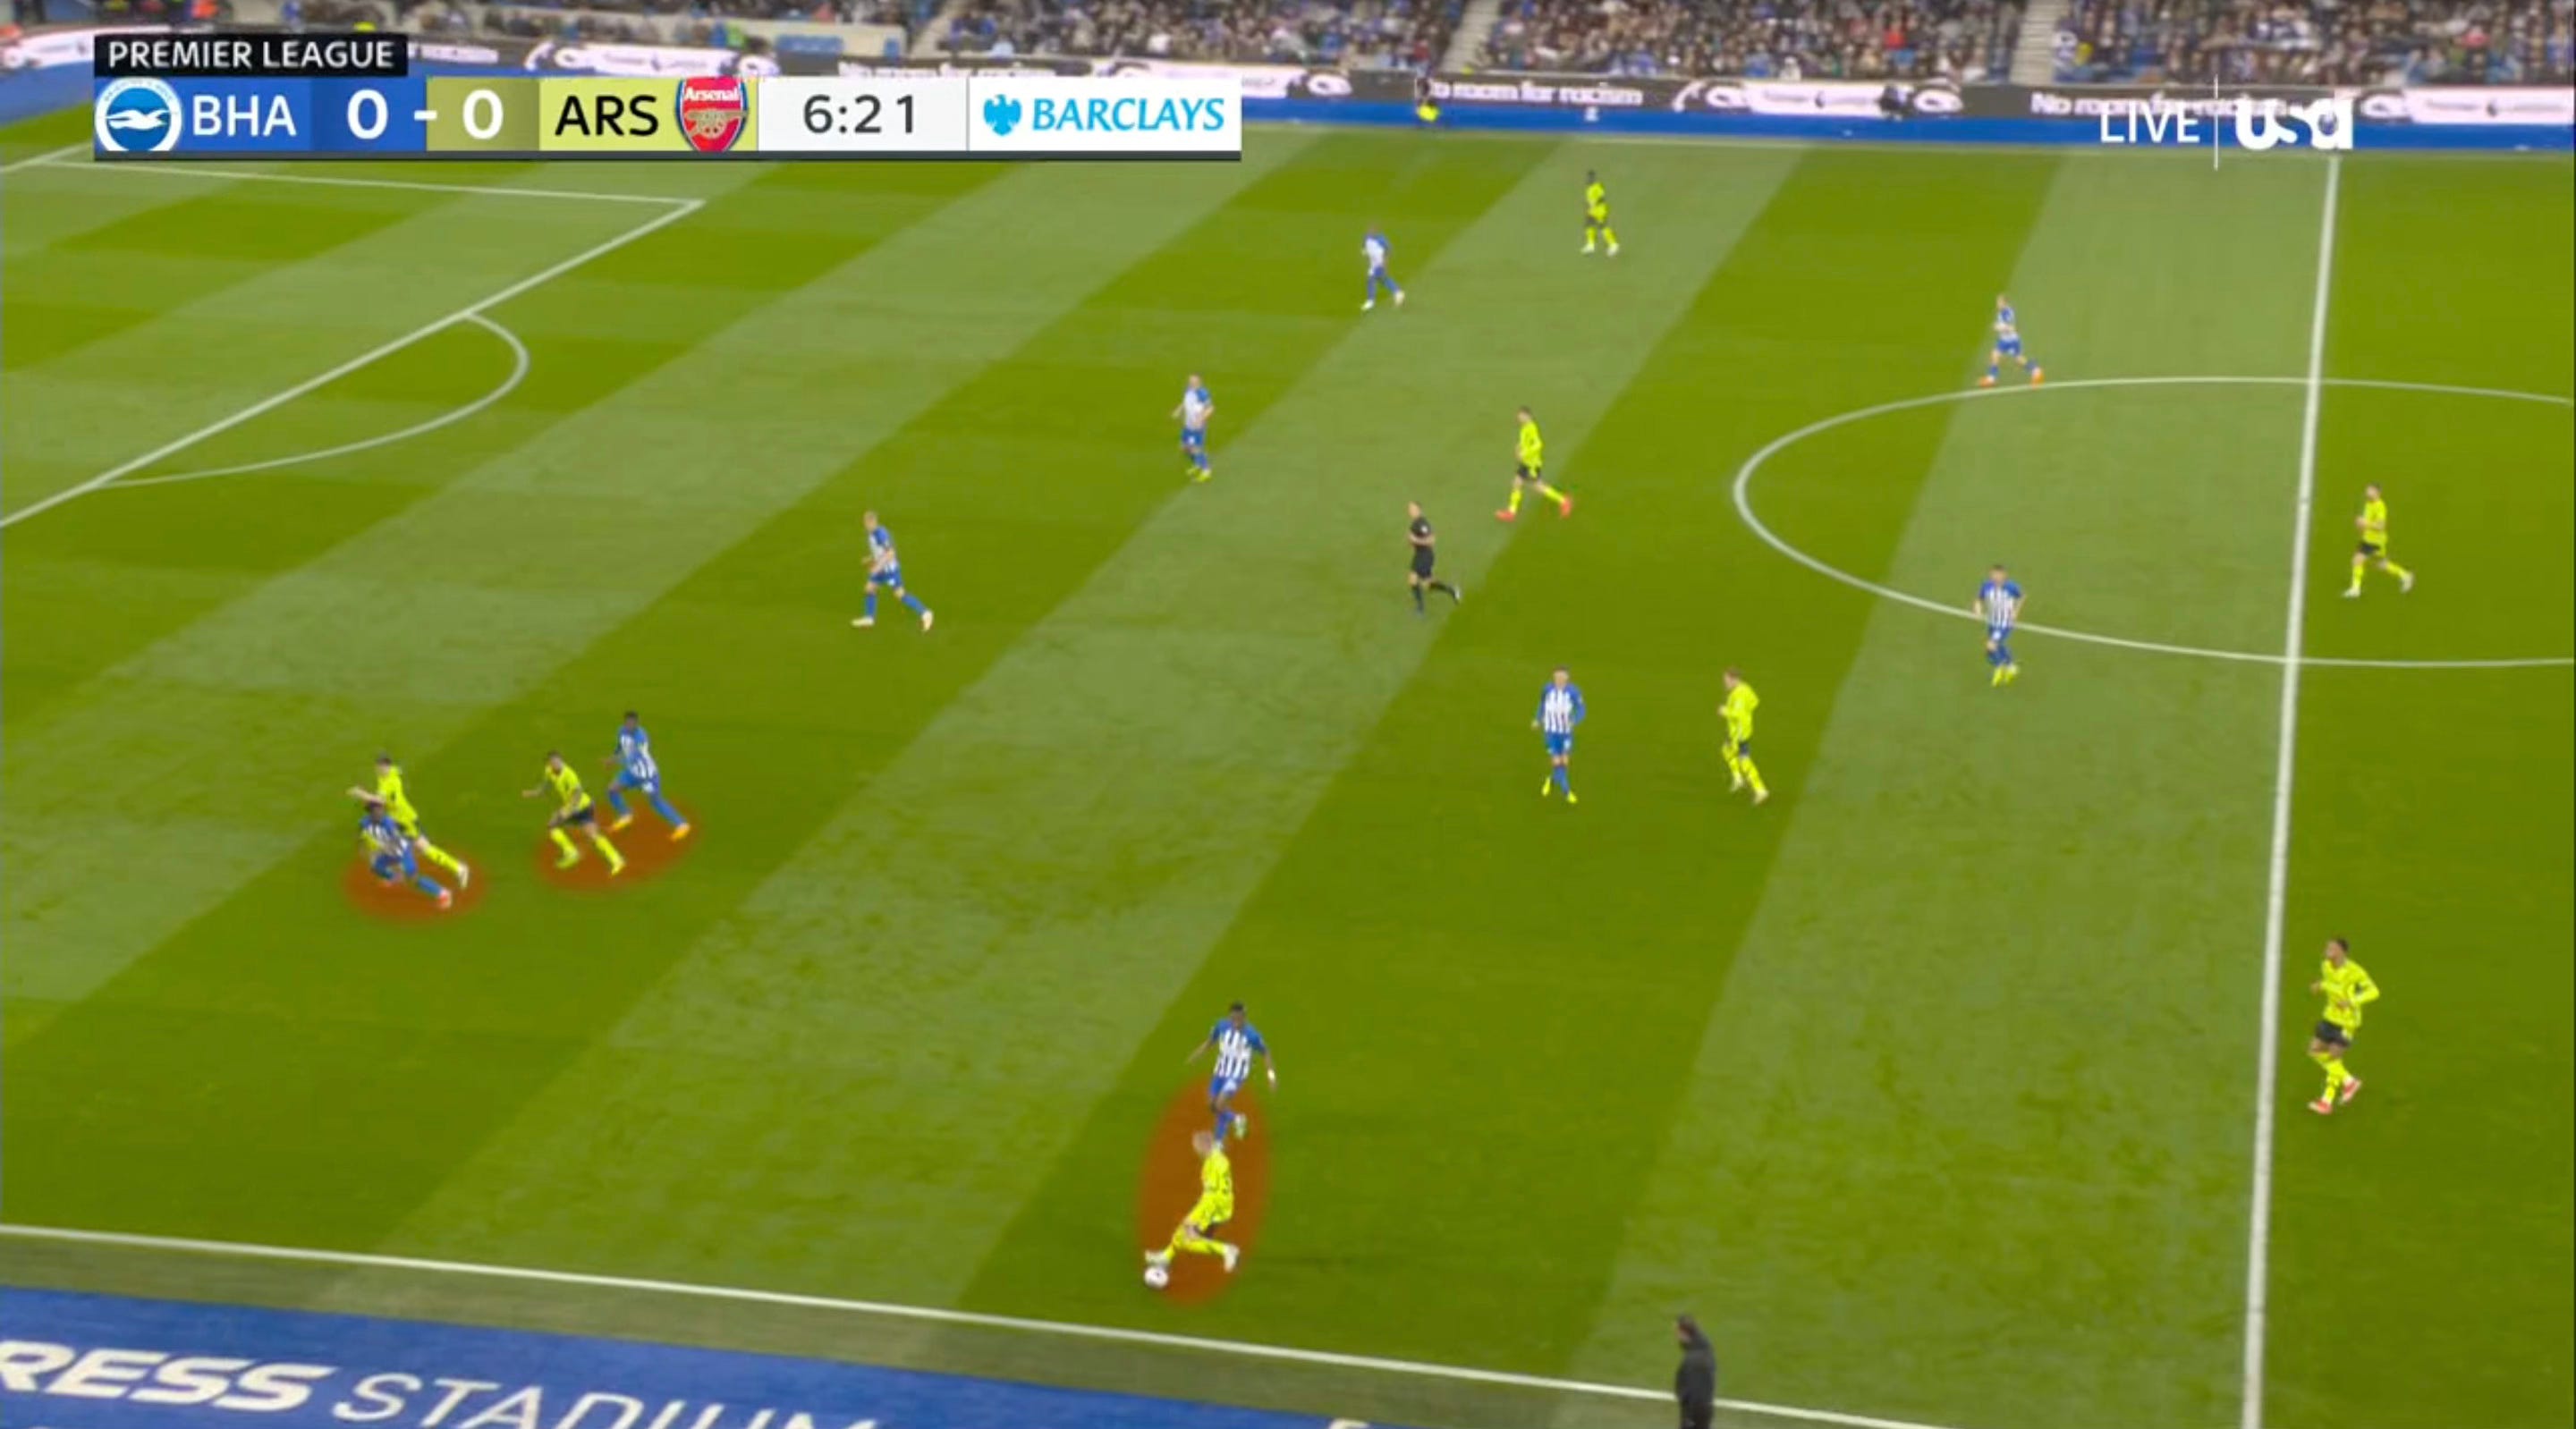
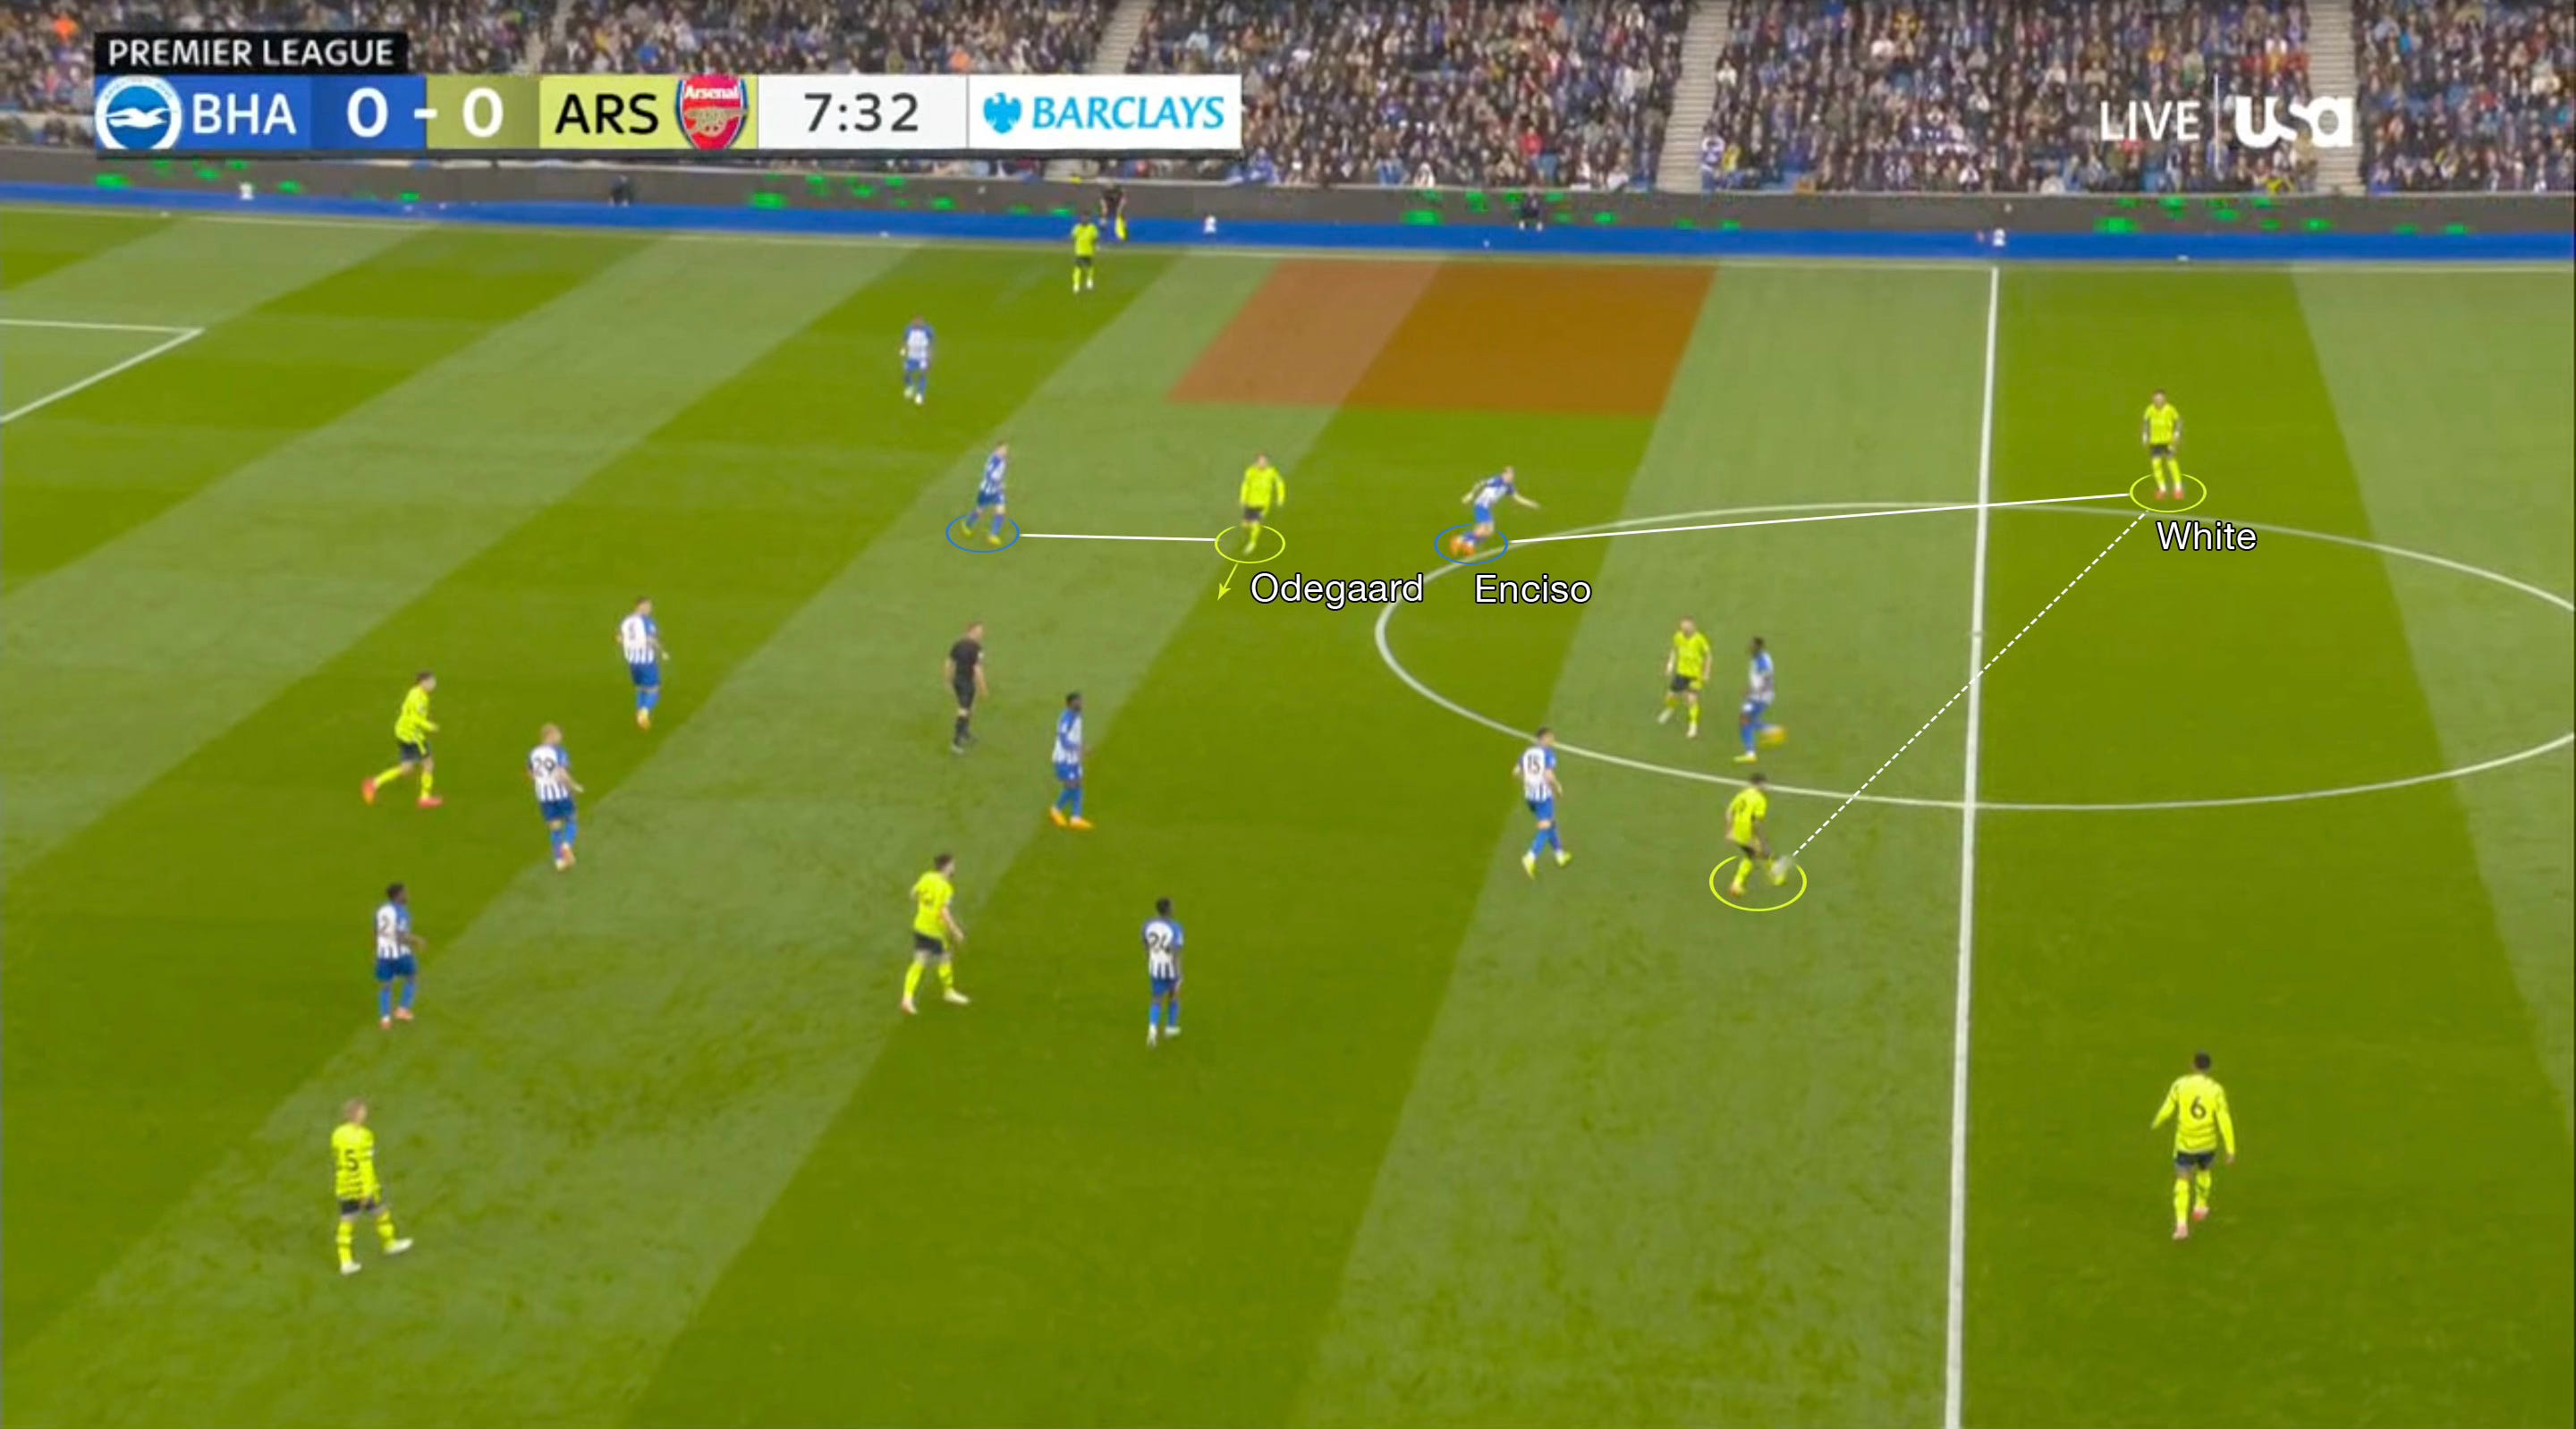
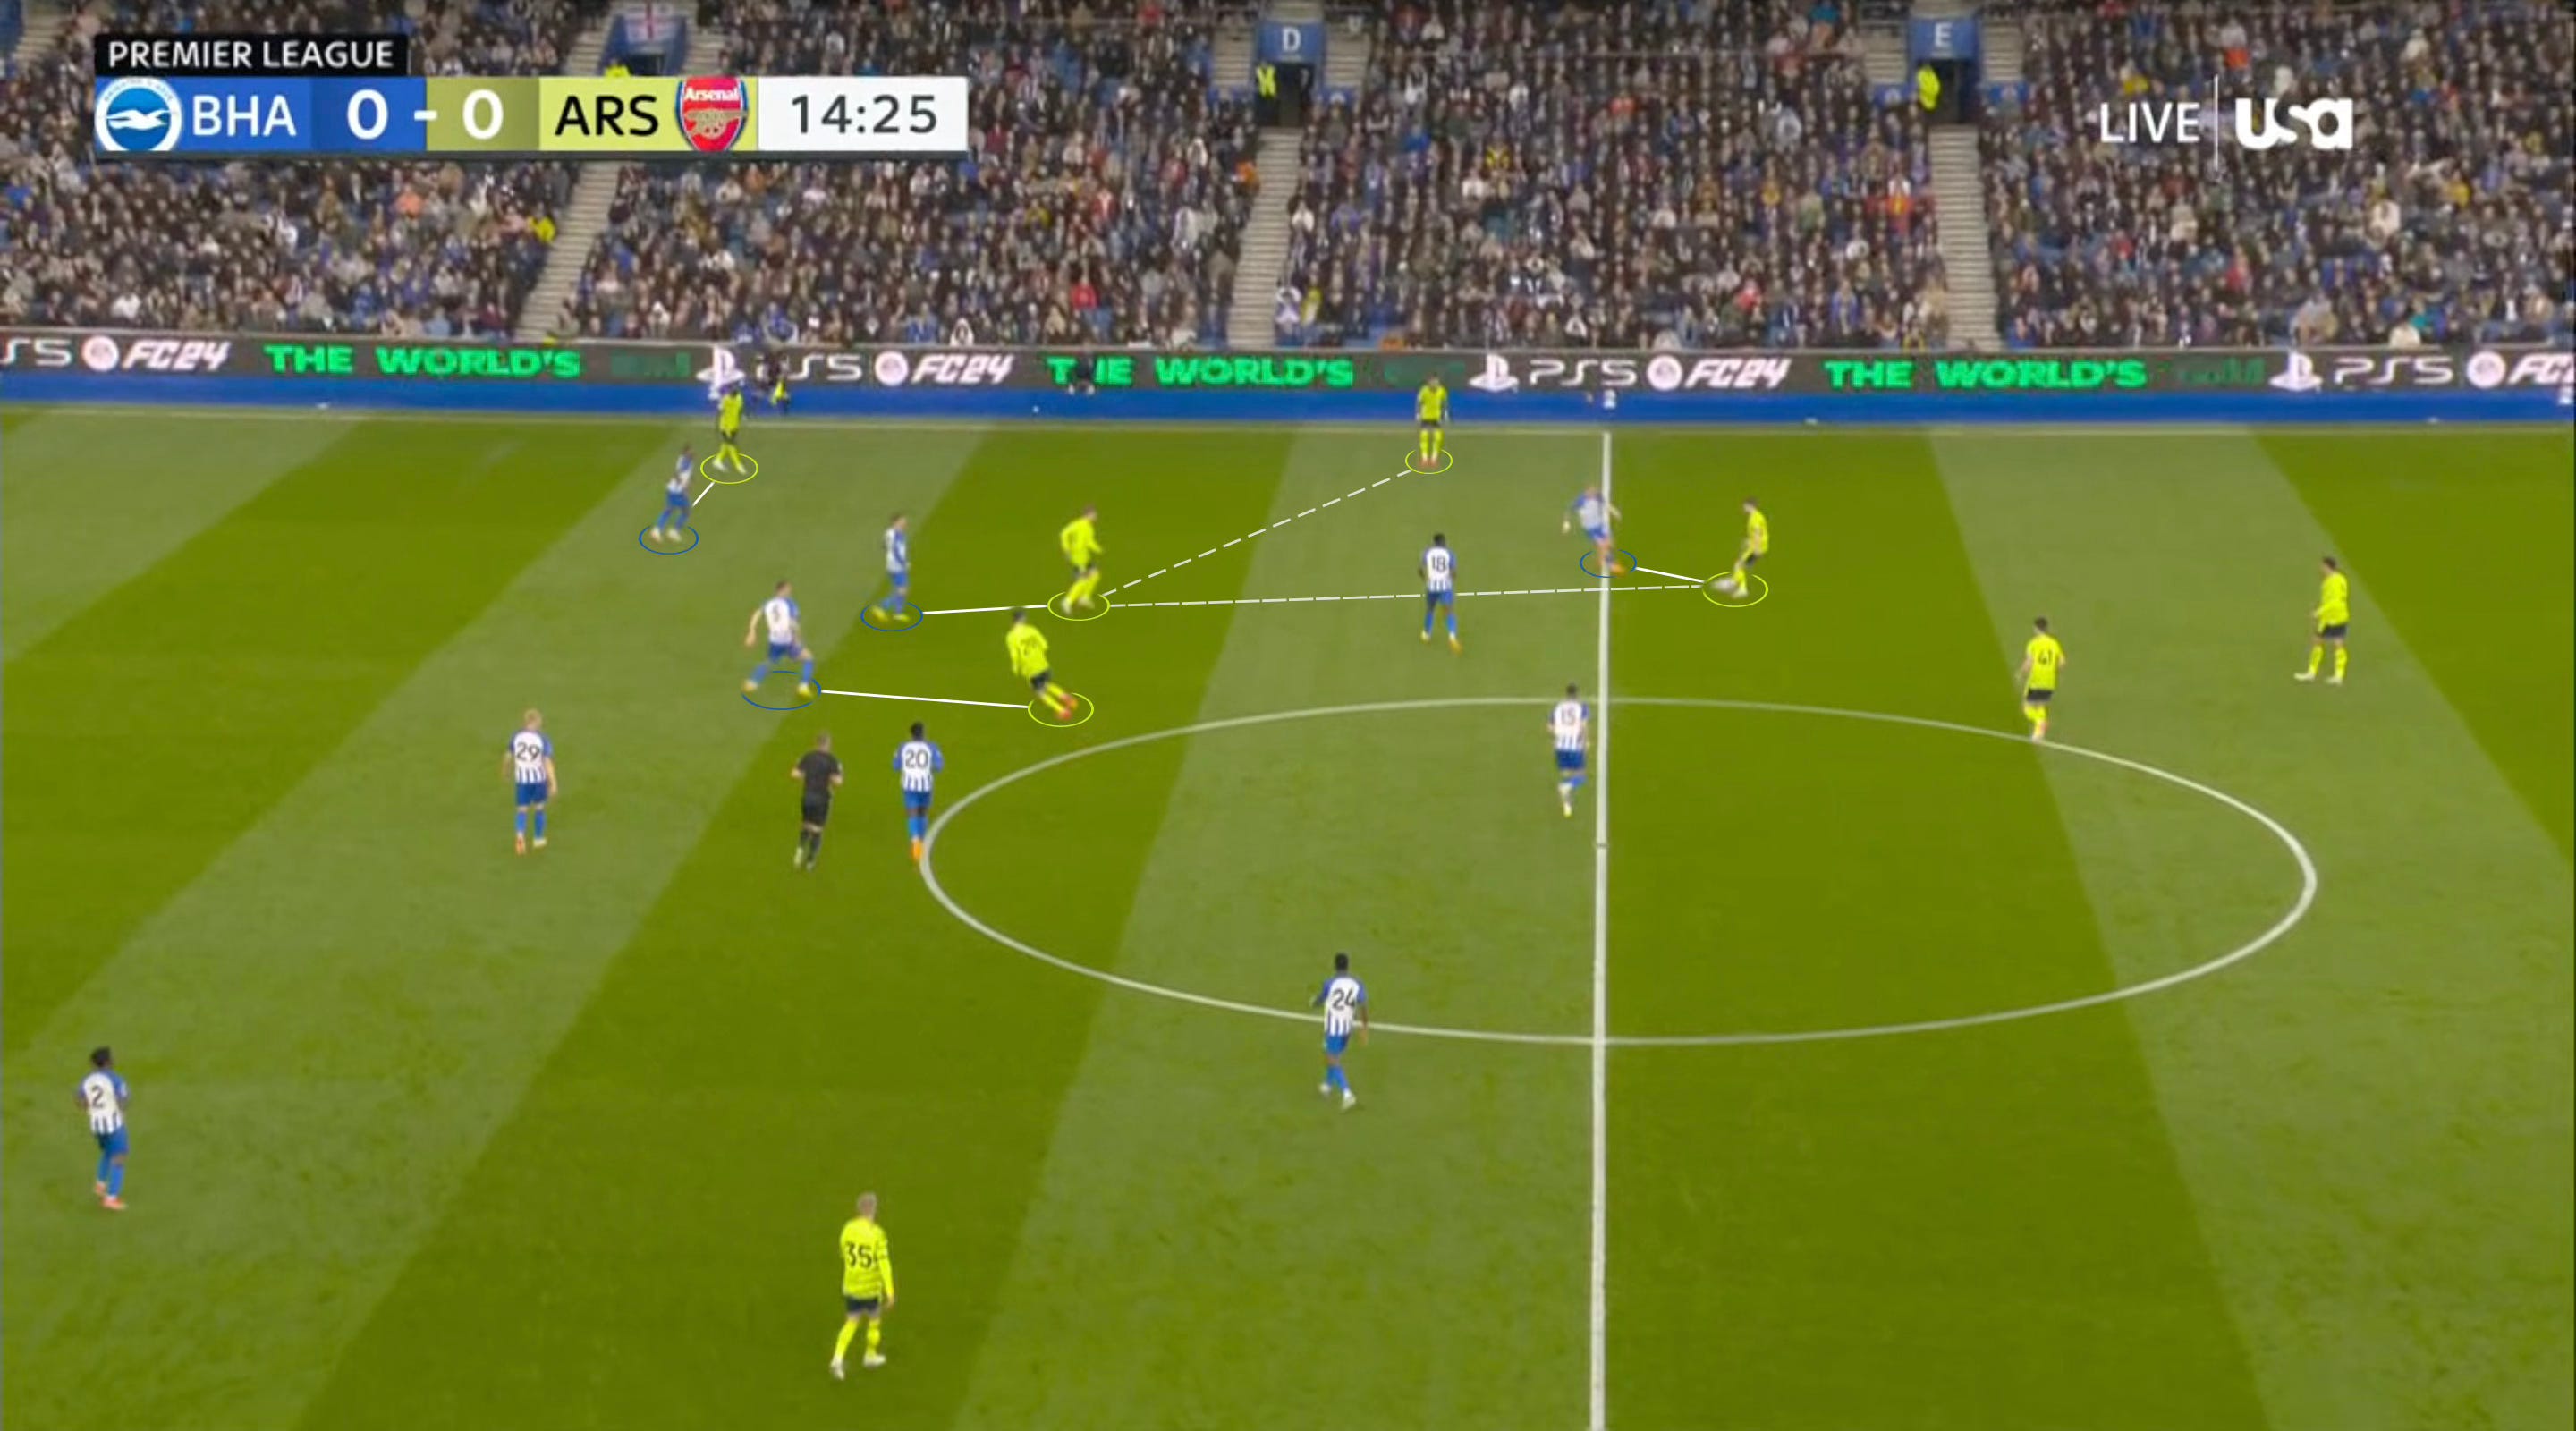
The difference in this play is that Ødegaard moves in another way that’s also potentially productive: out wide, like Rice did a couple of minutes prior. Again we can see the #8 marker (Groß) standing off their designated player as they move out.
Although the approach managed to exploit more wide space with freer access, Groß and Enciso’s positional command of the halfspace tightened the gap for Saliba to play through, meaning Ødegaard had to search for the passing lane from a deeper position.

What is also a slight hindrance, here, is that Saka naturally starts wide but then rotates inside more with the aim of receiving to feet, rather than moving up in service of the spare man. As a consequence, Ødegaard can’t push further through the angle that splits Groß and Enciso.
The result sees Enciso able to get across in time whilst Ødegaard is not set and goal-facing yet. And, with Saka already having been searching for the short ball, he can’t create the separation to cleanly offer ahead.
This leads to another turnover but the tweak to the approach is trending in the right direction.
2nd example
Shortly after, we see the same move from Ødegaard. Better yet, Saka moves inwards in service of his teammate’s shift.
What aids this further is that Jorginho is quick to feed the Norwegian. It was an incentive game-long to force the ball into the playmaker’s feet whenever half a chance arose, and it’s a good play when you are able to dictate your marker’s actions so heavily.

Although he got to receive goal side of Enciso and let the ball run across him to control with a bit more forward momentum, Ødegaard and Saka were still pretty isolated. There’s still a clear underload, as seen below, since Havertz is central and, significantly, so is White, as he’s still in the 1st line.
Things click into place
1st example
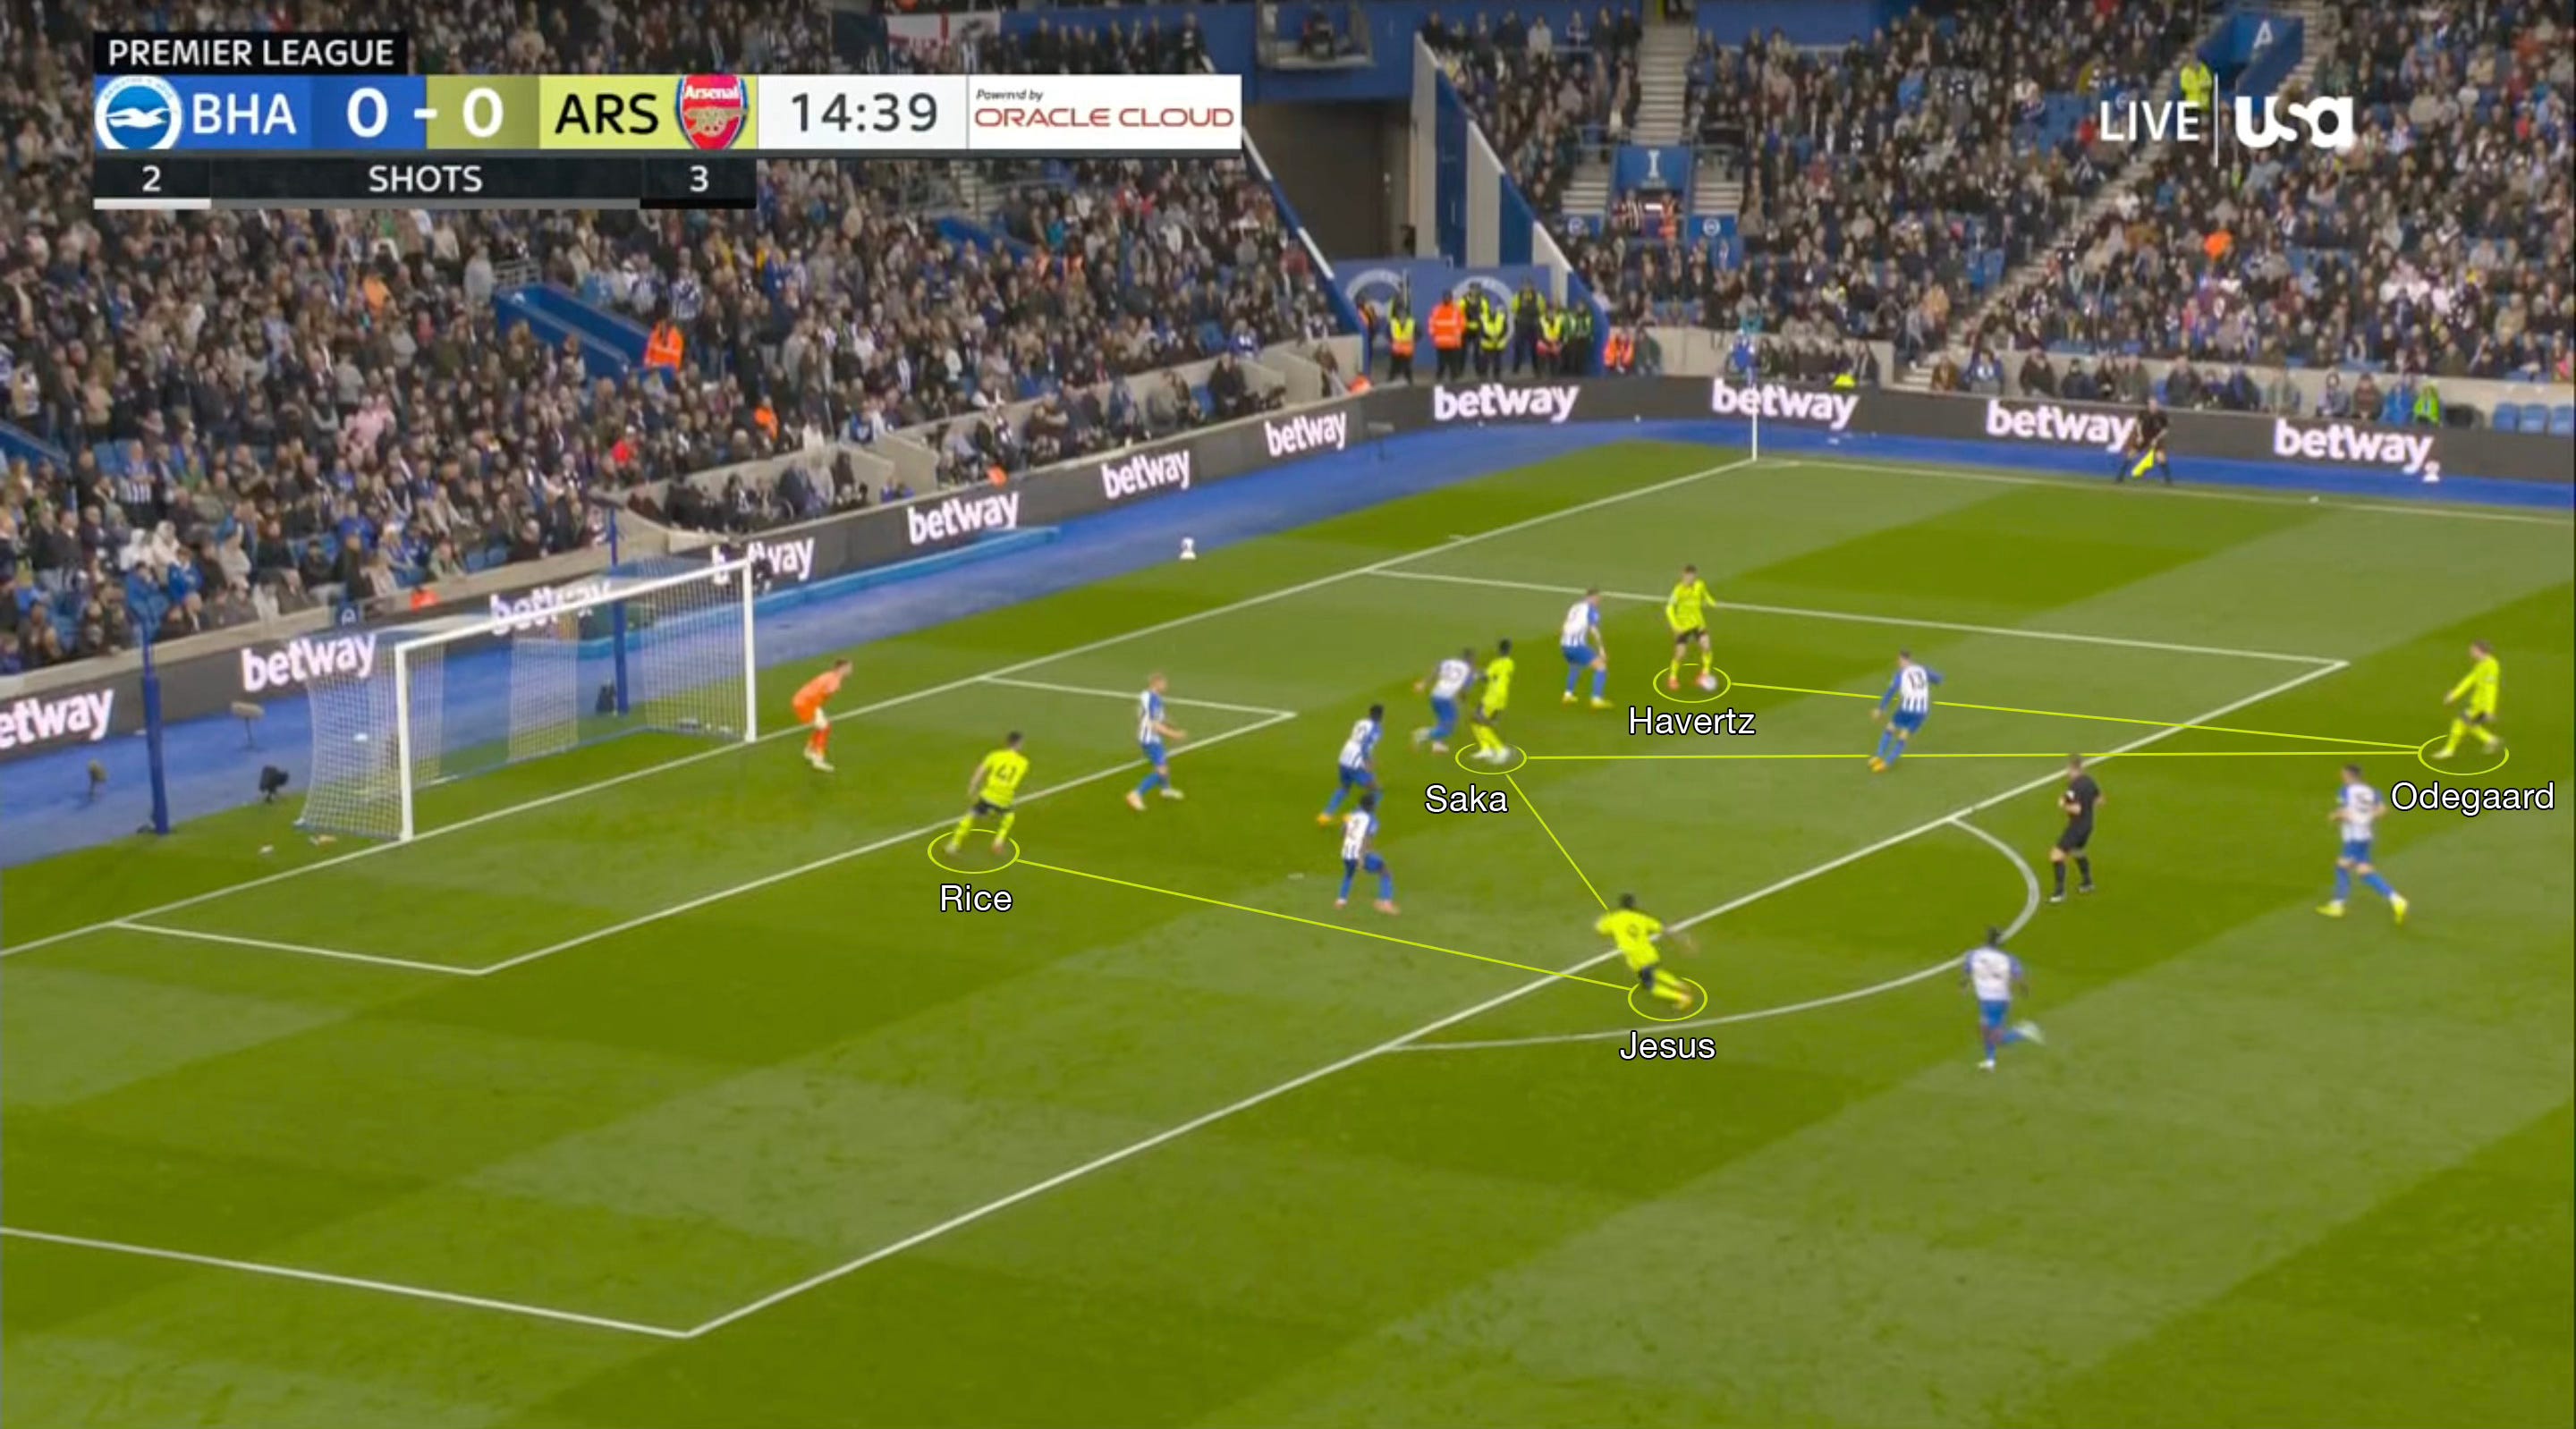
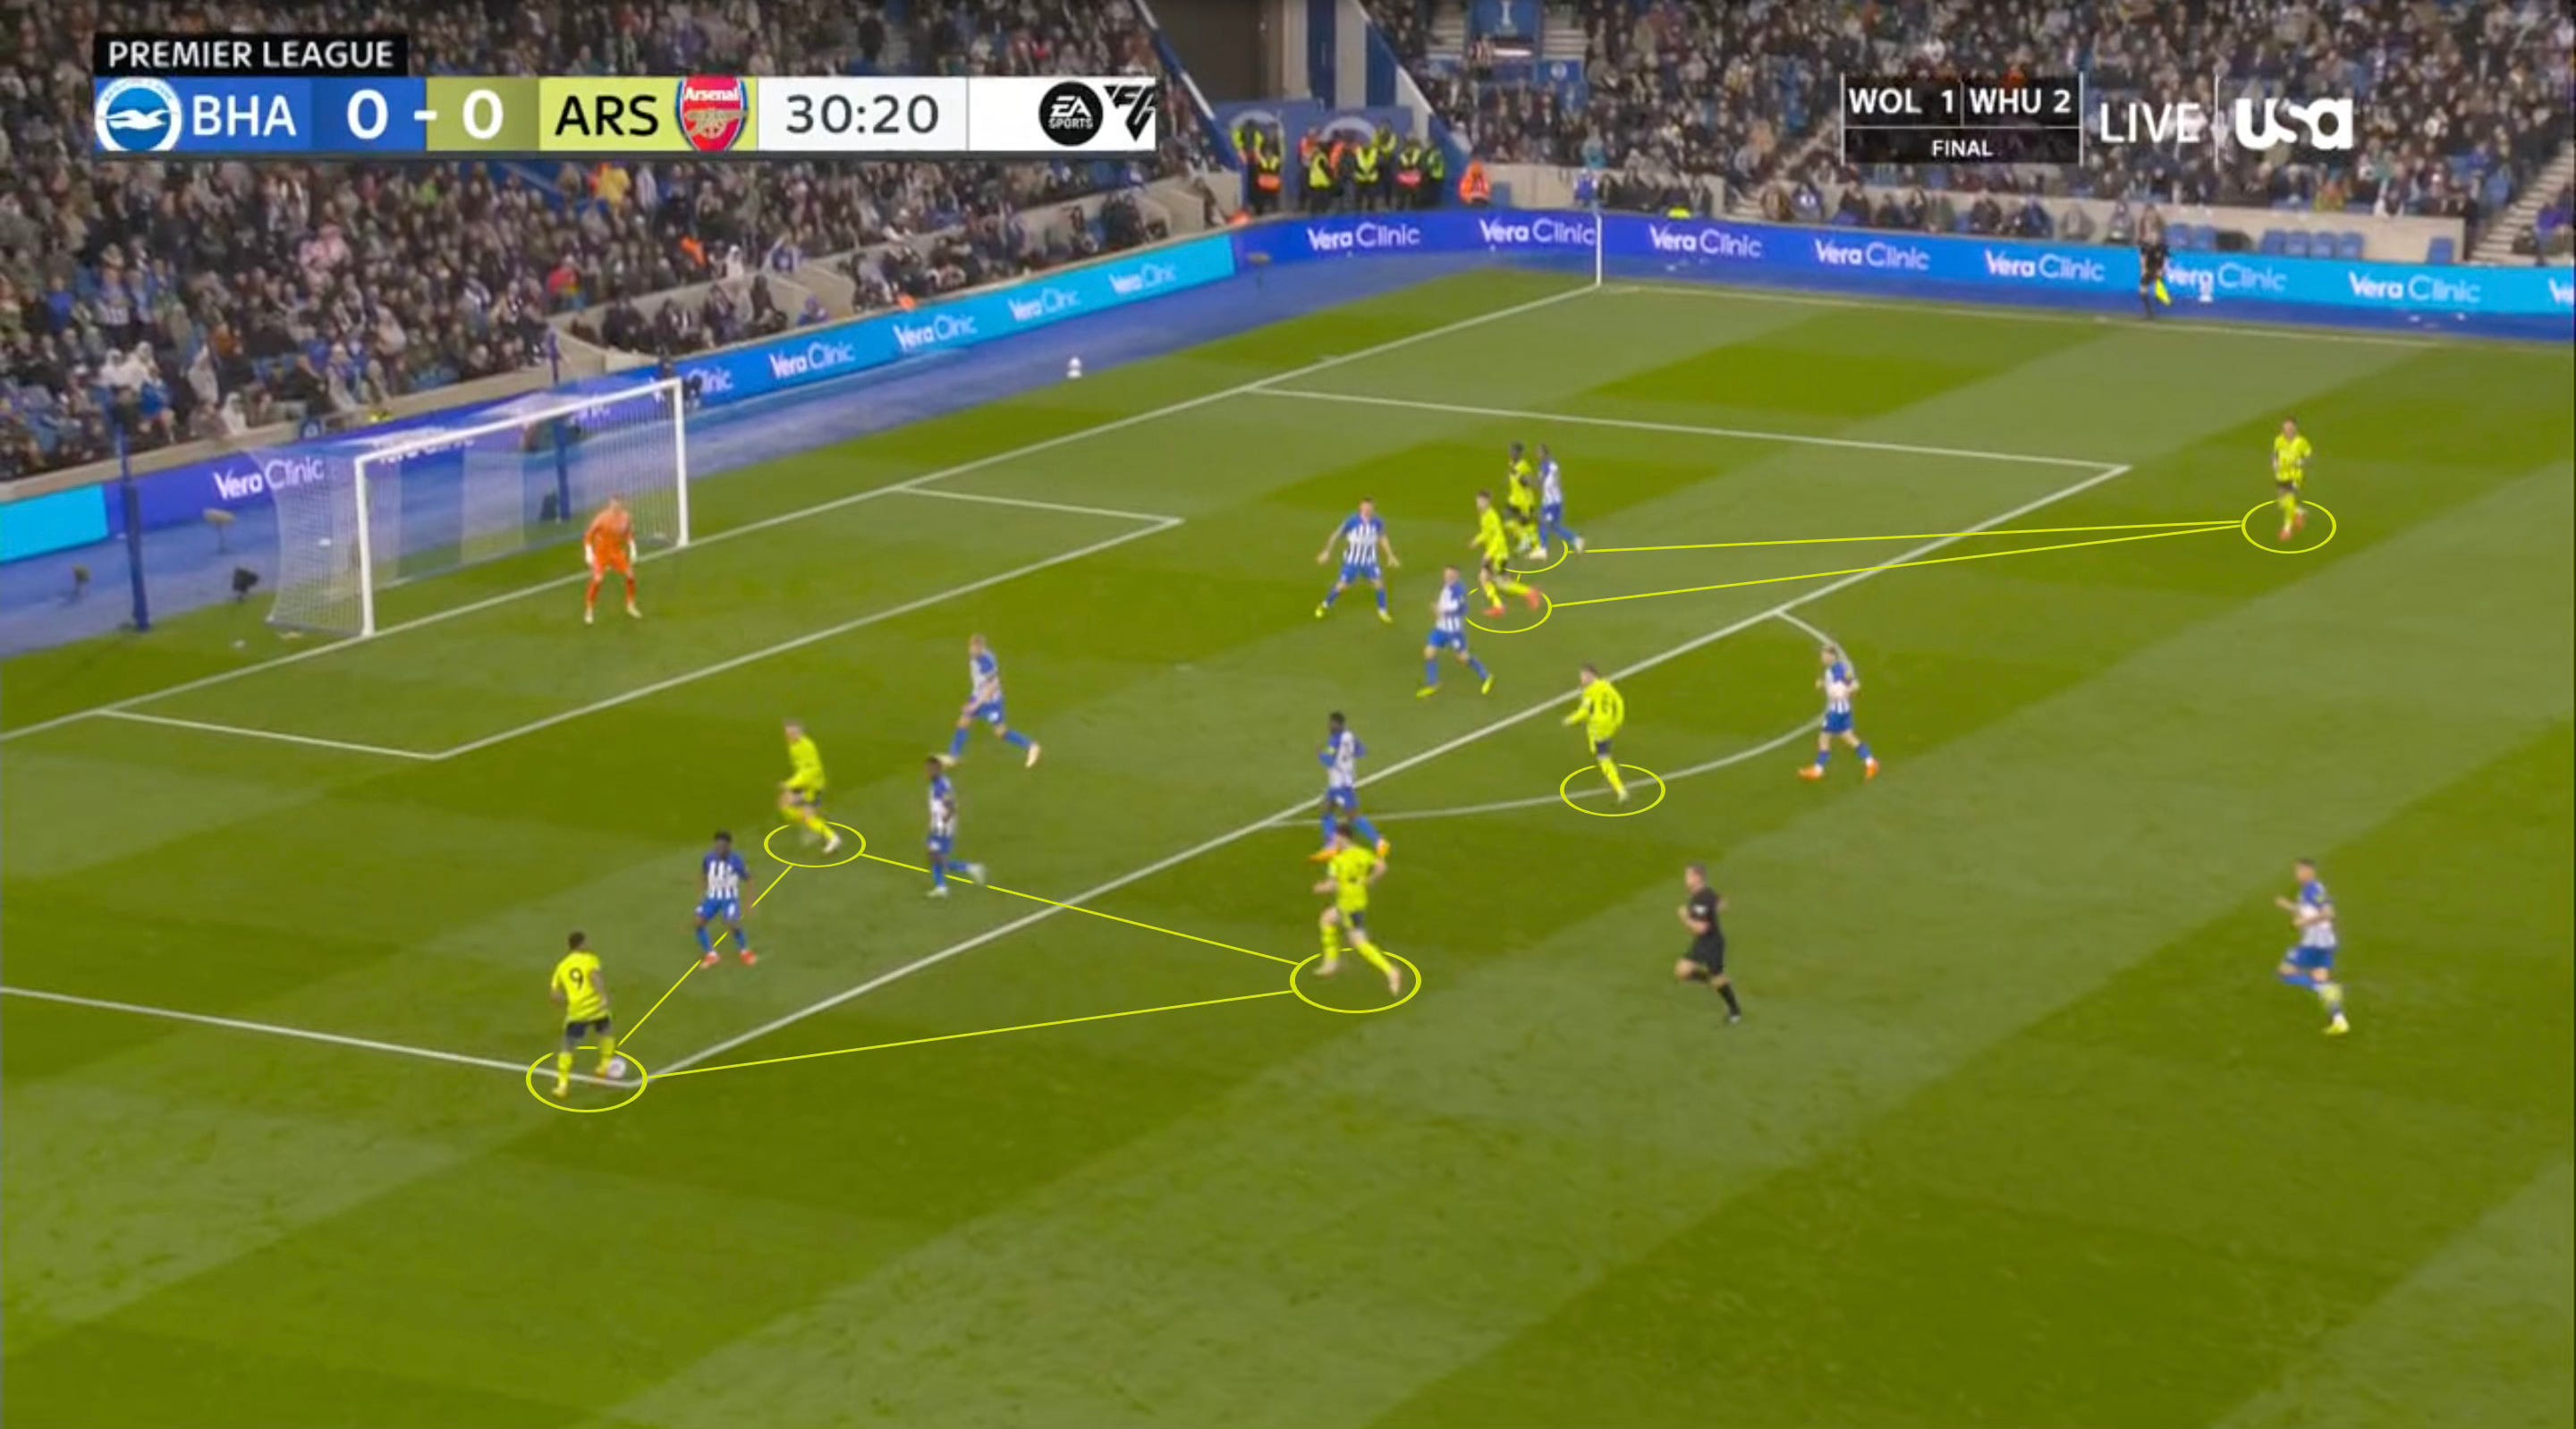
Directly following the failed instance above, as Arsenal counterpress well to regain control, we finally see a fully-formed move that pays huge dividends.
Perhaps more so because Raya had split the CBs himself, White pushed up instead, and continued once he saw Jorginho drop in, too.
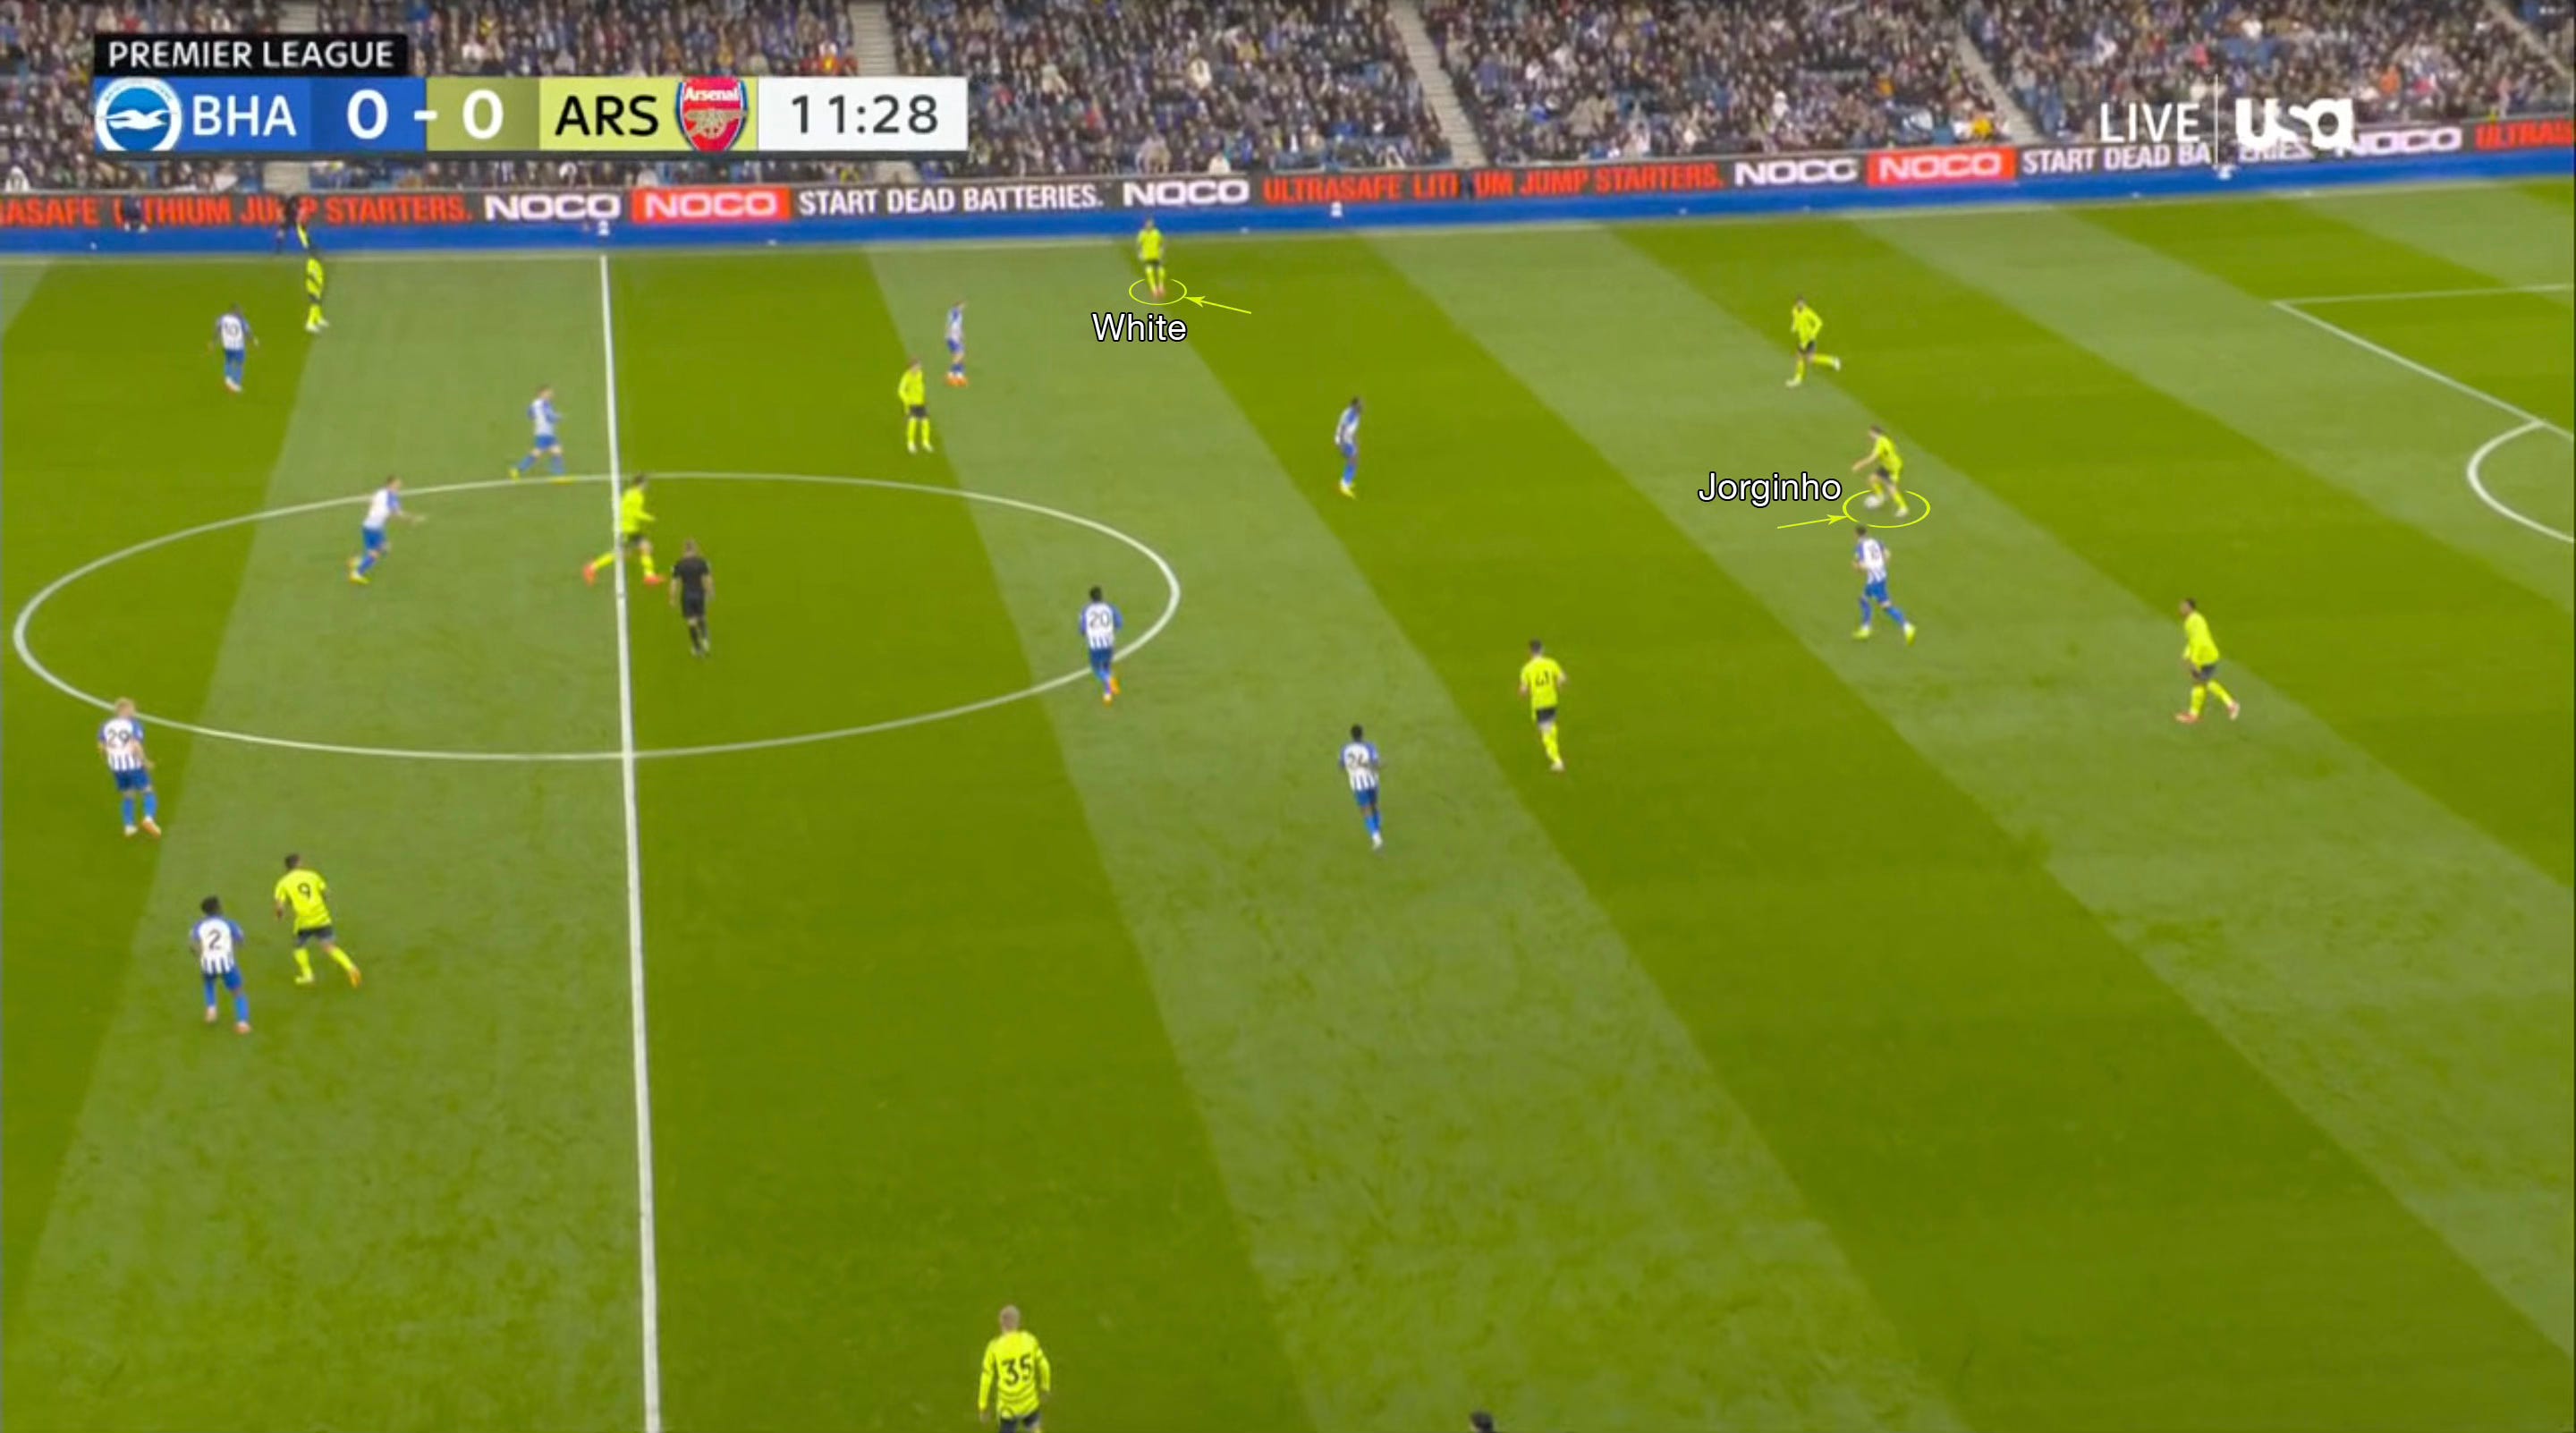
What was missing to fully exploit this was the fact that Enciso had dropped to form a compact block during the reset. But, with Jorginho closing off his angles to attract the press, and White in turn pushing on in response, he was able to angle himself to get off the press-breaking pass.

Not only is it a great improvement on positional exploitation, but it also ended up leading to a superior distributor fielding the ball from the middle, instead of Saliba.
What also makes this move doubly incisive is the positioning of those in the centre. With the #8s continuing to stay in their halfspaces, it leaves room for Havertz to continually drop through the middle, which in turn enables him to draw out a Brighton CB.

Even though White has to step inside to meet it, the key is that he’s now part of a trio of attackers, rather than a pair. It also means there are multiple players (Saka & Ødegaard) making splitting movements in either direction of the ball, meaning neither Estupiñán nor Groß can press White without freeing up an attacker inside.
Thanks to a very tidy weaker foot through ball, White was able to then exploit the drawn space following Estupiñán’s hesitance in response to the overload.
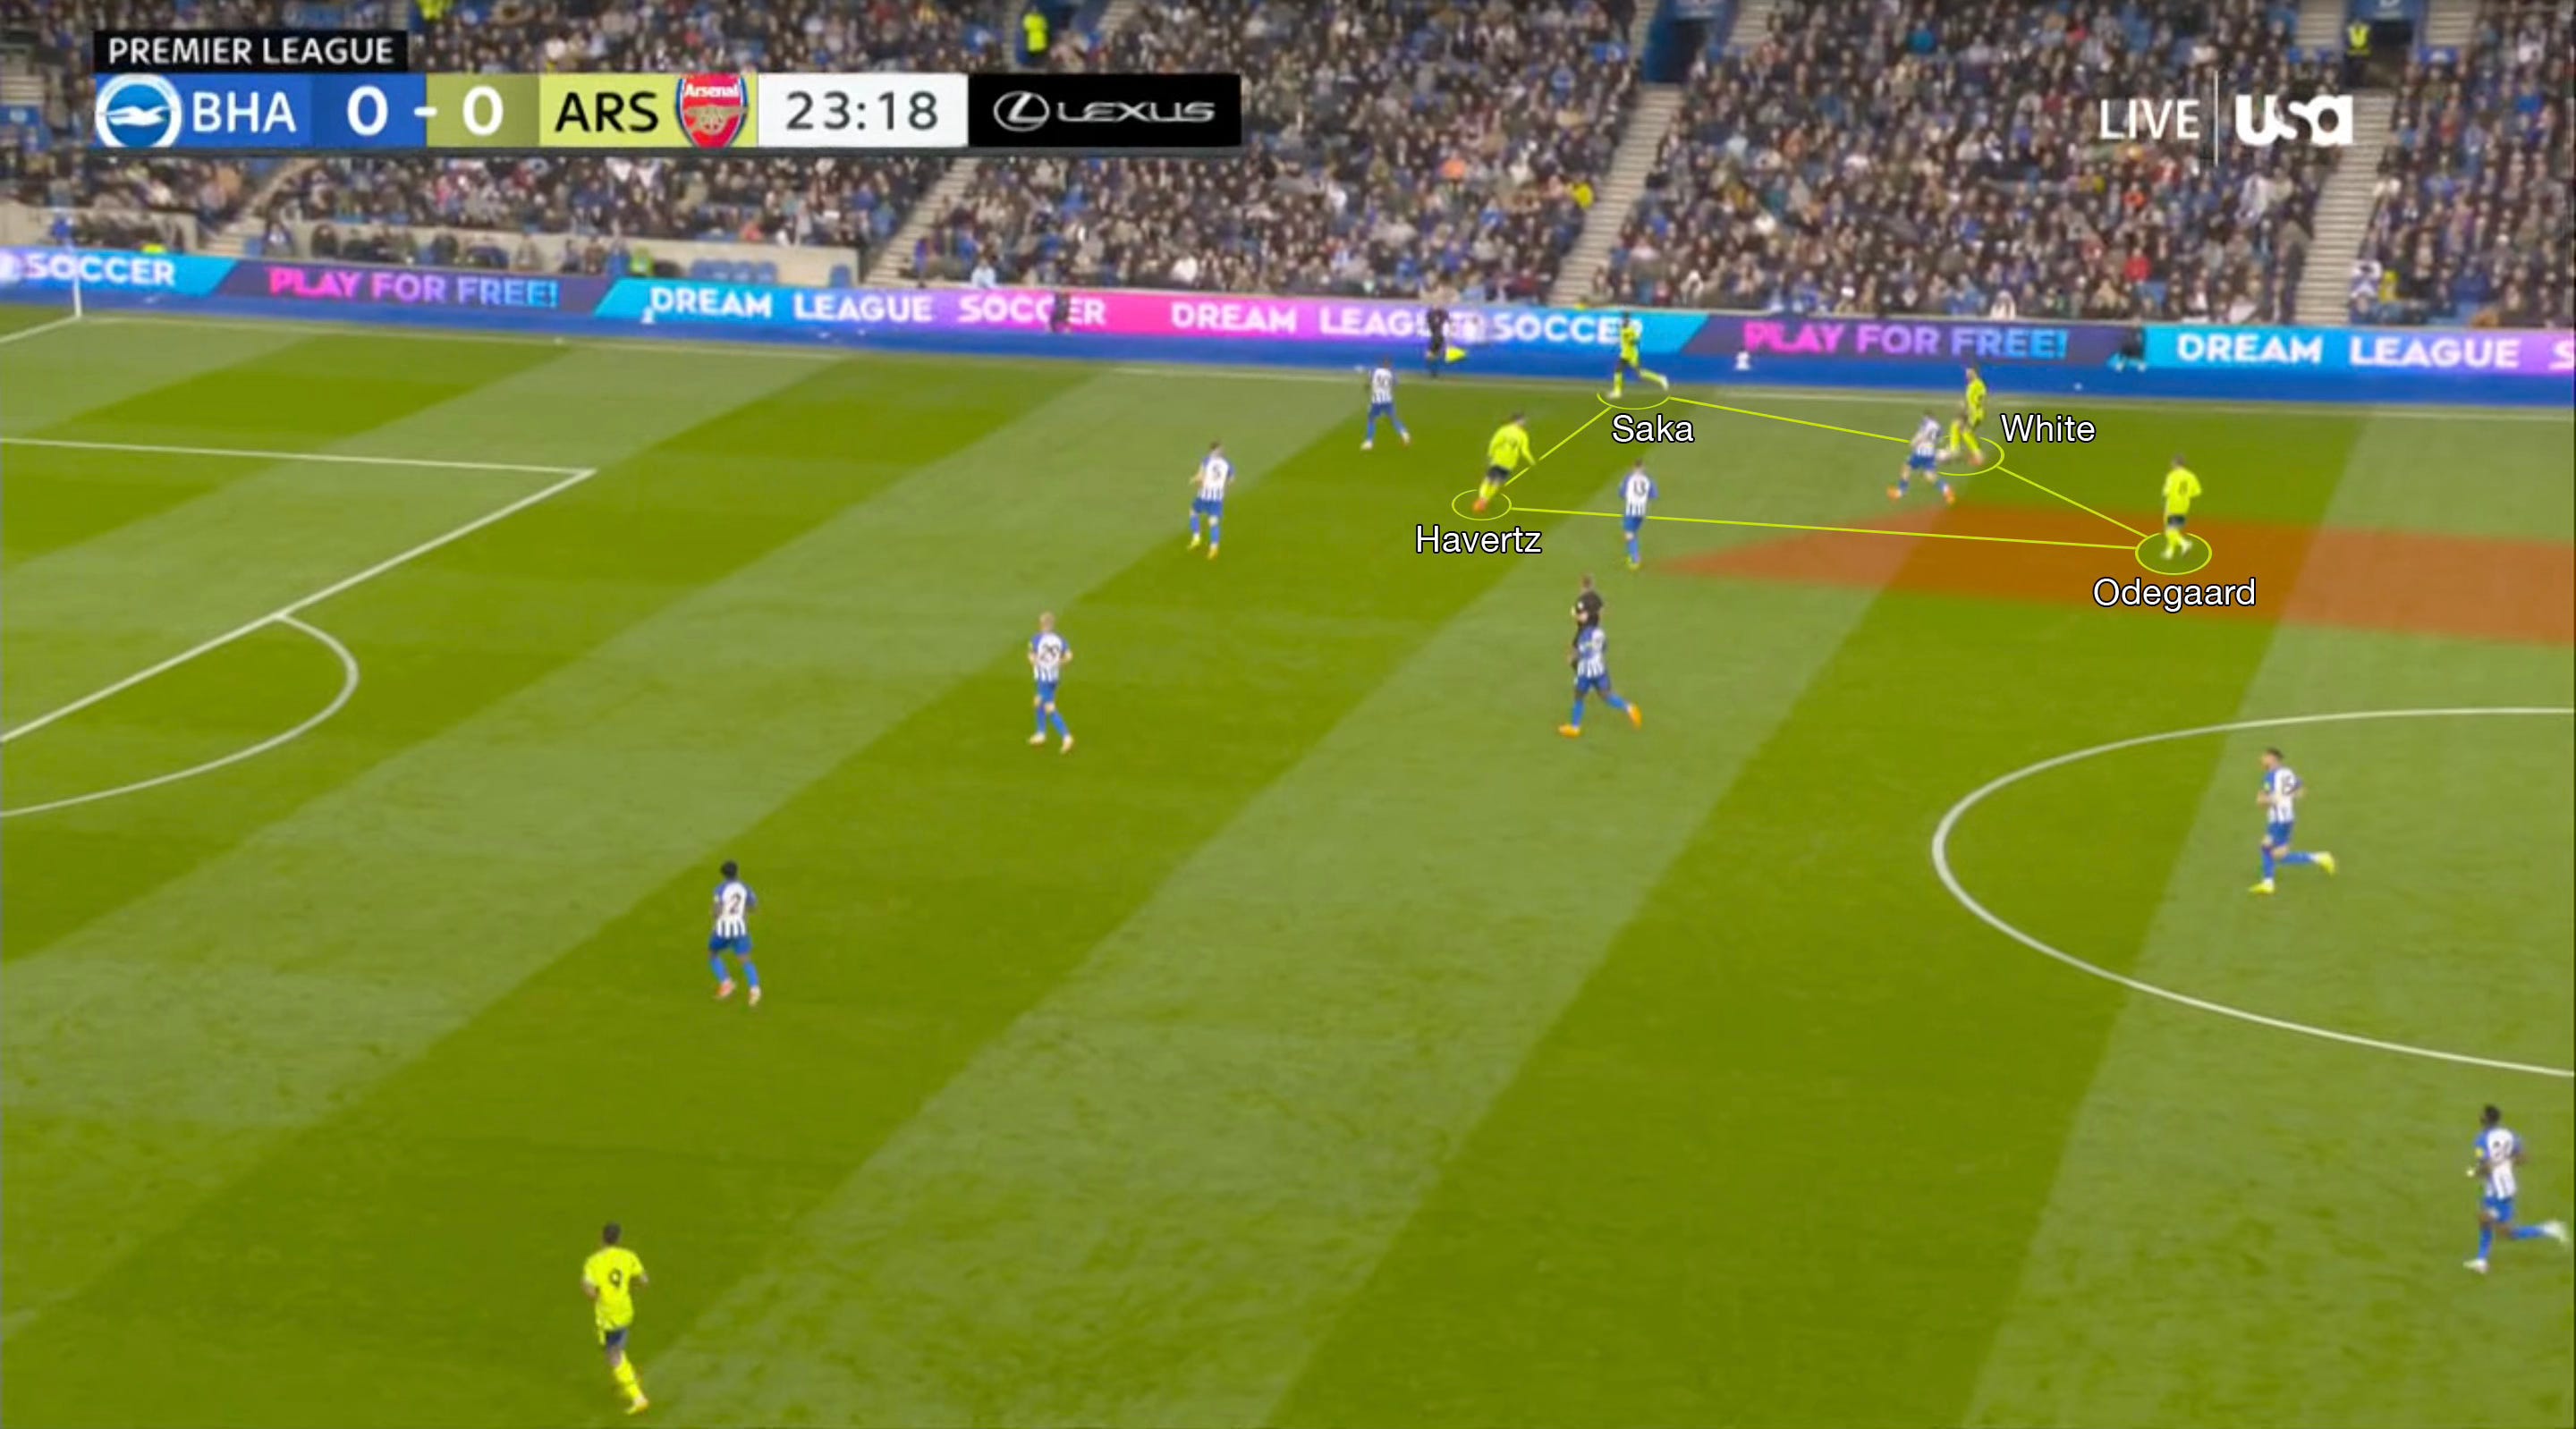
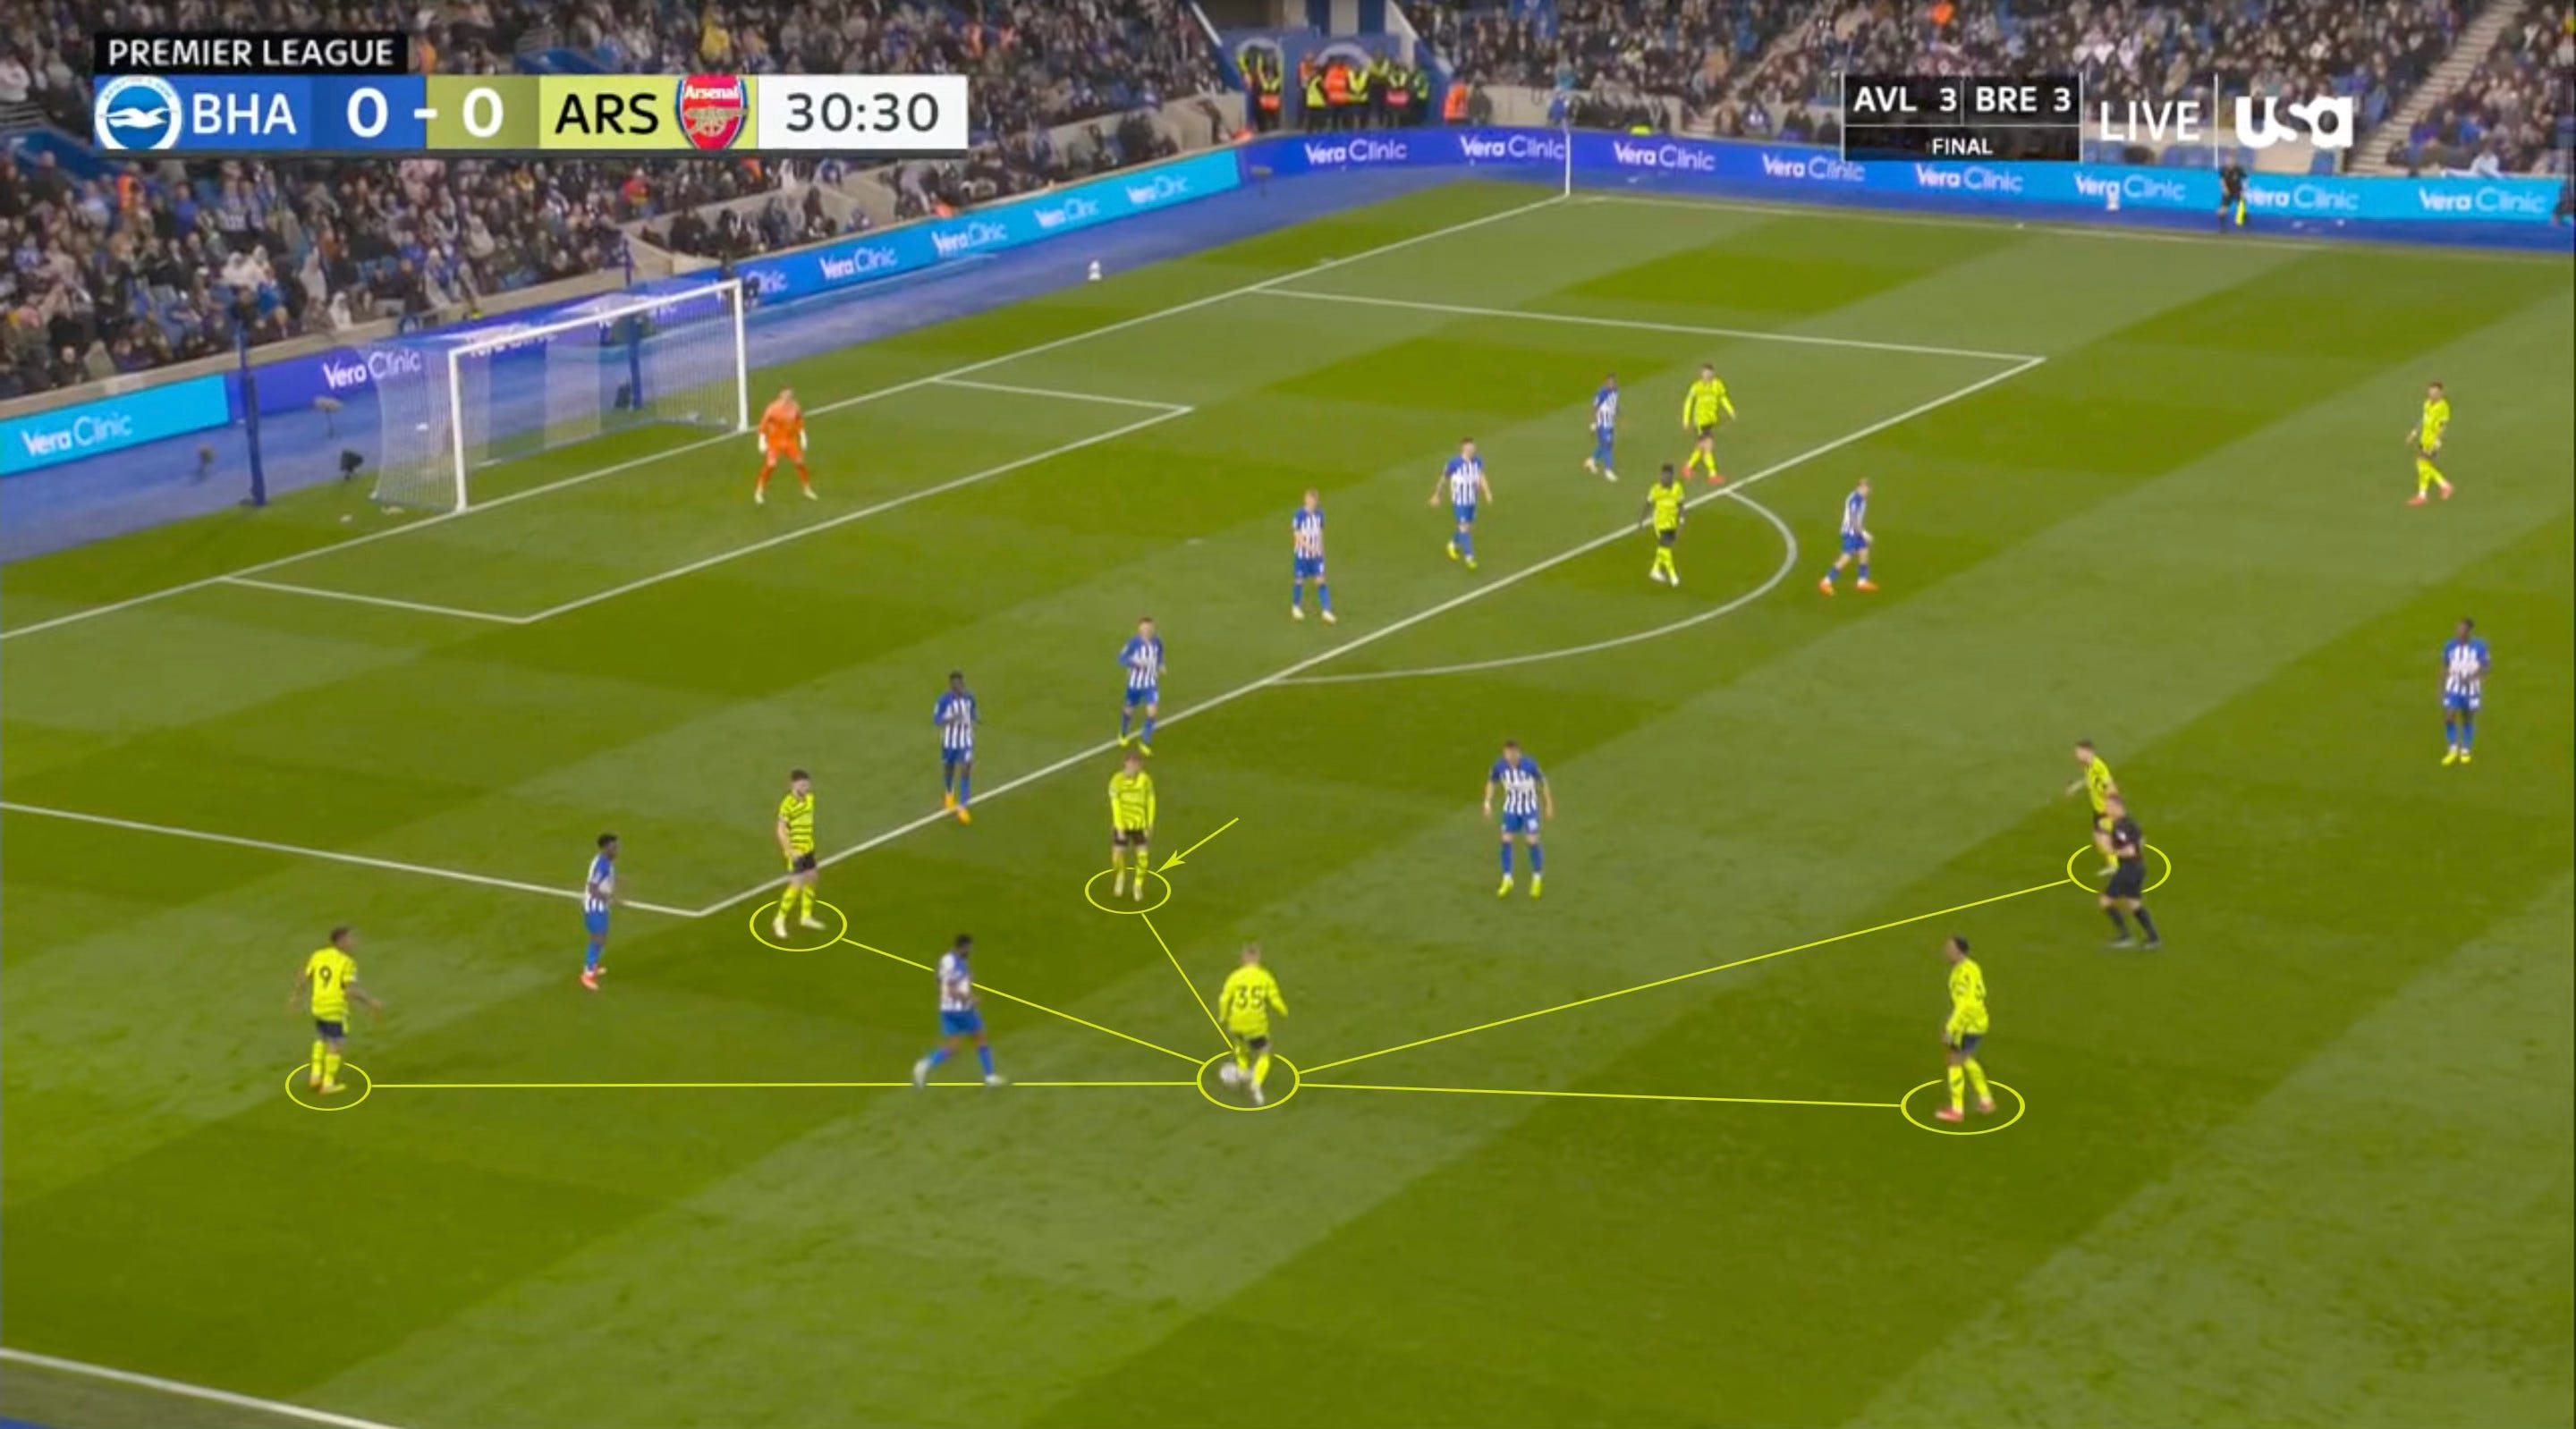
2nd example
In this scenario, the exploitation of the spare man is more about gaining territorial control than directly creating a chance from it.
The usual suspects out on the right are now an established triangle and, in another case of exploiting Brighton during a small moment of transition, Jorginho becomes the bright spot. Not only does he, again, drop deep but also assesses the options and urges the pass so he can exploit the lane into Ødegaard.
The move draws Enciso out, who thinks he’s covering effectively against White with a curved run to expand his cover shadow, but the nature of the man-marking means Groß is only reacting to Ødegaard’s quick drop to the ball. So, the inside pocket of space that Enciso leaves exposed is enough to allow the #8 to connect play into White, who’s already goal-facing.
Whilst it might not seem like it’s done much, it’s disorganised Brighton, so they can’t press out. Suddenly Welbeck and Moder, the front two, are the ones following back in against the #8s.
Whilst the double pivot controlling their zone is useful, their forcibly passive roles help enable what happens next.
As ever, there’s patience and detail to Arsenal’s exploitation. More application of the simple things like White’s increasingly closed body stance is used to draw Enciso in, and he can afford to do it because he knows Saka will time his movement inwards so that he can drop in one step ahead of his marker to link to the new spare man, Jorginho, through the gap. Jorginho, by moving up with the play earlier and delaying his drop back, cleverly eliminated himself as an option to cover against in Enciso’s mind.
The big reward is time on the ball to exploit a high line. A cardinal sin of any pressing outfit, but one that Arsenal forced.

It’s also worth highlighting Havertz’s relentless movements up and down and up and down, keeping Dunk guessing and unsettled at all times, before eventually peeling further inside to make the decisive run.
For good measure, as the transition attack plays out, the front 5 form the standard ‘W’ shape as Rice and Saka underlap into the vacant lanes.
Then, once Rice’s run comes up short, Jesus reacts and interchanges by darting off the blind side of his man to exploit the back post space.

Bit by bit
Though this wasn’t the answer to all of Arsenal’s problems against the press, it was a domino that needed to fall. A big question asked and answered that then gave them a more stable platform from which to pick away further.
After this, Enciso became wise to White’s presence and started to drop back in the same way Adingra had been doing. This only isolated the front two, though, and made pressuring Arsenal’s 1st line extremely difficult.
With Enciso back, who becomes the spare man? Well, why not Ødegaard. With control higher up, Havertz’s vertical double movements were surplus to requirements, so he started to offer as the 4th man out on the right.
This meant Ødegaard could occupy the free space between Brighton’s 1st and 2nd lines without the same pressure from Groß due to Havertz’s positioning. When play recurred through that side, Havertz made even more of an effort to drop through that channel so to occupy the midfielder and allow Ødegaard free reign of the space in front.
Other tweaks to the shape saw Rice and Zinchenko take turns dropping in and out of the 1st line in the way Jorginho had previously. This way, they could maintain a now clear-cut numerical advantage in the 1st phase while enabling Jorginho to be at the centre of play alongside Ødegaard in the 2nd line, which, as proven by the clip, allowed for good control and distribution from that zone.
On the other flip side of this, it leaves the players who are better and more mobile defenders (particularly Rice) in positions more dedicated to rest defence.
All in
The ultimate goal here, beyond simply winning the match, is to be in complete control of proceedings. So, patience is necessary to pull at every string in order to rinse the most out of every situation. Eventually, you then work from buildup in your own third to buildup in your opposition’s third, which is how the opening goal came about.
After several more passes around the back that put excruciating focus on maximising the pressure in order to consistently find holes via the spare man, Arsenal then reap the rewards by getting to work the ball from back to front to then, finally, establish full control in Brighton’s own third. And, as soon as they did, it was only bad news for the hosts.
In these situations, there is no rush. It is all about suffocating the opposition to the nth degree. Shorter distances mean better compactness, which is great offensively and defensively. Offensively, it means the movements required to interchange and create space or separations are smaller – you’re not asking a player to sprint 30 yard straights every other minute; you’re asking them to make quick shifts across a small space in the direction of where the next vacant space is/will be.
The structure provided, with triangles staggered on either wing, and two supporting central figures – the CF, occupied by Ødegaard in this picture, who can roam and create overloads on the ball side, as well as the #6, occupied by Jorginho, who’s out of picture – make ball circulation so difficult to contend with.
To a certain extent, it doesn’t even matter whether the players on the ball are the best technically, because the fluidity of the movement and understanding between the players is what allows margin for error in their cases. The opposition are playing second fiddle to those interchanges that create constant separations.
Such is the intent on establishing control that Jesus was never likely to deliver that ball first time around. The purpose of the team-wide movement and positioning was to force Brighton’s shape to sink deep into a pit. Welbeck is the only Brighton player below (out of picture) who is not crammed into their own third.

And, whilst maintaining a compact block like they are has many benefits for a defensive outfit, it’s here where Arsenal have become so ruthless in their deconstruction of deep blocks this calendar year.
At this point, it becomes death by a thousand passes. Without much needing to be done, the command of space and the structure alone – with just a little bit of added aid from the roaming #9 – creates a flood of options that are so hard to take the ball away from. And, if play was shifted across, it only takes a small piece of lateral movement from the #9 to replicate this on the other side.
With the CBs pushing so high to the near side, they themselves can also become the ‘4th man’ in circulation but are also so key to providing a short out-ball that is so tricky for opponents to account for without sacrificing space somewhere else closer to goal. Not to mention the upsides of having a defender so ready to latch onto the nearest attacking receiver post-turnover.
Even if a team manages to win the ball back in these situations, they are still faced with a flood of counterpressers. Oftentimes, that outcome even works further in Arsenal’s favour because they can then attack against a now-disorganised block still within the opposition’s third.
Billy Carpenter put together an excellent thread on this that I’d recommend reading.
It should go without saying that tapping the ball around in front of the defence isn’t going to magic itself into golden opportunities, but, as we’ve seen countless times in these examples, Arsenal are great at problem-solving and the pull-and-release. Enticing opponents to help open space elsewhere, even in multiple areas.
Watch what effect Zinchenko’s and Gabriel’s continued pausing and centring over the ball does to the Brighton strikers. They know that if they don’t cover the options in front, they will be exposed, so they’re constantly held at arm’s length. The Arsenal players could even catch them being lazy if they wanted to, but the game of cat-and-mouse is higher-percentage, and that’s what allows for greater control.
To go with that point of pull-and-release, which we see in those sorts of actions that force a reaction out of opponents for the benefit of teammates, it’s also there on a broader scale to help create isolated situations.
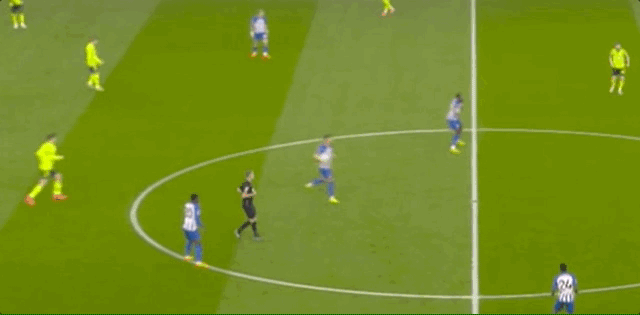
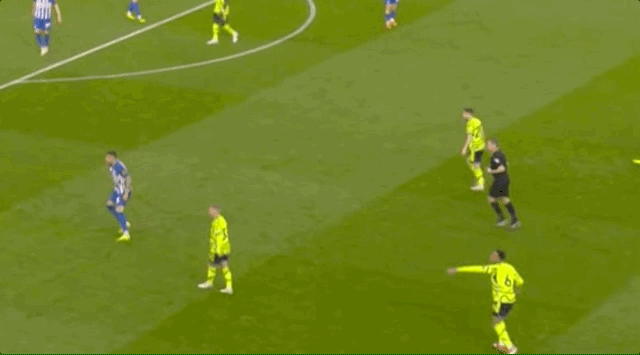
See, here, how intentional the play is to draw Brighton back out. It isn’t always of maximum benefit to keep play congested within the opposition’s third – opening space can help take advantage of the individual superiorities you have at your disposal, like Jesus’ dribbling ability.

As shown in the gif, also, there’s deliberate patience to both the release and the pass selection. It’s about testing the waters and doing so in ways that dictates how the opposition functions. Even the way Gabriel’s holding his foot on top of the ball highlights that it’s Arsenal who allowed Brighton out, not the other way around.
Now that the hosts have been pried out but still at arm’s length, it’s easy for even Gabriel, who’s not necessarily the most capable distributor, to access the desired attacker directly in space because of the time and margin for error he’s afforded.
Another element to this, like in previous wide moves, are the surrounding counter movements. Both Rice and Zinchenko, like the rest of the players positioned on the inside of the Brighton block, also move to the ball, both to ensure on-ball security as well as to pin the space into the target.
Of course, there are then a multitude of options ready to pounce in the box, particularly from the pre-set far side. That alone is a huge positive of how the team’s evolved this season because cutbacks from Martinelli’s side into Ødegaard had become a staple that teams had come to well and truly stifle against the old system that relied heavily upon Jesus and Zinchenko to create those isolated events down the left.
Thanks to the current setup, however, it’s renewed the side’s ability to find attackers, namely Ødegaard for his trademark low finish.
On the whole
Overall, it was a very tricky test that Arsenal made relatively light work of, and that’s a testament to the level this side is performing at. The team is just so flexible, in and out of possession, and the ability to problem-solve with such security is something most league opposition naturally struggles to combat.
As I tweeted post-match, what this current system is doing to put my old fears to bed is creating an environment in which we’re not overly reliant upon a minute number of individuals. If Jesus and Zinchenko feel the pressure down the home stretch again, I would strongly back this iteration of the team to pull through, even with players who are inferior on a technical level. It’s almost a baffling thought given how the holes their absences created in the 1st half of the season were like craters when it came to its impact on our performance levels in attack.
This is not to say that every match should be a stroll, but it is to say that this team is in a far better position to handle the pressure in matches that they couldn’t last year, most notably against opposition that Arsenal should have beaten during the run-in.
~
Thanks for reading, hope you enjoyed. You can find me here.