
Dealing With Dings
Dealing With Dings
by Paul "Capt'n Pauley" Esterle
[Archives]
Given the current state of the economy, I’d hazard a guess that most of us are sailing used boats and further that the majority of those boats are built of fiberglass. That doesn’t mean we don’t love our boats and want them to be strong and look as good as possible. Older fiberglass boats can suffer from a number of cosmetic defects that detract from their appearance and sometimes may cause structural damage.
However it is also true that most of us can effect the necessary repairs ourselves, with materials readily at hand at most marine stores. These repairs can be made as a regular part of boat maintenance or in preparation for repainting. That shiny fiberglass exterior eventually chalks and fades and often the only way to get back that original look is a new coat of paint.
The Basics
Before we delve into any repair processes, we need to understand how these boats are built and the underlying problems we are trying to fix. In some cases, they are strictly cosmetic while in other cases there might be a structural issue causing the problem.
Most modern fiberglass boats are built in a female mold. These molds are extremely well finished; the surface of the molded boat can only be as good as the mold surface. That surface is then waxed multiple times to act as a mold release for the hull; to make it possible to remove it from the mold.


Once the mold is waxed, a thin layer of gelcoat is applied. This layer is specifically formulated to provide the color and shine to the finished hull. It is also designed to cure tacky (slightly sticky). A thin layer of fiberglass mat is either sprayed on via a chopper gun, or hand-laid with sheets of mat. The mat consists of short strands of fiberglass pressed together with a binder, much like felt.
The following layers of fiberglass are what provide the strength and rigidity to the hull and can be combinations of cloth and/or roving. The reason for the layer of mat is to keep the weave of these layers from “printing through” on the finished hull. In other words, without the mat, you could see the weave of the cloth or roving in the finished hull.
In some cases, a core material is then applied to the hull and covered with further layers of fiberglass to form a cored component.
The Defects
In a perfect world, fiberglass hulls and decks would look good and last forever. Well, they do last a long time but don’t necessarily look good. An “experienced” boat can suffer from chips, gouges, dings and scratches.
Chips
Ideally, the gel coat should be around 20 mils thick. Since gelcoat has no reinforcement in it and is somewhat brittle, too thick a layer can chip or craze. This is particularly possible on an outside corner, say, the edge of a cockpit seat. When the gelcoat is applied to the mold, this area is an inside corner and the gel coat can bridge the corner, then be likely to chip when struck.
Gouges
Hitting the dock or the trailer can scrape off the gelcoat and, in extreme cases, some of the underlying fiberglass reinforcement.
Impact Cracks
Dropping a heavy item on the deck, a winch handle for example, can cause the gel coat to crack, often in a circular pattern. An extremely heavy contact, from hitting a piling for example, can actually fracture the underlying fiberglass and require more extensive structural repairs.
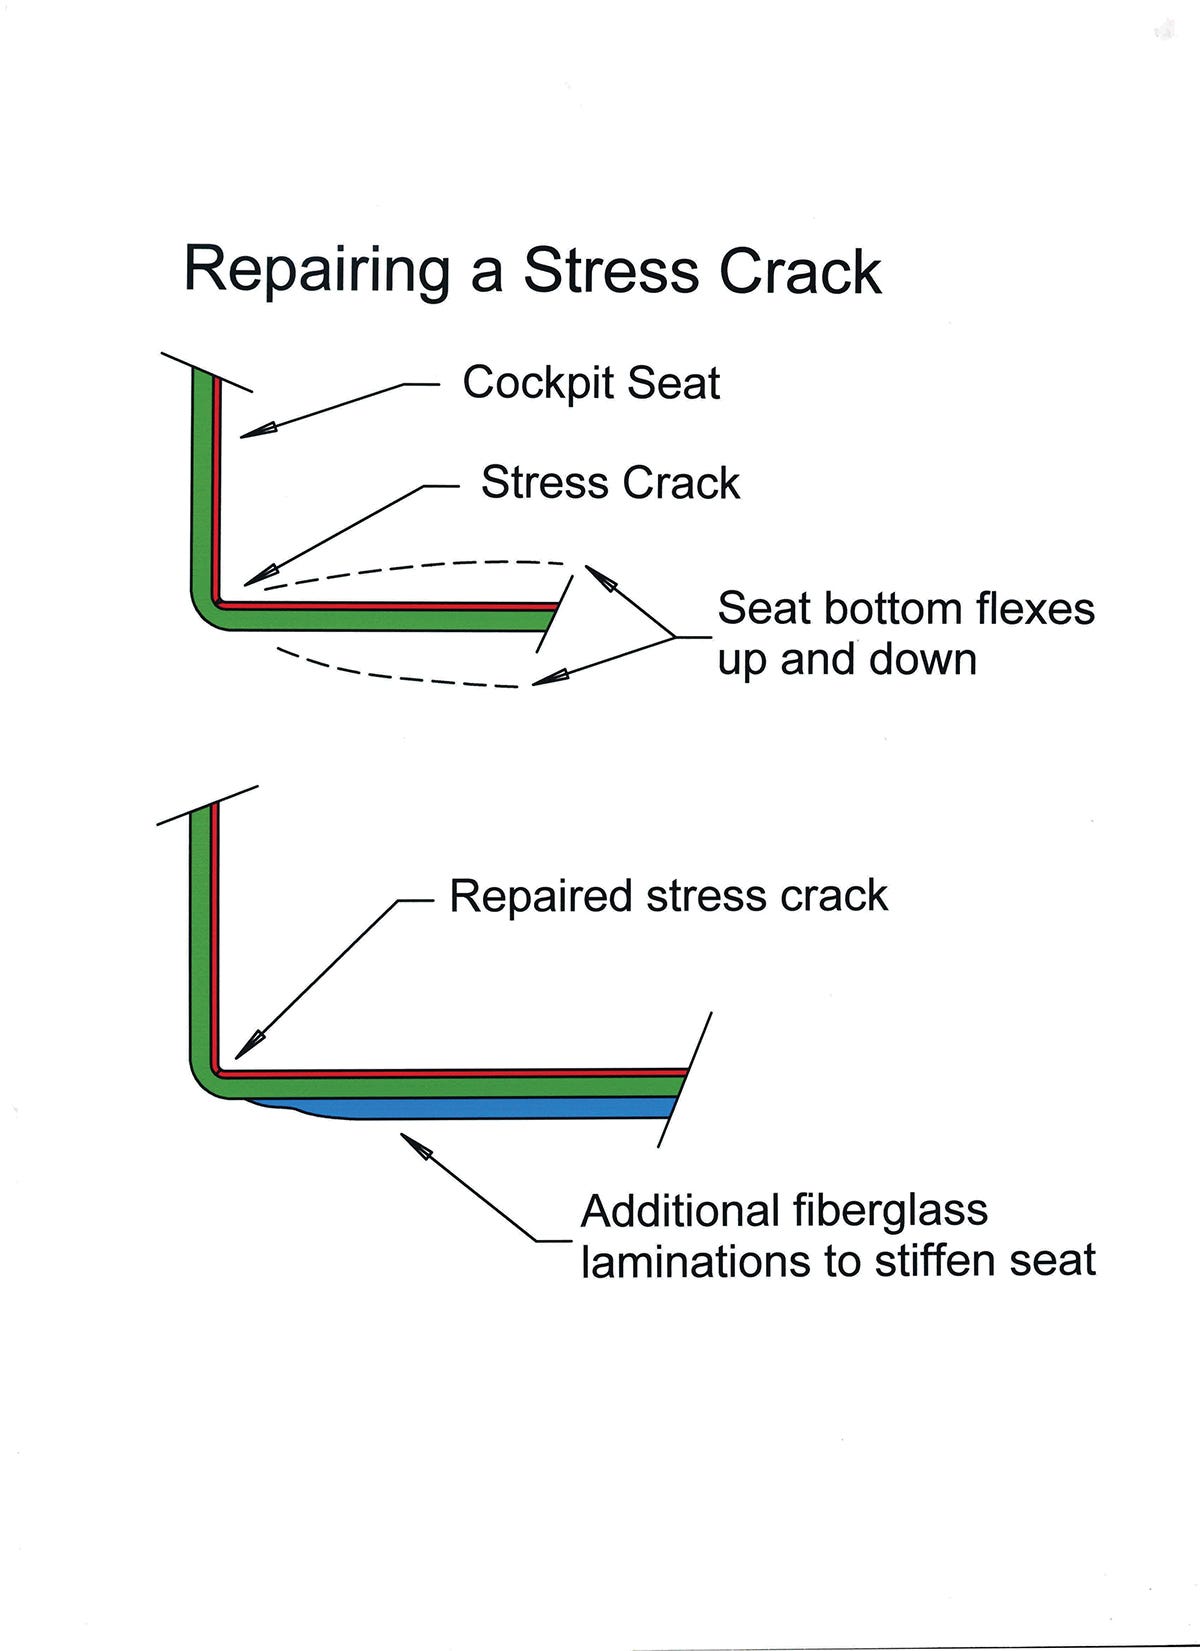
Stress Cracks
Other cracks are caused by the underlying structure flexing. While you can patch this type of crack, unless you reinforce the area that is flexing, the crack will most likely reappear.
Crazing
Very old fiberglass hulls and decks with too thick a gelcoat layer can form a network of cracks looking something like the bottom of a dried out lakebed.
Preparation
Remember the part about the multiple waxing of the mold? Well, that wax can hang around in the pores of the fiberglass for years. In addition, you may have also waxed the hull to help protect it. In any case, all wax needs to be removed before doing anything, even sanding. (The heat from sanding just drives the wax farther into the pores.) Most marine paint companies make a specific product for de-waxing.
Wash the hull or deck with soap and water to get the dirt and grease off. Then use clean rags and a fiberglass de-waxer to get the wax out. Follow the directions on the de-waxer for best results.
(NOTE: Pulling out soapbox and climbing on it. I recommend choosing one paint company and using ALL their products, from epoxies to thinners to paint. I have had nothing but bad results when I mixed products from different companies. The thinner may cost more to start but having a paint job go bad is even more expensive. Climbing down off soapbox and putting it away.)
Materials
Cracks and superficial gouges can be filled with gel coat paste. Make sure what you are buying is actual gelcoat; those small tubes of “gelcoat repair” are actually 3M 5200 with pigment, not gelcoat. The gelcoat comes in two flavors, with wax and without wax. The gelcoat with wax will cure to a hard surface and is good if you are only applying one coat. The gelcoat without wax can be over-coated with more gelcoat but must be sealed off from the air to cure hard. That sealing can be plastic film or Poly Vinyl Alcohol (PVA) mold release sprayed on the surface.
Most gelcoat paste comes in pint, quart, or gallon cans and is a neutral color. You can buy small tubes of colorant to add to the gelcoat to match your existing hull. I would suggest the use of an artist’s color wheel to match the color. Also be aware that the gelcoat starts fading as soon as it cures and after a while won’t match the older, already faded gelcoat. Just a FYI.
If structural damage or gouges extend into the fiberglass laminate, you will also need fiberglass cloth, mat roving, or a combination to fill the gouge. You will also need it to strengthen any part of the structure that is stress cracked. Always use epoxy resin for these repairs; it provides a far stronger bond with the molded fiberglass than polyester resin does. In some instances, you can also use epoxy filler for repairs.
You will also need sandpaper, rubbing compound and 3M Finesse It II, as well as the usual tape, mixing items, and latex gloves for hand protection.
Techniques
We’ve already discussed the first step—de-waxing the hull. From there, it depends on your plans. If you are going to paint the boat, you can use epoxy filler to patch the problem areas. If you want to maintain the gelcoat, you’ll need to use a different process.
In either case, structural problems need to be addressed first. Repair any structural damage with cloth or roving and epoxy resin. If you have an area that is flexing and cracking the gelcoat, build up the back side of the area with additional layers of fiberglass cloth and resin. Be sure to remove any paint and rough up the area being strengthened.
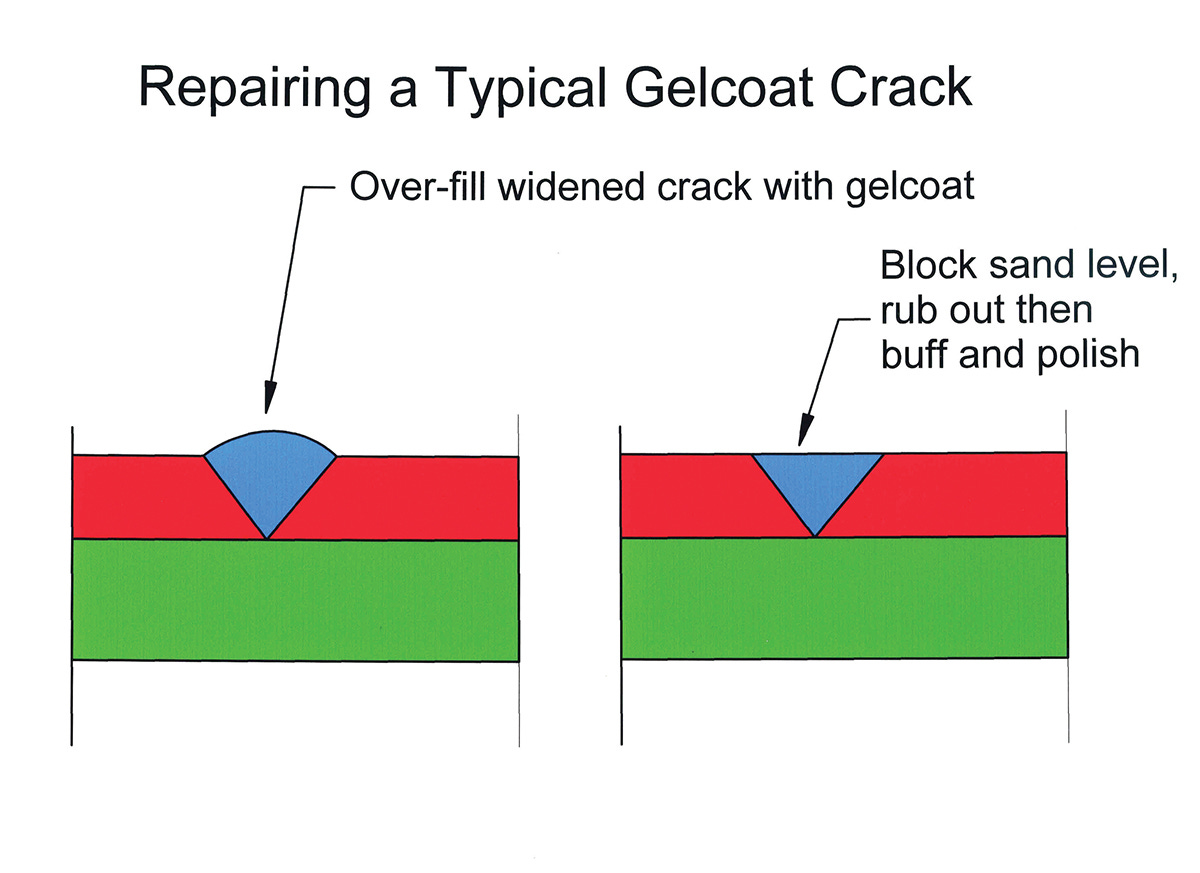
It is difficult to get either epoxy filler or gelcoat into narrow cracks. Widen these out to a shallow Vee with the sharpened end of a churchkey or a triangular cabinet scraper.
If you plan on painting the repaired area, fill the damaged area with epoxy filler and block sand smooth. Once all the defects are filled, you can move on to the painting.
Cosmetic repairs to gelcoat are a little more complicated. Start by doing any required structural filling with epoxy and fiberglass. Conventional wisdom states that you can apply epoxy over polyester but you can’t apply polyester (gelcoat) over epoxy. Gougeon Bothers (WEST SYSTEM epoxy) did a study and found you can get excellent adhesion of polyester over epoxy if these steps are followed:
• Mix the epoxy and hardeners extremely accurately. The object is to not have excess hardener or resin present in the finished mix.
• Allow the epoxy to completely cure for several weeks.
• Wash the cured epoxy with soap and water and rough up with 80-grit sandpaper.
Before applying the gelcoat, tape off the area around to patch to keep the messy gelcoat contained. Slightly overfill the patched area (the gelcoat shrinks slightly when hardened). Carefully block sand the gelcoat level with the rest of the area around it. Use progressively finer grits until you get to 600. Use the rubbing compound to get rid of the scratches from the 600 grit sandpaper. That will leave a mat finish. Buff the patch with 3M Finesse It II polishing compound. This should bring back the shine to the repaired areas.
Remember that the original gelcoat is only about 20 mils thick, so be very careful in sanding around the patch.
Extensive crazing is a difficult case, as there are too many cracks to fill individually. I ended up sanding most of the gelcoat off Ternabout prior to painting her.
Soon your boat will be looking as good as new. Unless you are going to paint it, but that’s another article! •SCA•
Thanks for this helpful article. NOTE: A DA (dual action) sander works great for feathering out cracks for larger repairs, perhaps a half-dollar size or larger.