

Subscription management in Knack using Stripe
Subscription management in Knack using Stripe
Manage subscriptions to your Knack app using Stripe and Make, without any code.

Introduction
Using Knack as your database tool, you may have use cases where you’d like to:
Restrict users from seeing data on pages unless they have a subscription
Allow a user to subscribe/manage their subscription
Allow a user to update their billing details
Most of this would not be possible with Knack alone, and would require integrating with a separate payment service app.
In this tutorial, we will use a combination of Knack, Stripe, and Make to create a simple no-code subscription service that enables a user to view elements on a Knack app once they have subscribed.
Table of contents
Prerequisites
Adding a new subscription product in Stripe
Setting up a payment link to your product in Stripe
Activating the customer portal in Stripe
Limit customers to one subscription in Stripe
Setting up a subscriber user role in Knack
Adding new fields to the Accounts table in Knack
Setting up a page paywall in Knack
Setting up a subscription management section in Knack
Adding a subscription confirmation page in Knack
Creating a ‘new subscription is added’ scenario in Make
Creating a ‘subscription is cancelled’ scenario in Make
Conclusion
Prerequisites
A Knack builder subscription
A Stripe workspace
A Make subscription
Adding a new subscription product in Stripe
The first step in this process is ensuring you have a subscription-based product set up in Stripe. I recommend beginning in Stripe’s Test mode while building this workflow, and once you’re content, you can move the product and any other settings to Live mode.
In Stripe, navigate to the Product catalog page and click Add product.
Enter the product details, including Name and Product tax code.

Enter the price information, including Pricing model, Price.
Click Recurring to make this product price subscription compatible, and choose the appropriate Billing period.
Once you have finished setting up your product, click Save product.


Setting up a payment link to your product in Stripe
The next step is to set up a unique link to your product so that this can be added into Knack for new subscribers to use.
Navigate to your new product within Stripe.
In the Pricing section, you will see the subscription pricing you originally set up.
Find and click on the Create payment link button.

In the Payment page section, select any of the options, such as Collect customer's’ address, and anything else that is relevant for you.

Leave all the settings as is in the After payment section. We will adjust this later to redirect to a Subscription confirmation page in your Knack app.

Once you have finished setting up your payment link, click the Create link button at the top-right of the page.
On this new payment link page, click on the Copy button to grab the new link, and note it down somewhere to reference later.


Activating the customer portal in Stripe
We will now need to activate the Stripe-hosted customer portal so that user can manage their subscription and billing details after they have subscribed. This method allows users to view their details using a one-time code login via their email.
In Stripe, navigate to the Settings page.
In the Billing section, click on the Customer portal link.
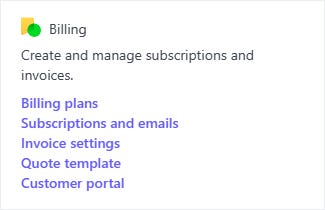
In the Launch customer portal with a link, click the Activate link button to generate a link.

Copy this new link and note it down somewhere to reference later.

Update any other relevant settings on the customer portal page, and click Save changes.


Limit customers to one subscription in Stripe
We will now prevent customers from being able to have more than one subscription at one time. This means that if a customer accidentally found their way to the payment link again and entered the same email address, they would be blocked from continuing.
In Stripe, navigate to the Settings page.
In the Payments section, click on the Checkout and Payment Links link.
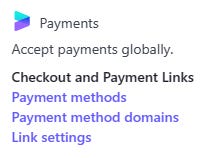
In the Subscriptions section, toggle on the Limit customers to 1 subscription.
You can keep the Direct customers to manage their subscription on option set to Customer portal.

Once this is done, you can exit the page.


Setting up a subscriber user role in Knack
We will now set up a subscriber user role in your Knack app. When assigned to a user, this will govern what pages they will have access to, and other page rules we may set up.
In your Knack app in the User Roles section, create a new role named Subscriber.

Nothing more is required here, we will only maintain this user role but not store any additional fields of data within the table.

Adding new fields to the Accounts table in Knack
There are a few new fields we will add in the parent Accounts table to support the integration with Stripe. Note that it best practice to maintain any user-relevant fields in the parent table to prevent loss of data when switching user roles.
In Knack, navigate to the parent Accounts table

Add a new Auto Increment field titled Account ID. This will be used as the unique identifier to map the user to a Stripe customer initially.

Add a new Yes/No field titled Has subscription, which defaults to No. This will be used to indicate if the user has an active subscription in Stripe or not. The value of this field will be controlled from an automation using Make.

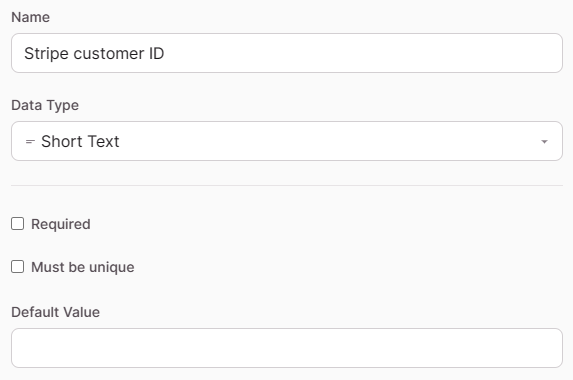
Add a new Short Text field titled Stripe customer ID. This will be populated when a new subscription is created initially, and will also be used to lookup the user in Knack when a subscription is cancelled in Stripe.
Add a new Text Formula field titled Subscription pay link, with the below code inserted into the Equation Editor, replacing
[INSERT STRIPE PAY LINK ID]with the Stripe payment link ID you generated in the payment link section.This will prefill the user’s email and account ID in the Stripe payment page when they click the link.
<a class="kn-button is-primary" href="https://buy.stripe.com/[INSERT STRIPE PAY LINK ID]?prefilled_email={Email}&client_reference_id={Account ID}">Subscribe</a>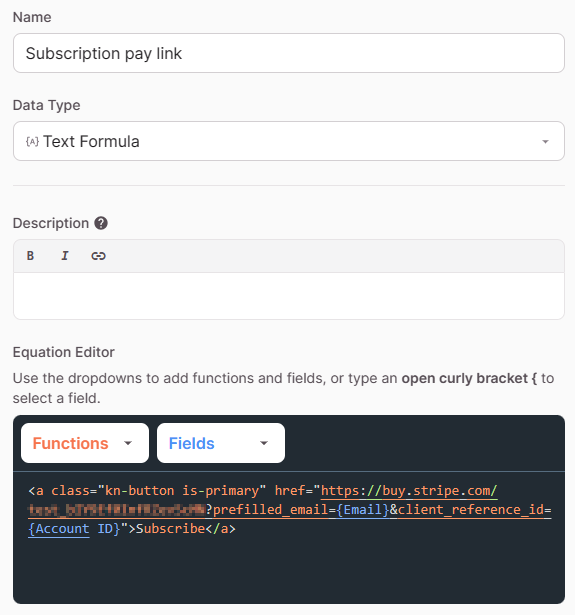
Add a new Text Formula field titled Subscription portal link, with the below code inserted into the Equation Editor, replacing
[INSERT STRIPE PORTAL ID]with the Stripe customer portal link ID you generated in the customer portal section.This will prefill the user’s email in the Stripe payment page when they click the link.
<a class="kn-button is-primary" href="https://billing.stripe.com/p/login/[INSERT STRIPE PORTAL ID]?prefilled_email={Email}">Manage subscription</a>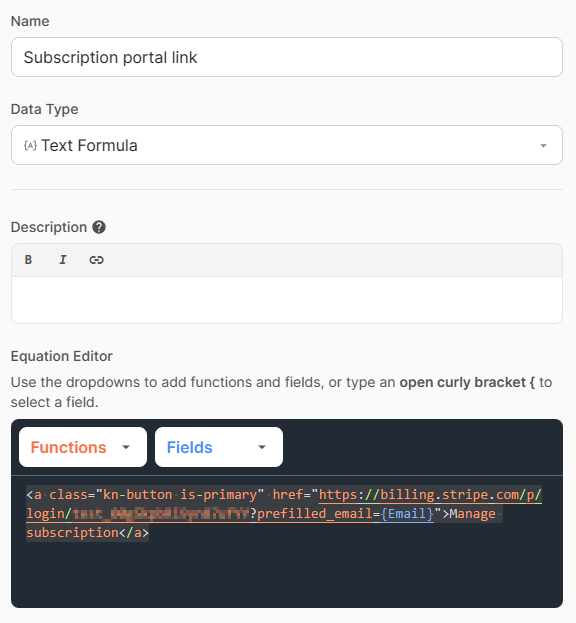


Setting up a page paywall in Knack
For any page on your Knack app that you want to hide the contents of to non-subscribed users, you will need to add a set of page rules, and give the user a method of subscribing easily.
Navigate to the page in your Knack app that you want to block. In this example, it is a page called Database.

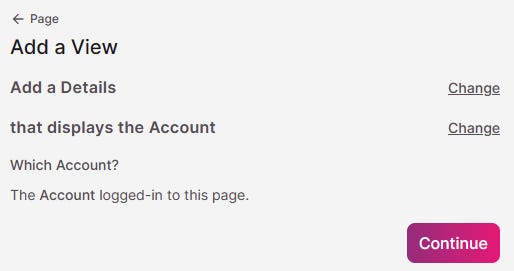
Add a new Details view at the top of this page that displays the Account logged in to this page.

Format this Details view’s title and description to instruct the user on how to Subscribe, and remove all fields except for the Subscription pay link field you created earlier, without the field label.
The view should look something like below:

Click on the Rules button at the top of the page.


Create two page rules:
The first will hide all views if the account’s Has subscription field is No.
The second will hide the Account Details view if the account’s Has subscription field is Yes.
Once this is done, click Save.


Setting up a subscription management section in Knack
Users will also need a method of managing their subscription once they have set it up. In this example, we will set this section up in the default Account Settings user page in the app, but you are free to set it up on any page in your app that seems most suitable.
Navigate to the Account Settings user page in your Knack app.

Add a new Details view at the top of this page that displays the Account logged in to this page.
Format this Details view’s title and description to instruct the user on how to subscribe/manage their subscription, and remove all fields except for the Subscription pay link and Subscription portal link fields you created earlier, without the field labels.

Click on the view, and click on the Rules link in the left pane.

Create two display rules:
The first will show the Subscription pay link field if the account’s Has subscription field is No.
The second will show the Subscription portal link field if the account’s Has subscription field is Yes.
Once this is done, click Save.


Adding a subscription confirmation page in Knack
The final element to add in Knack is a subscription confirmation page which the user will be redirected to when they complete a payment session in the Stripe pay link. This is an intermediary page that will give the Make automation some time to automatically set the Has subscription field to Yes before a user then navigates to any pages they should have access to.
Create a new login page in your Knack app titled Subscription confirmation. Ensure that Subscriber user roles can access this page.

Add a new Form view on this page that updates the Account logged in to this page.

Format this Form view’s title and description to inform the user that they have successfully subscribed, remove all fields in the form, and change the Submit button text to Continue to database, or whatever is relevant to you.

In Rules > Submit Rules, change the default submit rule to Redirect to an existing page, and select a relevant page to redirect the user to.

In the Subscription confirmation login page, untick Include this page in the Page menu, so that it remains hidden.


In the Live App, get the page URL for this new page and copy it.
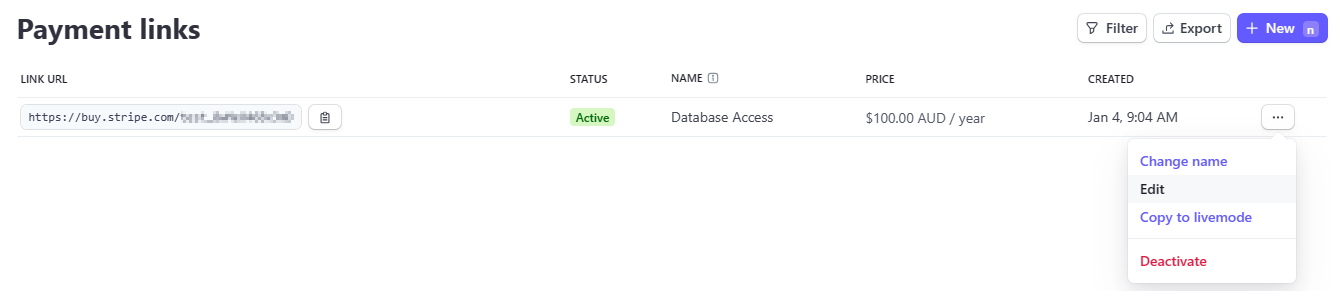
In Stripe, navigate to the Payment links page, and edit your existing payment link.

In the After payment tab, select Don’t show confirmation page, and paste the URL for your subscription confirmation page.
Once this is done, click Update link.
This means that the user will be redirected to this page once they have paid for their subscription in the Stripe payment link.


Creating a ‘new subscription is added’ scenario in Make
Now that both Stripe and Knack have been configured, the last thing to do is to integrate the two. In Make, we will create two new scenarios, the first to listen for new Stripe checkout sessions being completed (i.e. a subscription being created), and the second to listen for subscriptions being cancelled.
Let’s create the first one now.
In Make, create a new scenario called New subscription is added.
For the trigger module, choose Stripe’s Watch Events trigger.

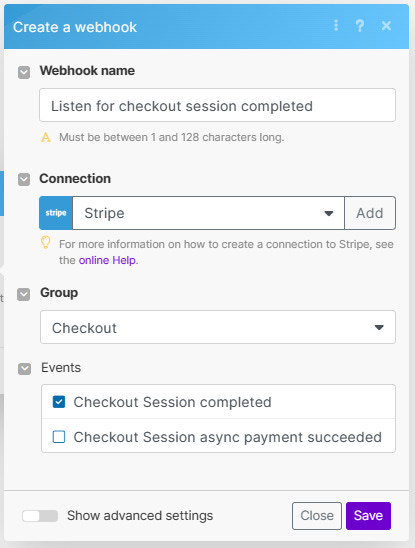
Click the Create a webhook button.
Input a webhook name, add your connection to Stripe (you will need your secret API key in Stripe for this), choose Checkout for the Group, and Checkout Session completed for the Event.
Once this is done, click Save.
This will create a webhook in your Stripe instance, and in Make.

Ideally you will need to run this module and generate a test payment to collect some sample data for the next part so that you can reference the client reference ID stored in the object.
Add a new follow-on module, and choose Knack’s Search for Records action.

Add your connection to your Knack app, choose Accounts for the Object, add a filter where Account ID Is {{1.object.client_reference_id}}, assuming that your trigger module has a module ID of 1.
In our Subscription pay link field in Knack, we reference this:
prefilled_client_reference_id={Account ID}This adds the Account ID to the Stripe checkout session so that we can then match this checkout session to the correct Account in this step.

Finally, add one last follow-on module, and choose Knack’s Update a Record action.


Add your connection to your Knack app, choose Accounts for the Object, add the Record ID from the previous module, set the Has subscription field to Yes, and set the Stripe customer ID field to {{1.object.customer}}, assuming that your trigger module has a module ID of 1.
This will update the Account record to indicate that there is an active subscription, and will add the Stripe customer number for use in our other Make scenario.
Your scenario should now look like the below. Make sure you test this scenario to make sure it successfully listens for a checkout session being completed, and finds and updates the Account record in Knack.
Once you have successfully tested, turn on the scenario.


Creating a ‘subscription is cancelled’ scenario in Make
Finally, we will create the second scenario to listen for when a Stripe subscription is cancelled. A Stripe subscription is cancelled when a customer cancels their subscription and the end of their billing cycle is reached, all payment attempts for a subscription fail, or a Stripe administrator manually cancels a subscription.
In Make, create a new scenario called Subscription is cancelled.
For the trigger module, choose Stripe’s Watch Events trigger.
Click the Create a webhook button. This will create a webhook in your Stripe instance, and in Make.
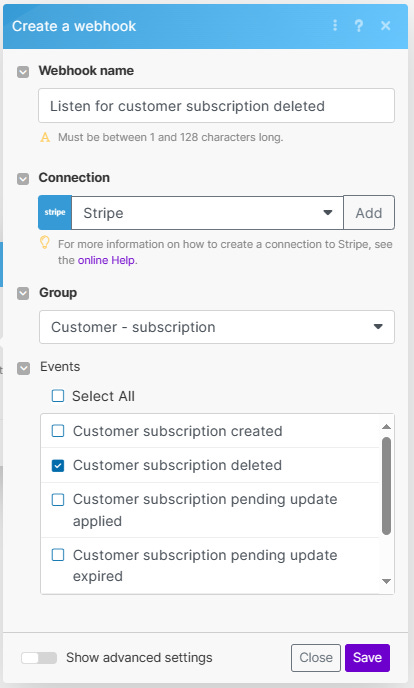
Input a webhook name, add your connection to Stripe (you will need your secret API key in Stripe for this), choose Customer - subscription for the Group, and Customer subscription deleted for the Event.
Once this is done, click Save.
This will create a webhook in your Stripe instance, and in Make.
Ideally you will need to run this module and generate a test subscription cancellation to collect some sample data for the next part so that you can reference the customer ID stored in the object.
Add a new follow-on module, and choose Knack’s Search for Records action.


Add your connection to your Knack app, choose Accounts for the Object, add a filter where Account ID Is {{1.object.customer}}, assuming that your trigger module has a module ID of 1.

Finally, add one last follow-on module, and choose Knack’s Update a Record action.
Add your connection to your Knack app, choose Accounts for the Object, add the Record ID from the previous module to the Record ID field, and set the Has subscription field to No.
This will update the Account record to indicate that there is no active subscription.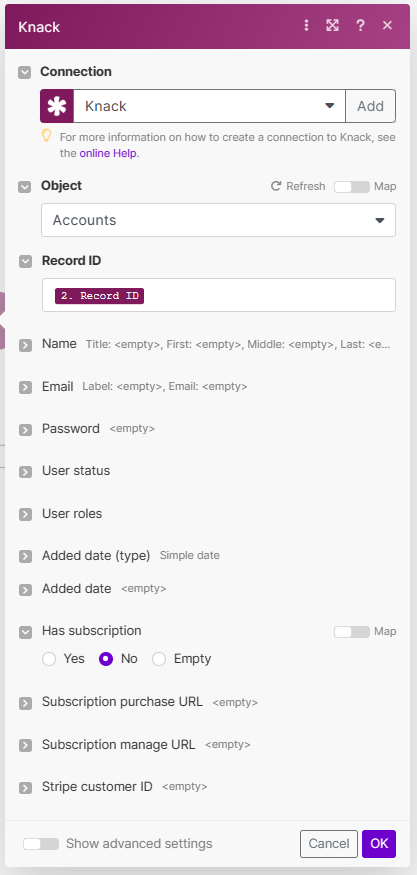
Your scenario should now look like the below. Make sure you test this scenario to make sure it successfully listens for a customer subscription being deleted, and finds and updates the Account record in Knack.
Once you have successfully tested, turn on the scenario.


Conclusion
With all of the above set up, your workflows should now look something like this:
Create a new subscription:
User logs in to Knack app.
User clicks the Subscribe button, which redirects them to the Stripe payment link, with a prefilled email address and Knack account ID stored for reference.
User fills in billing details and confirms.
Make scenario #1 runs to listen for the checkout session being completed, and automatically sets the account in Knack to has subscription, and the Stripe customer ID stored for reference.
User is now able to access the Knack app page content.
Cancel a subscription:
Subscription is cancelled for some particular reason
Make scenario #2 runs to listen for a subscription being deleted, and automatically sets the Account in Knack to does not have subscription.
User is no longer able to access the Knack app page content.
This is the simplest form of subscription management within Knack, but builds the foundation for any further requirements you may have.