Jota: Restricted or Refined on the Right?
Jota: Restricted or Refined on the Right?
Another two games for Celtic, another two wins... and another two starts on the right wing for Jota.

Please Note: This post may be too long for Gmail users. If the post is cut short due to your email provider, the rest can be viewed at stephenrussell.substack.com. Alternatively, use the Substack app here:

Contents
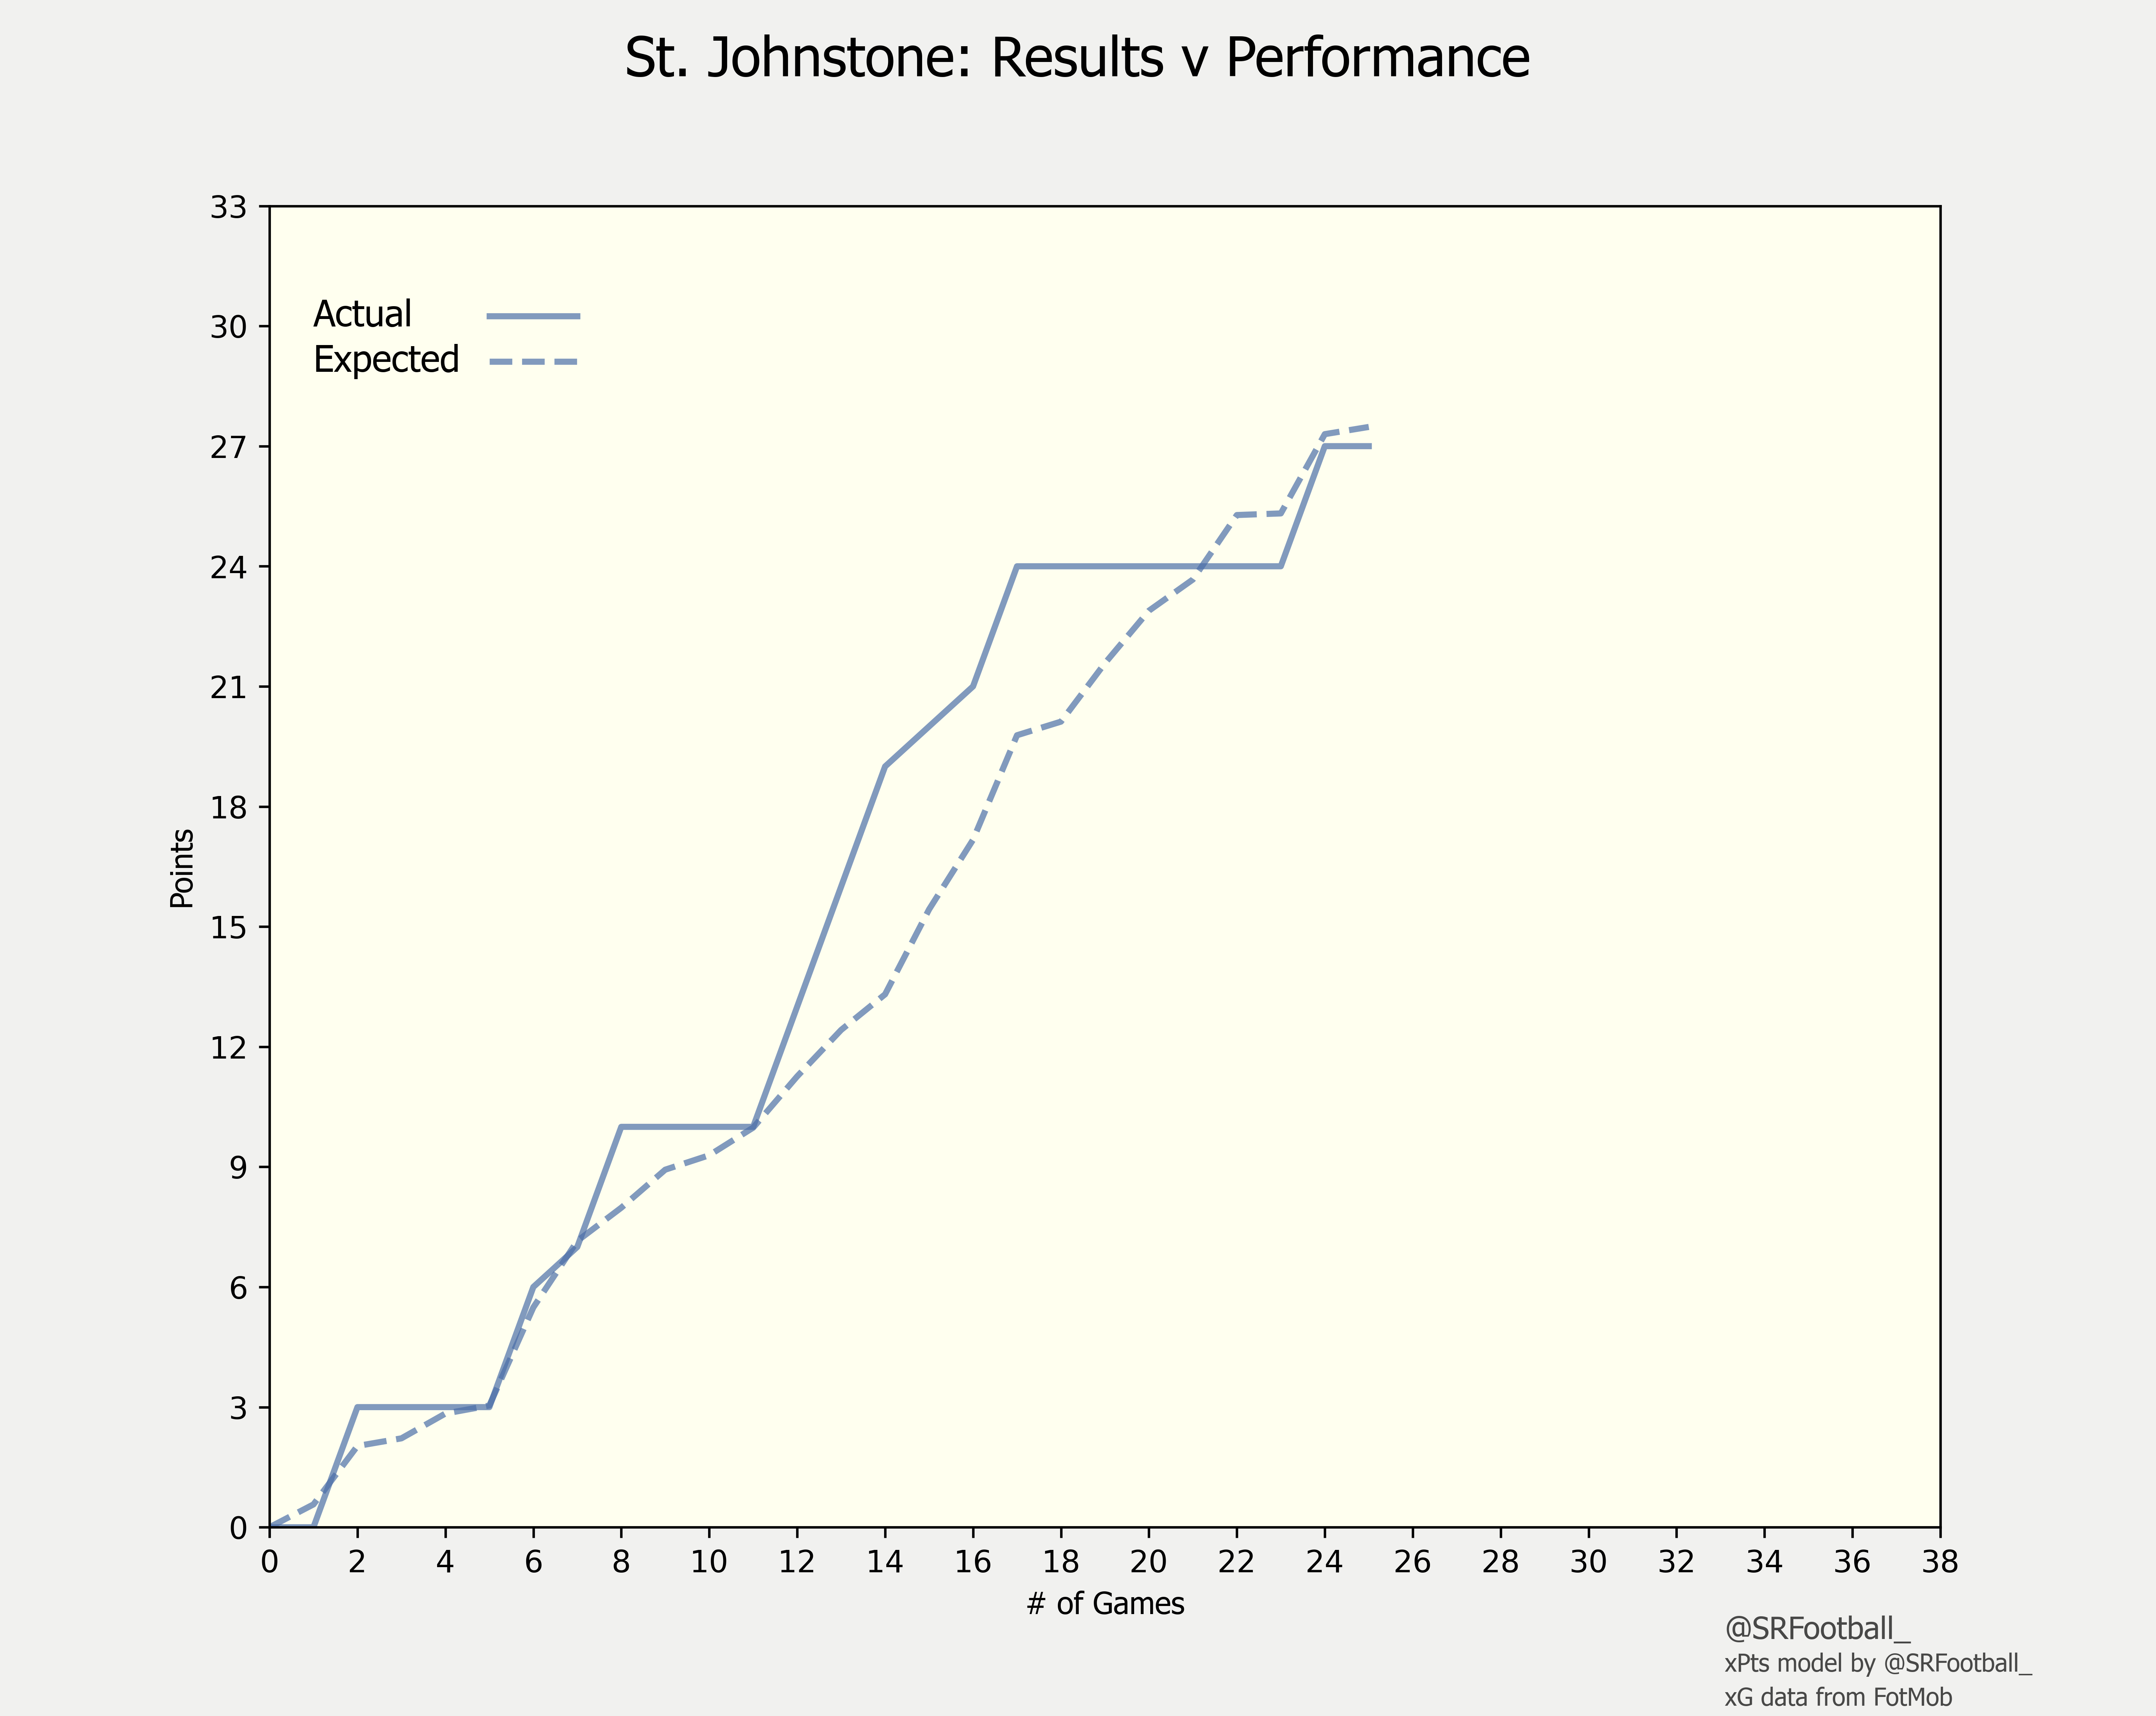
St. Johnstone 1-4 Celtic
Rangers 2-1 Ross County
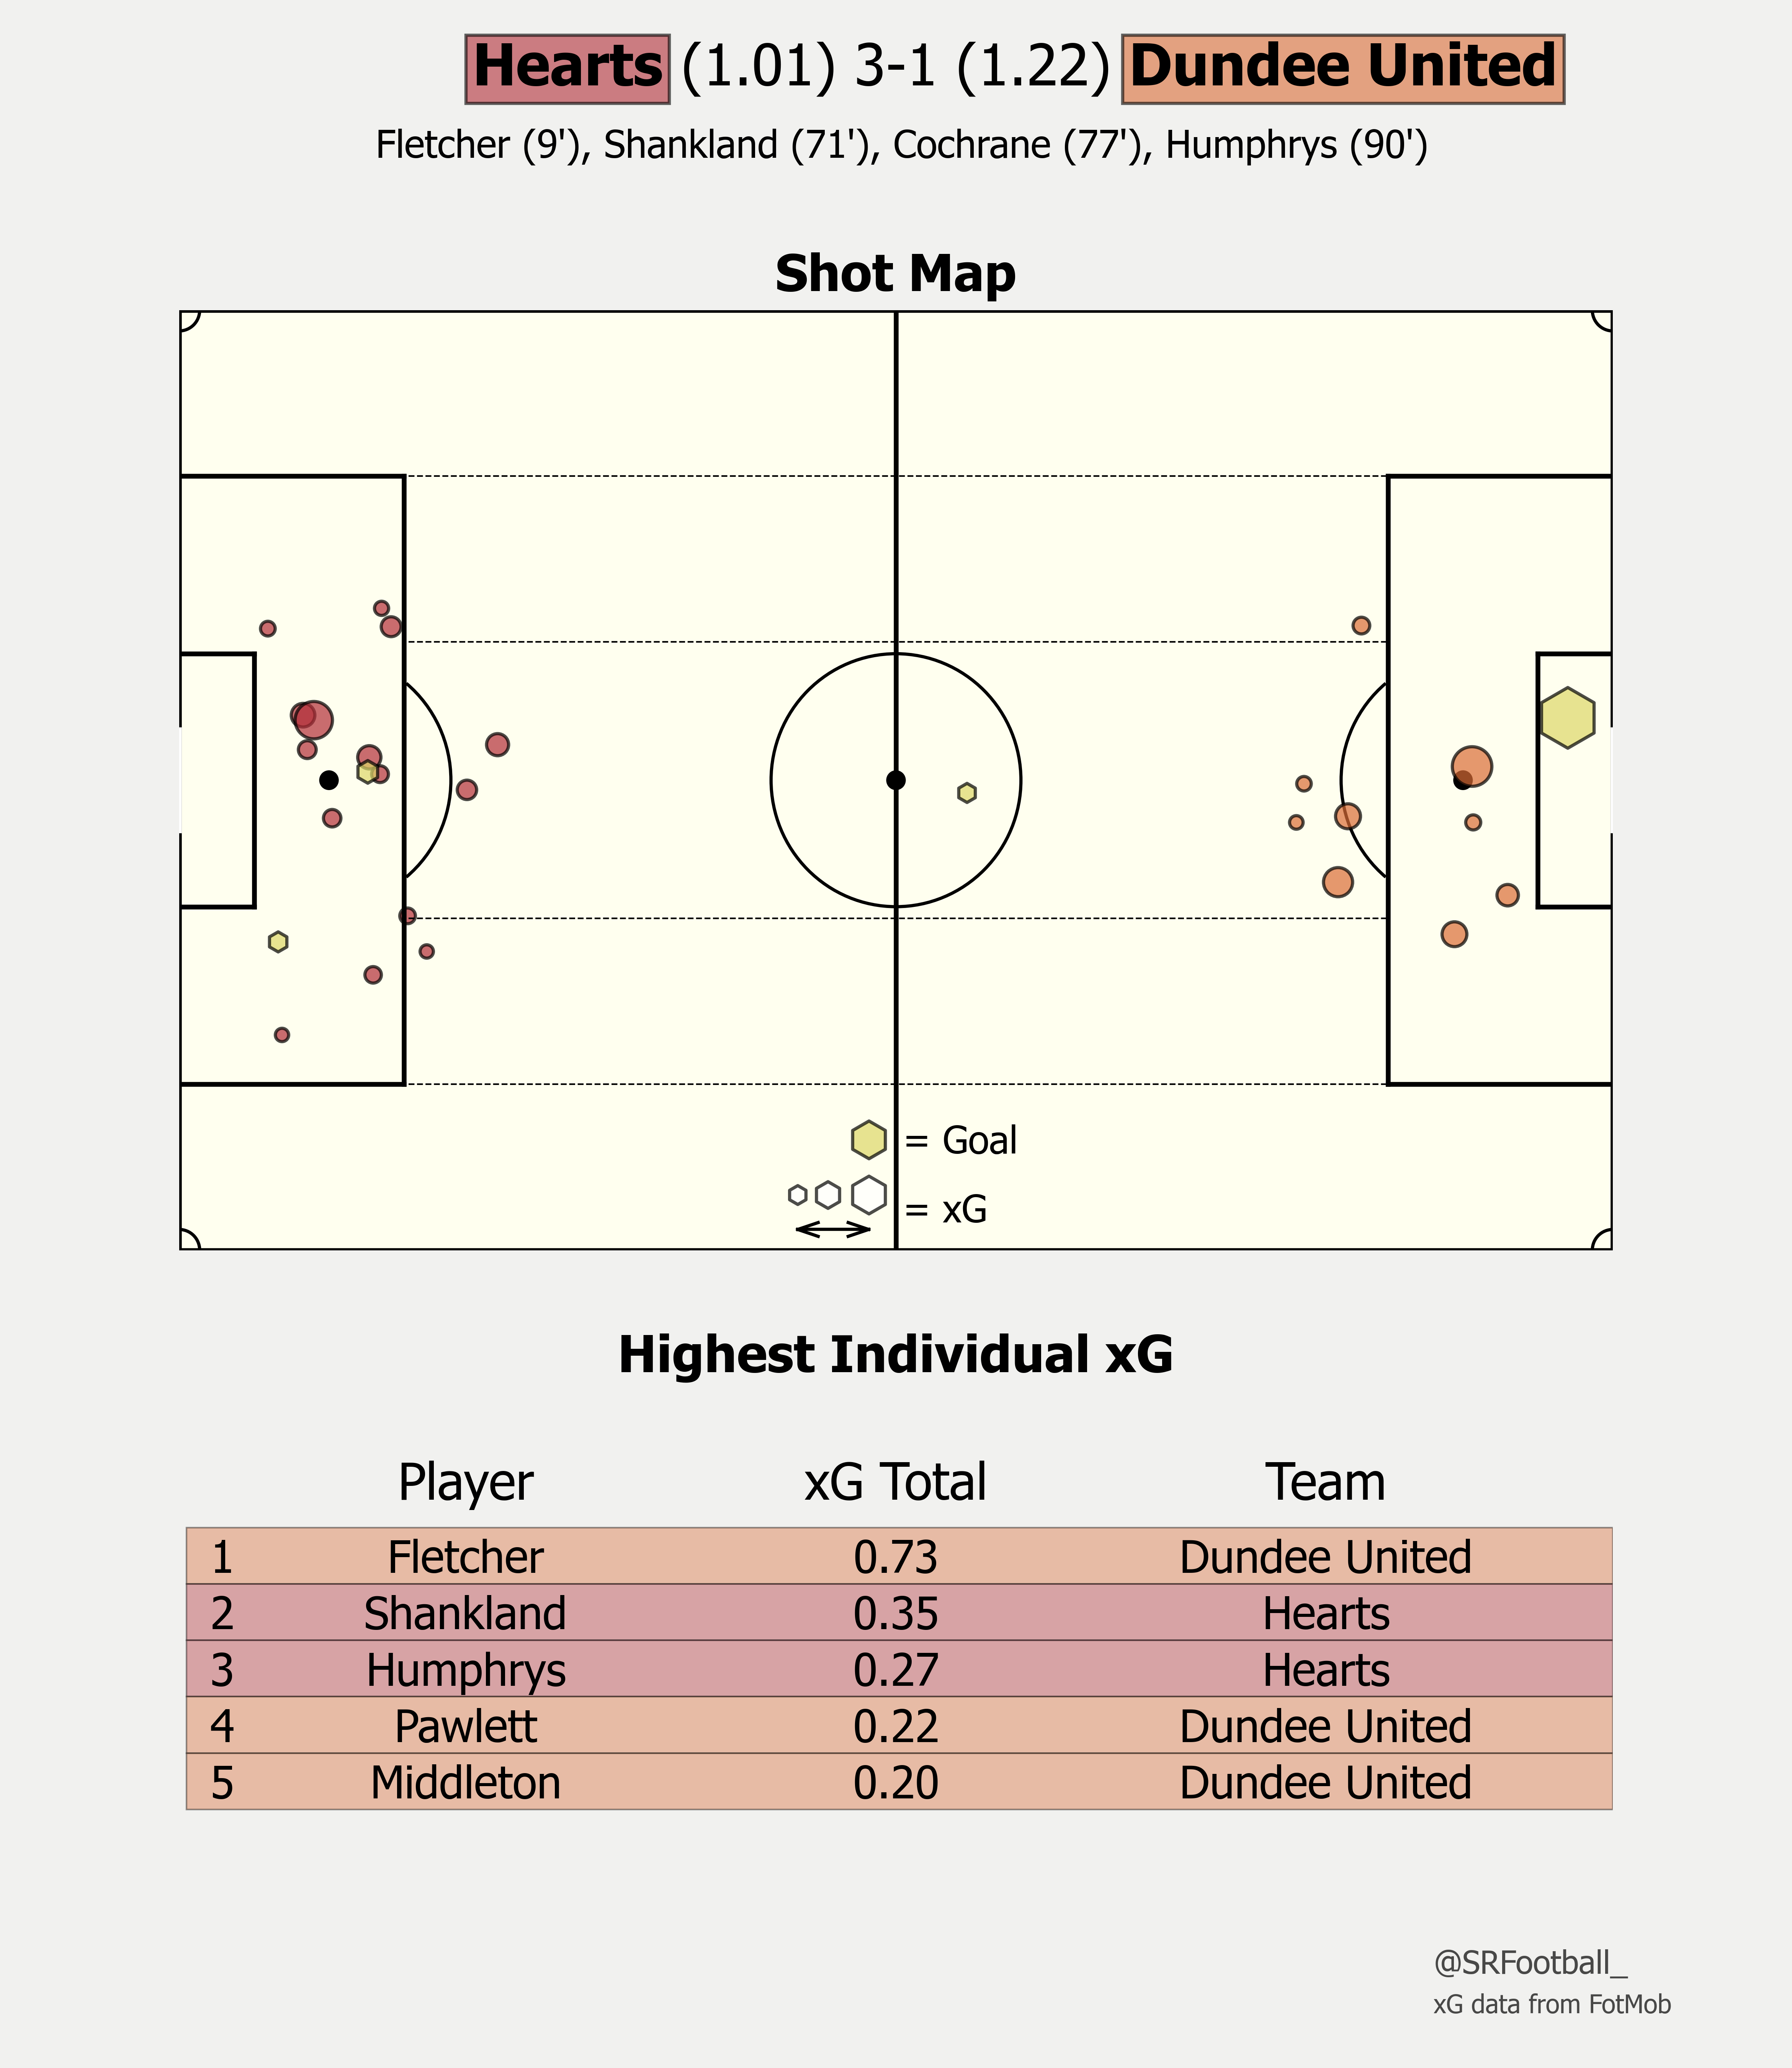
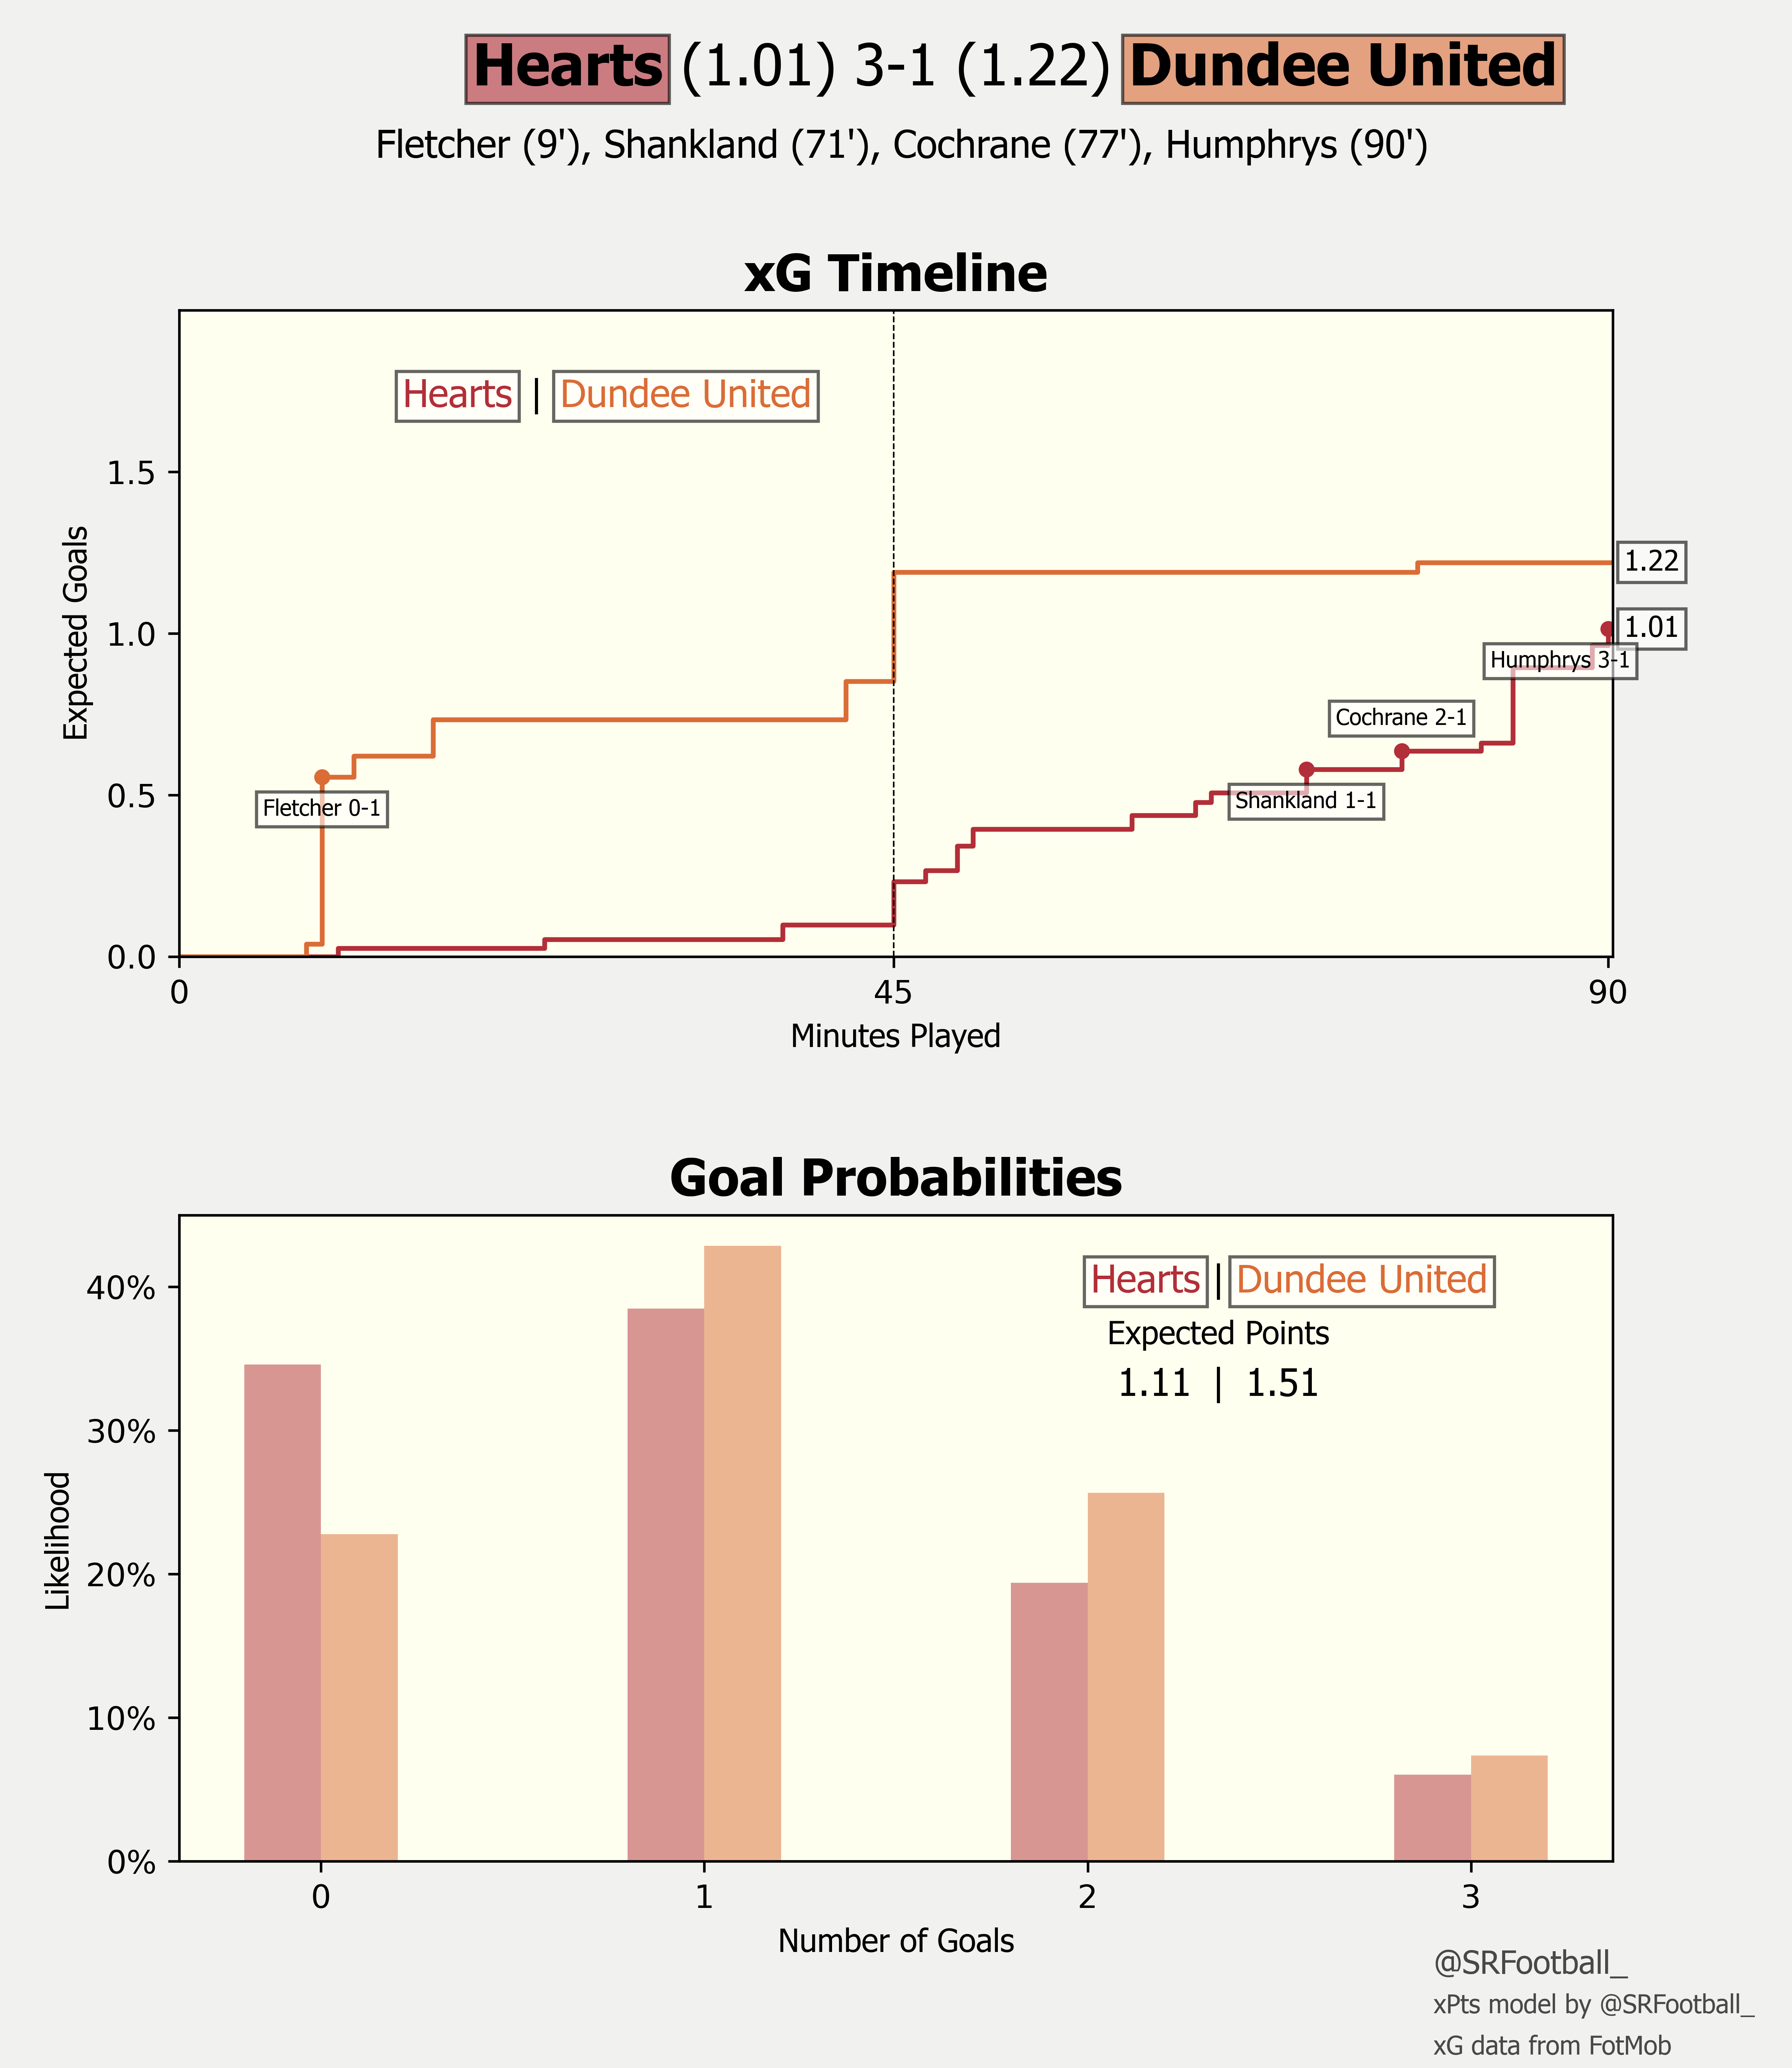
Hearts 3-1 Dundee United
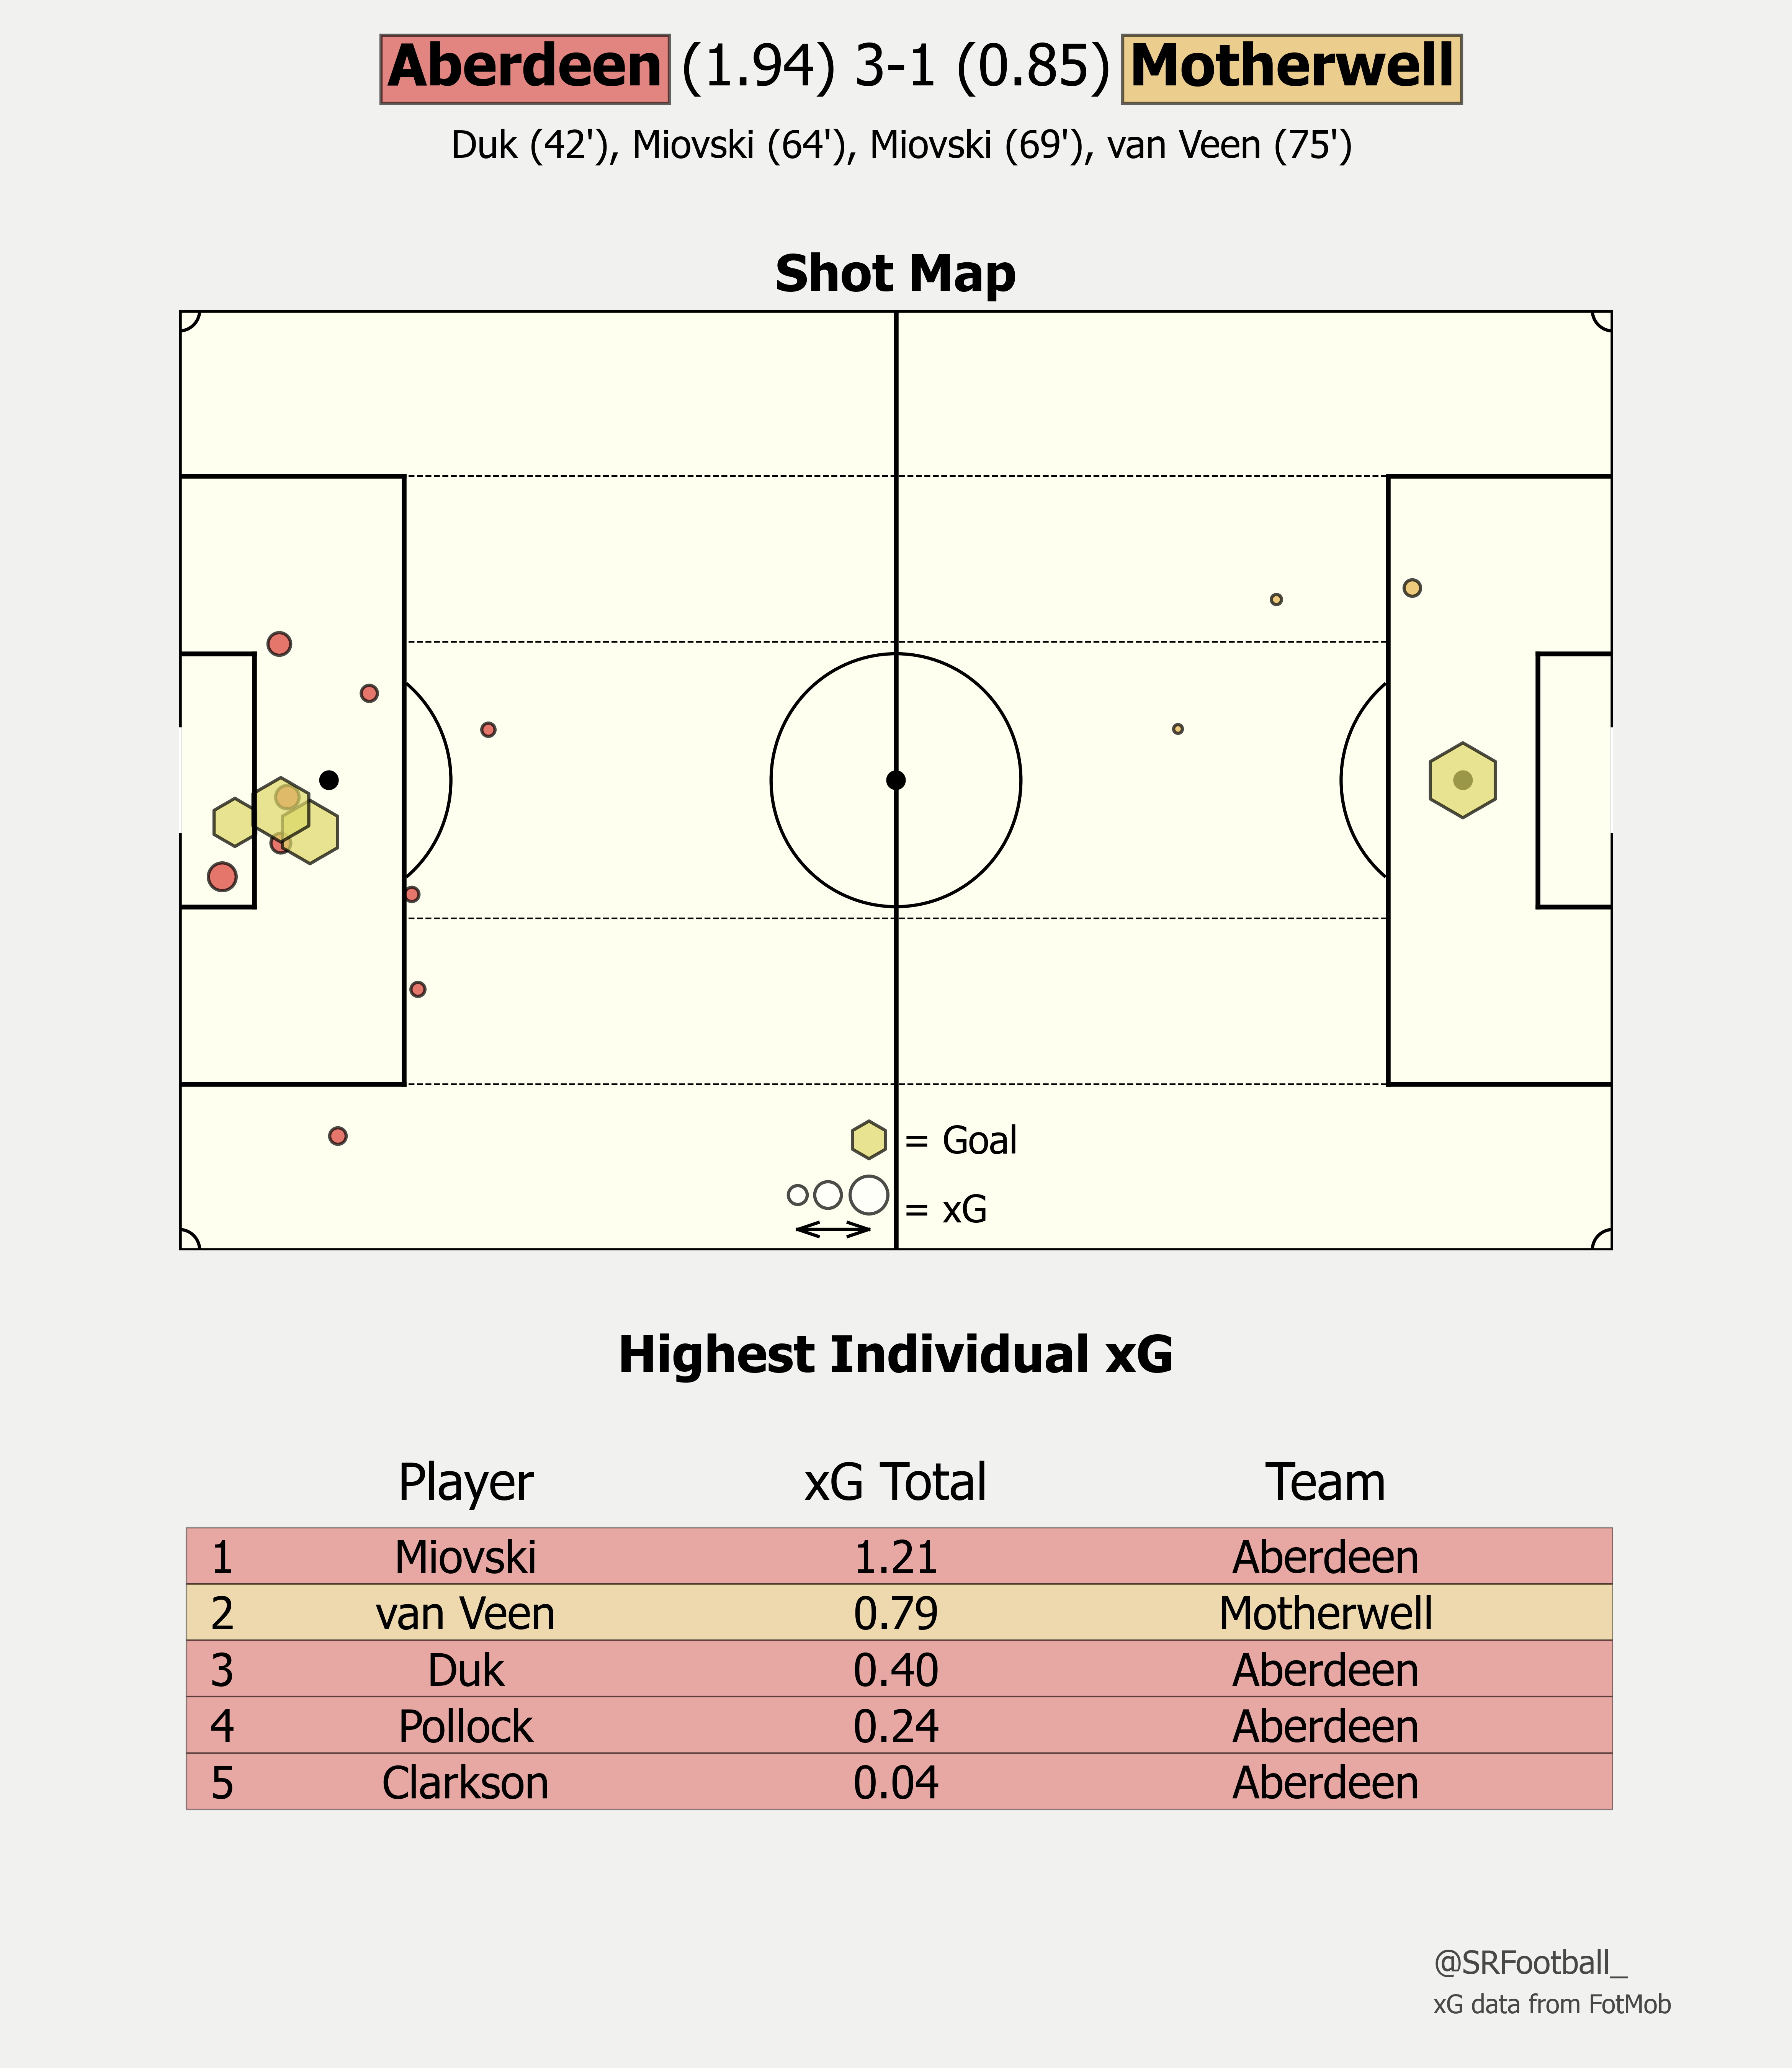
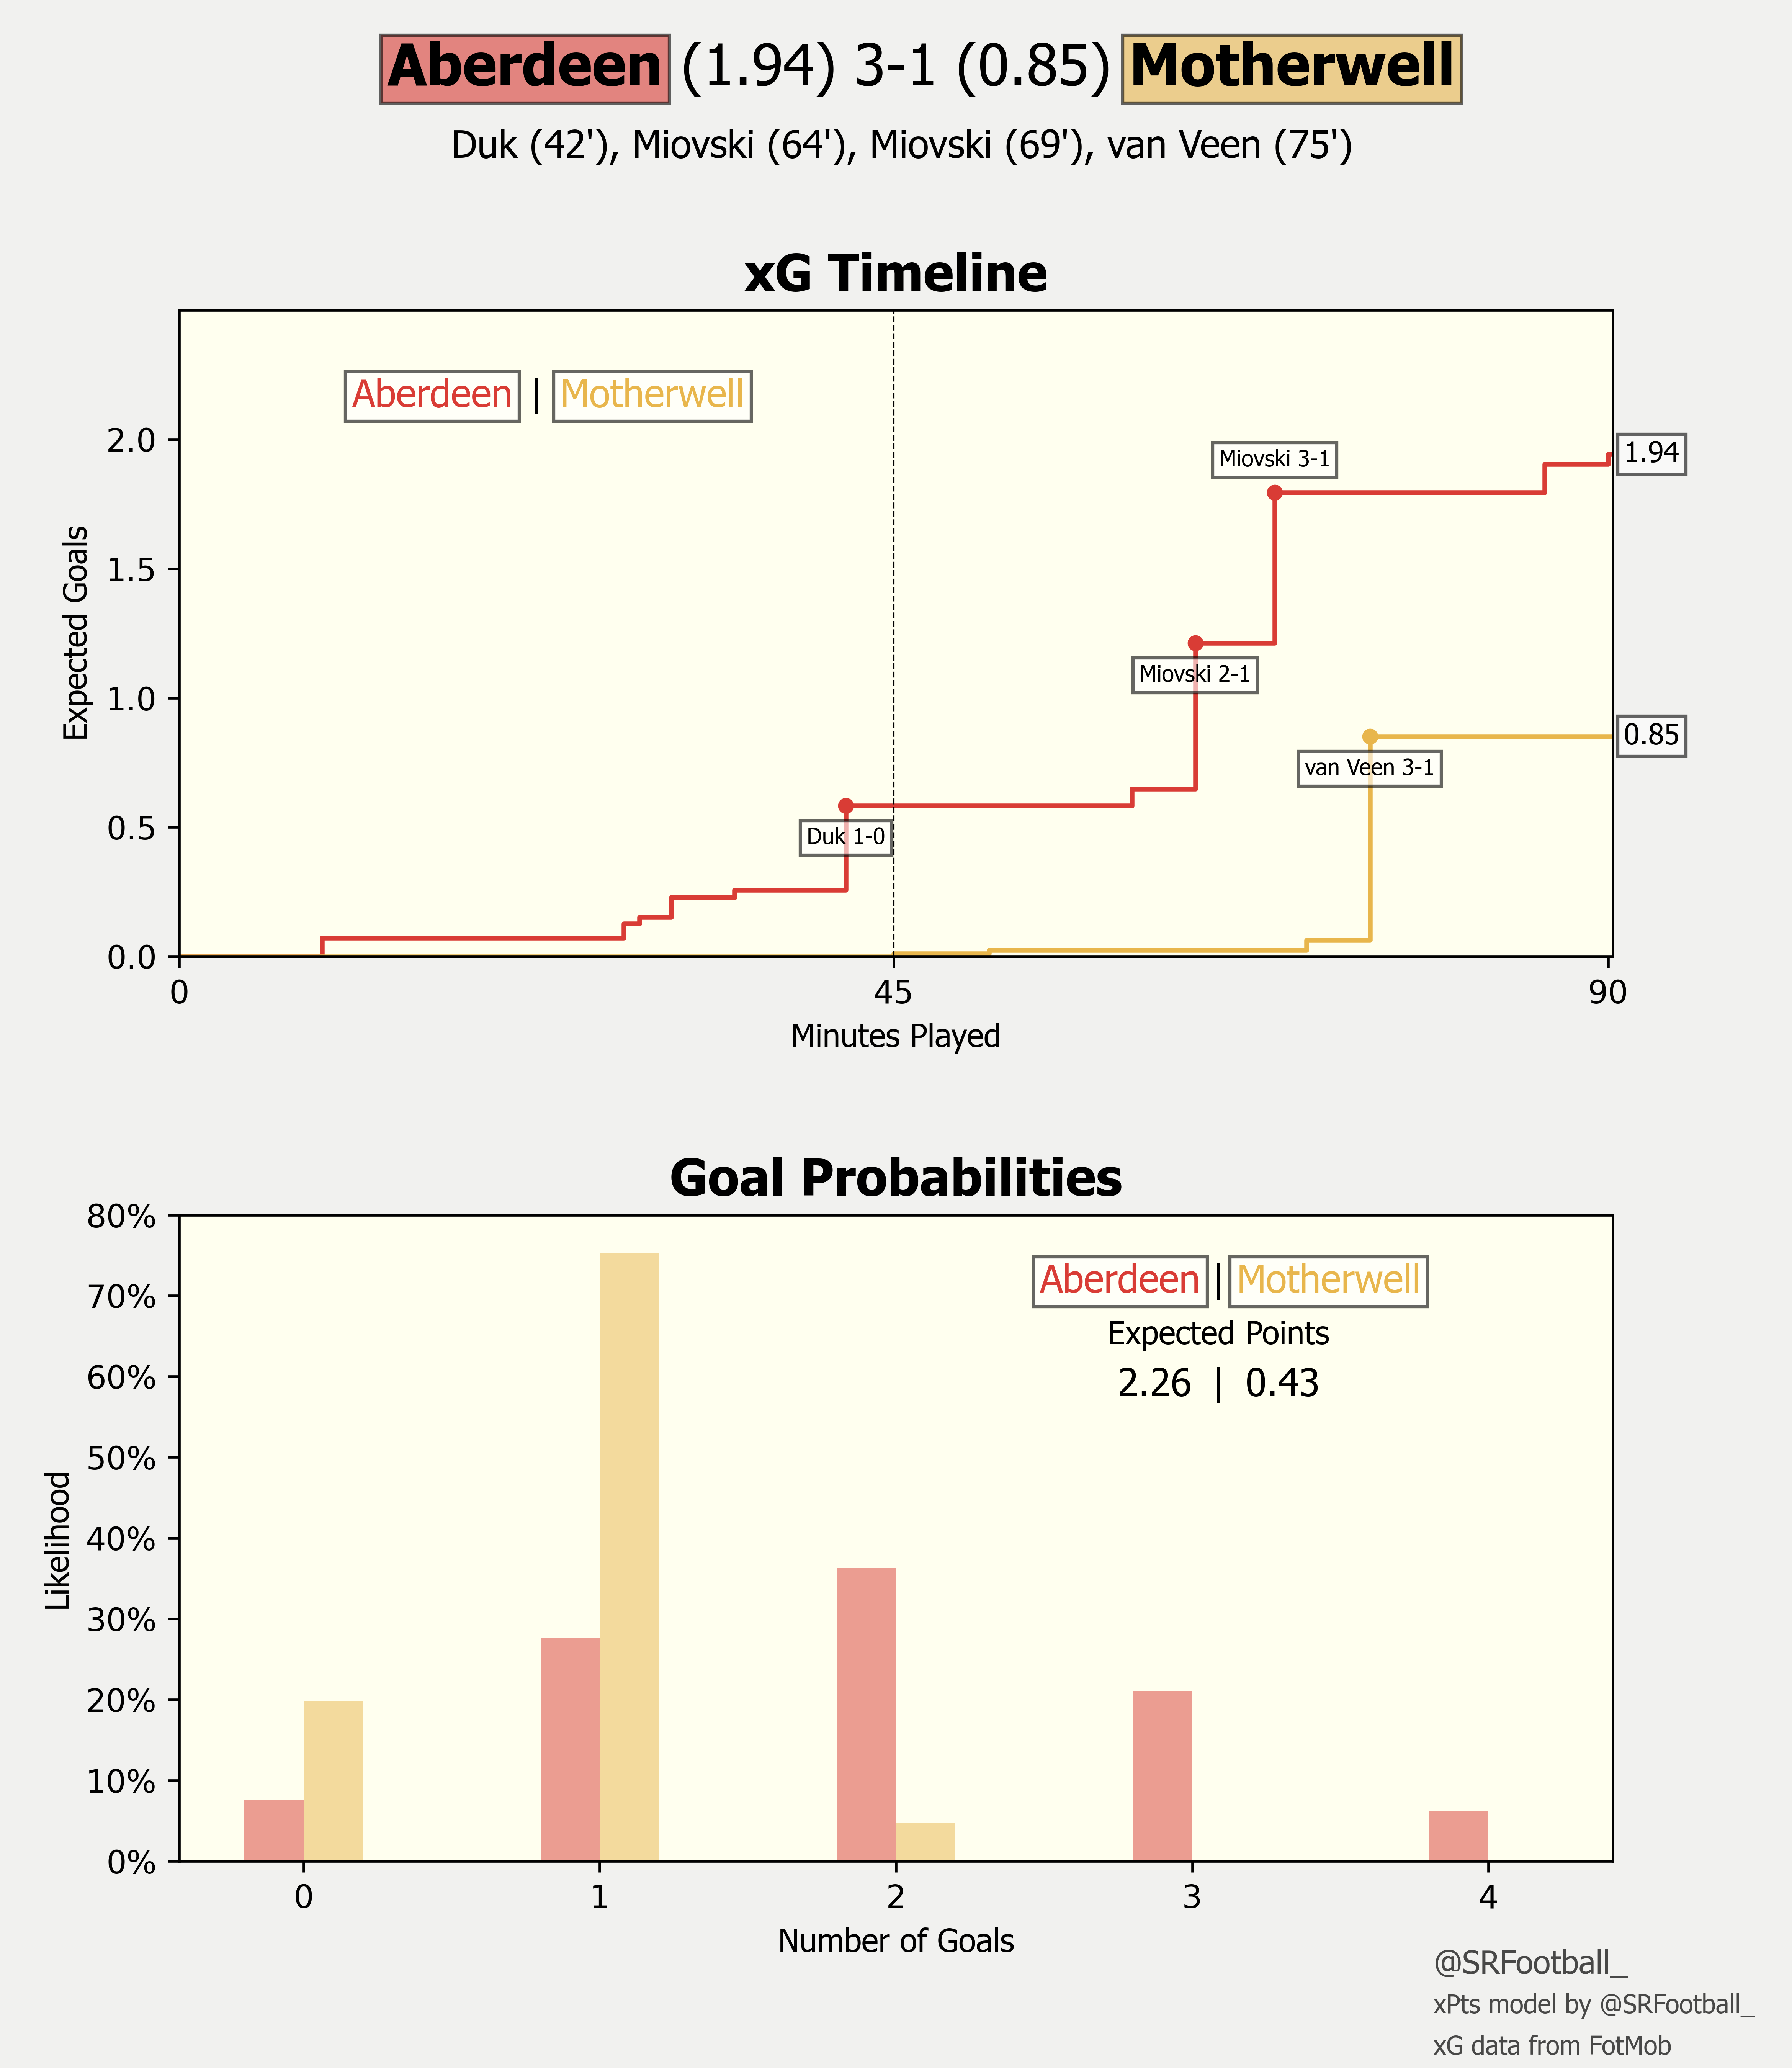
Aberdeen 3-1 Motherwell
Livingston 3-1 Kilmarnock
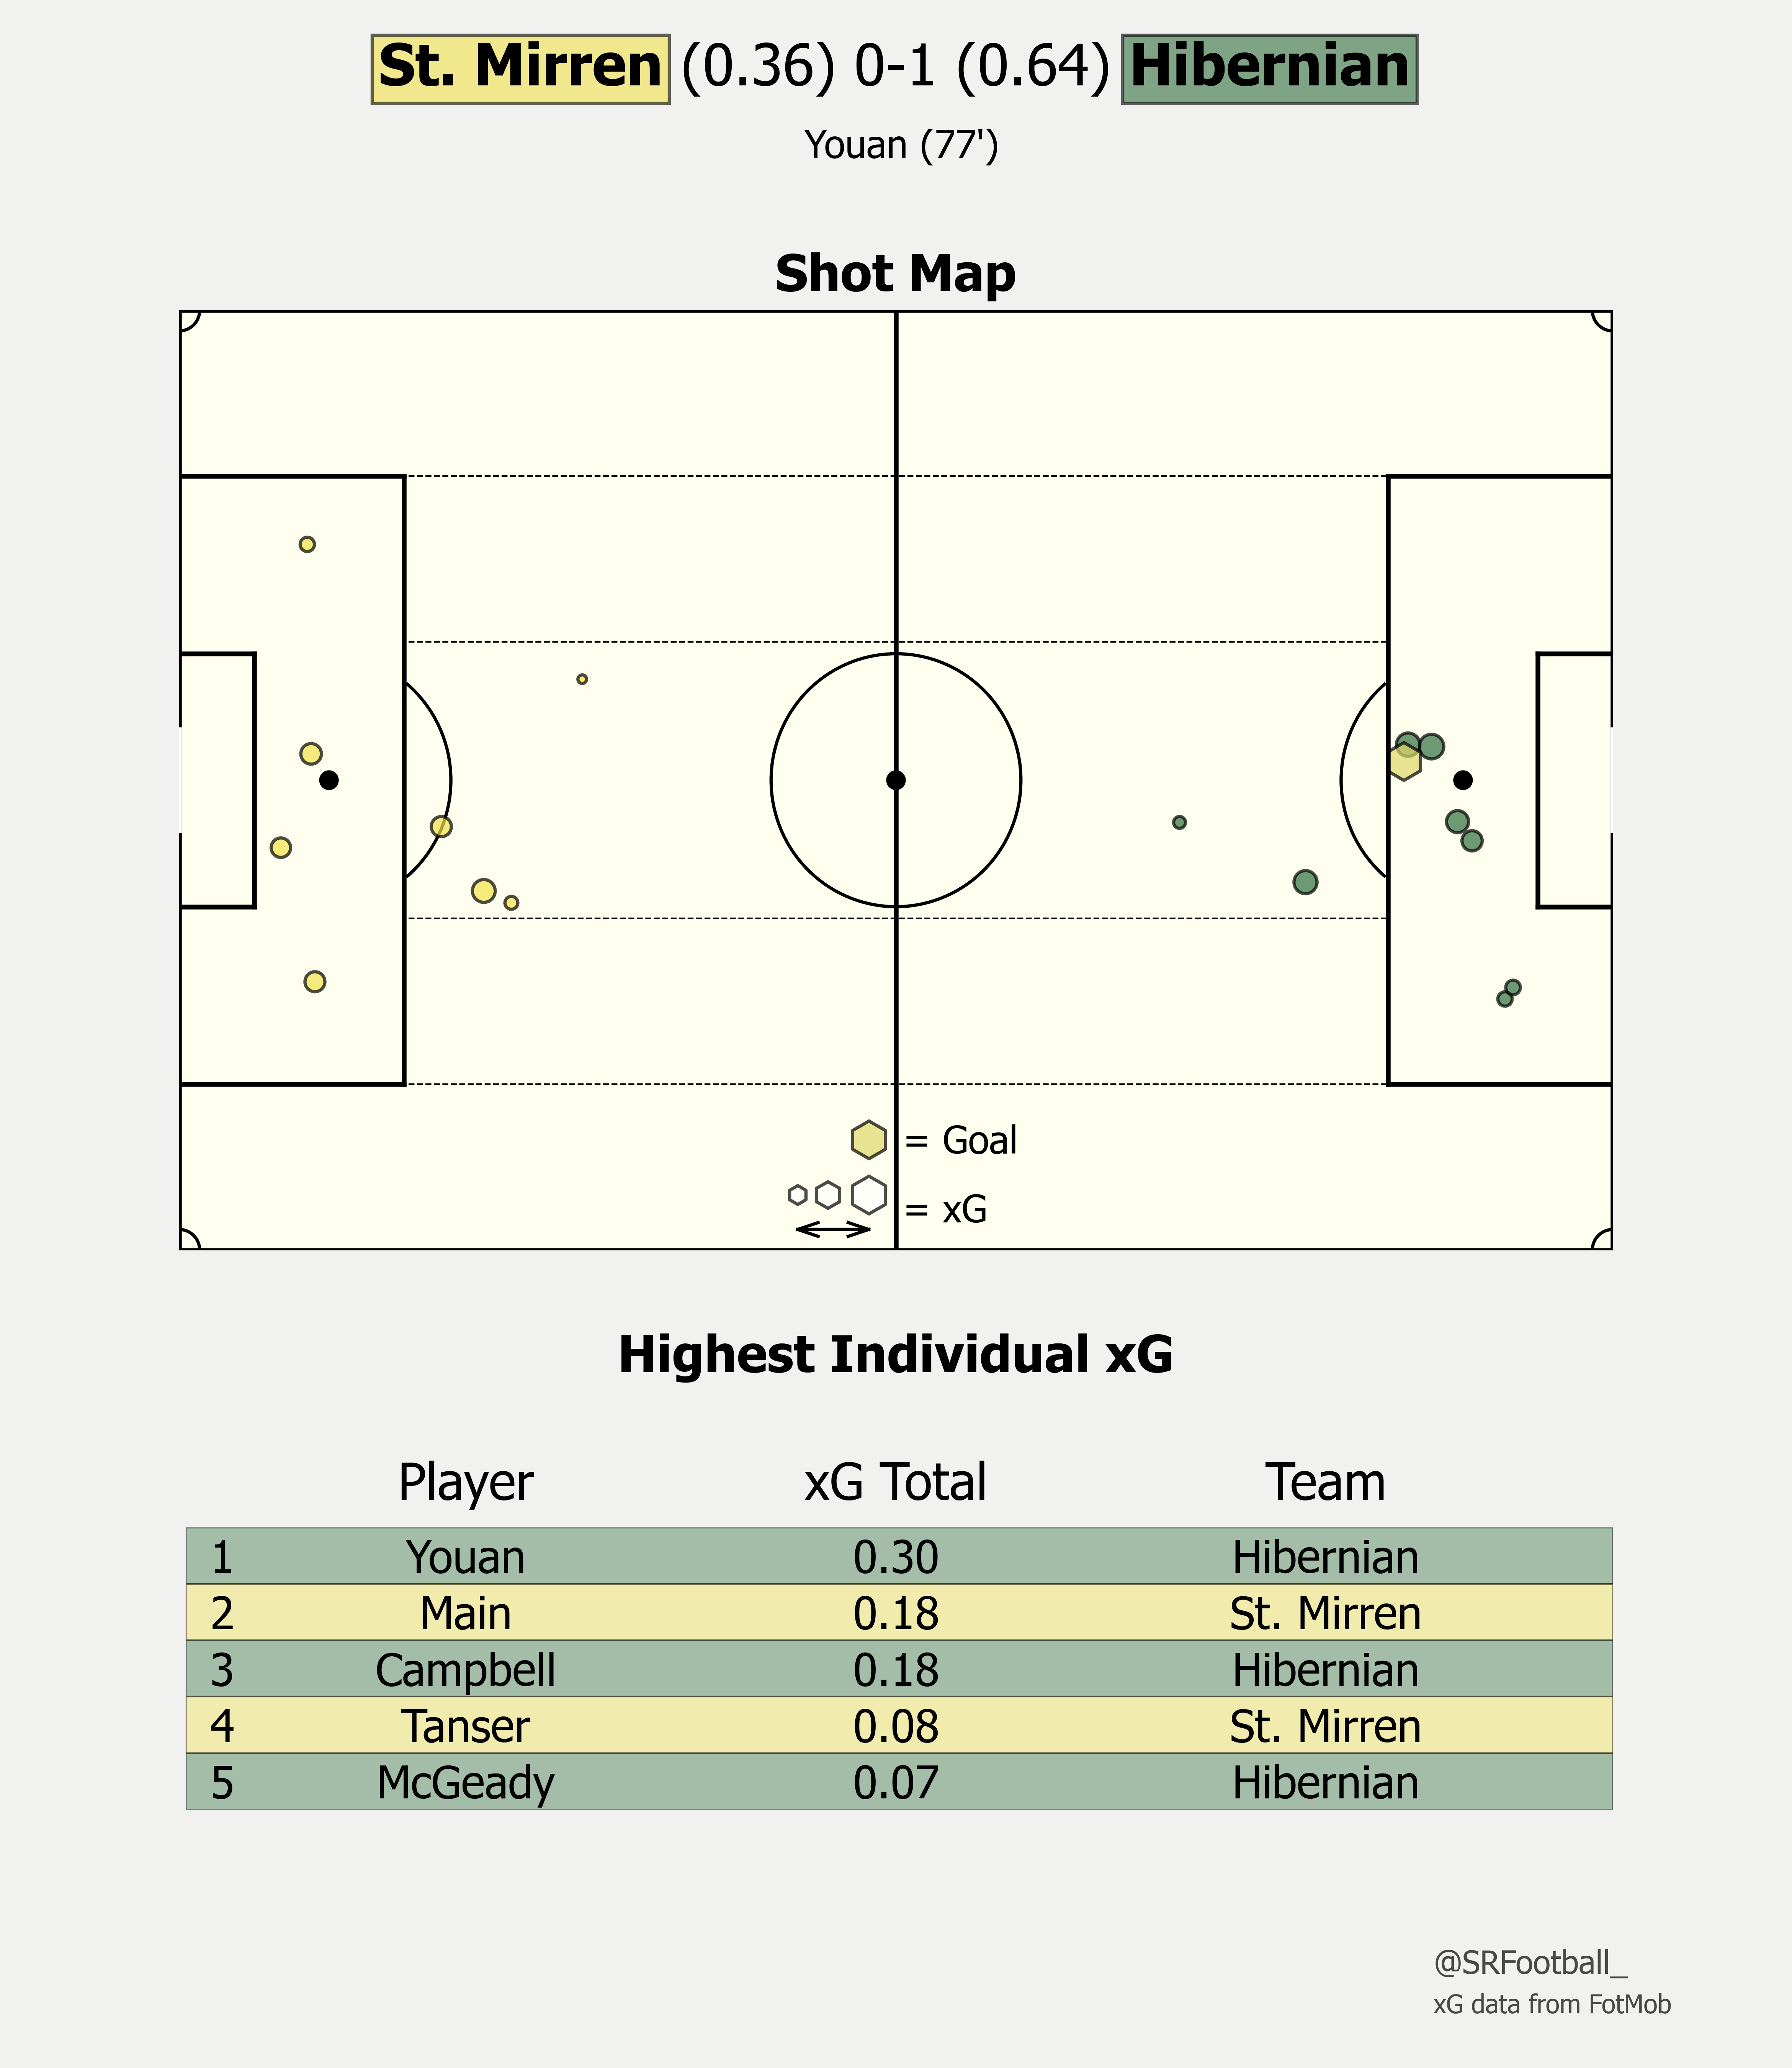
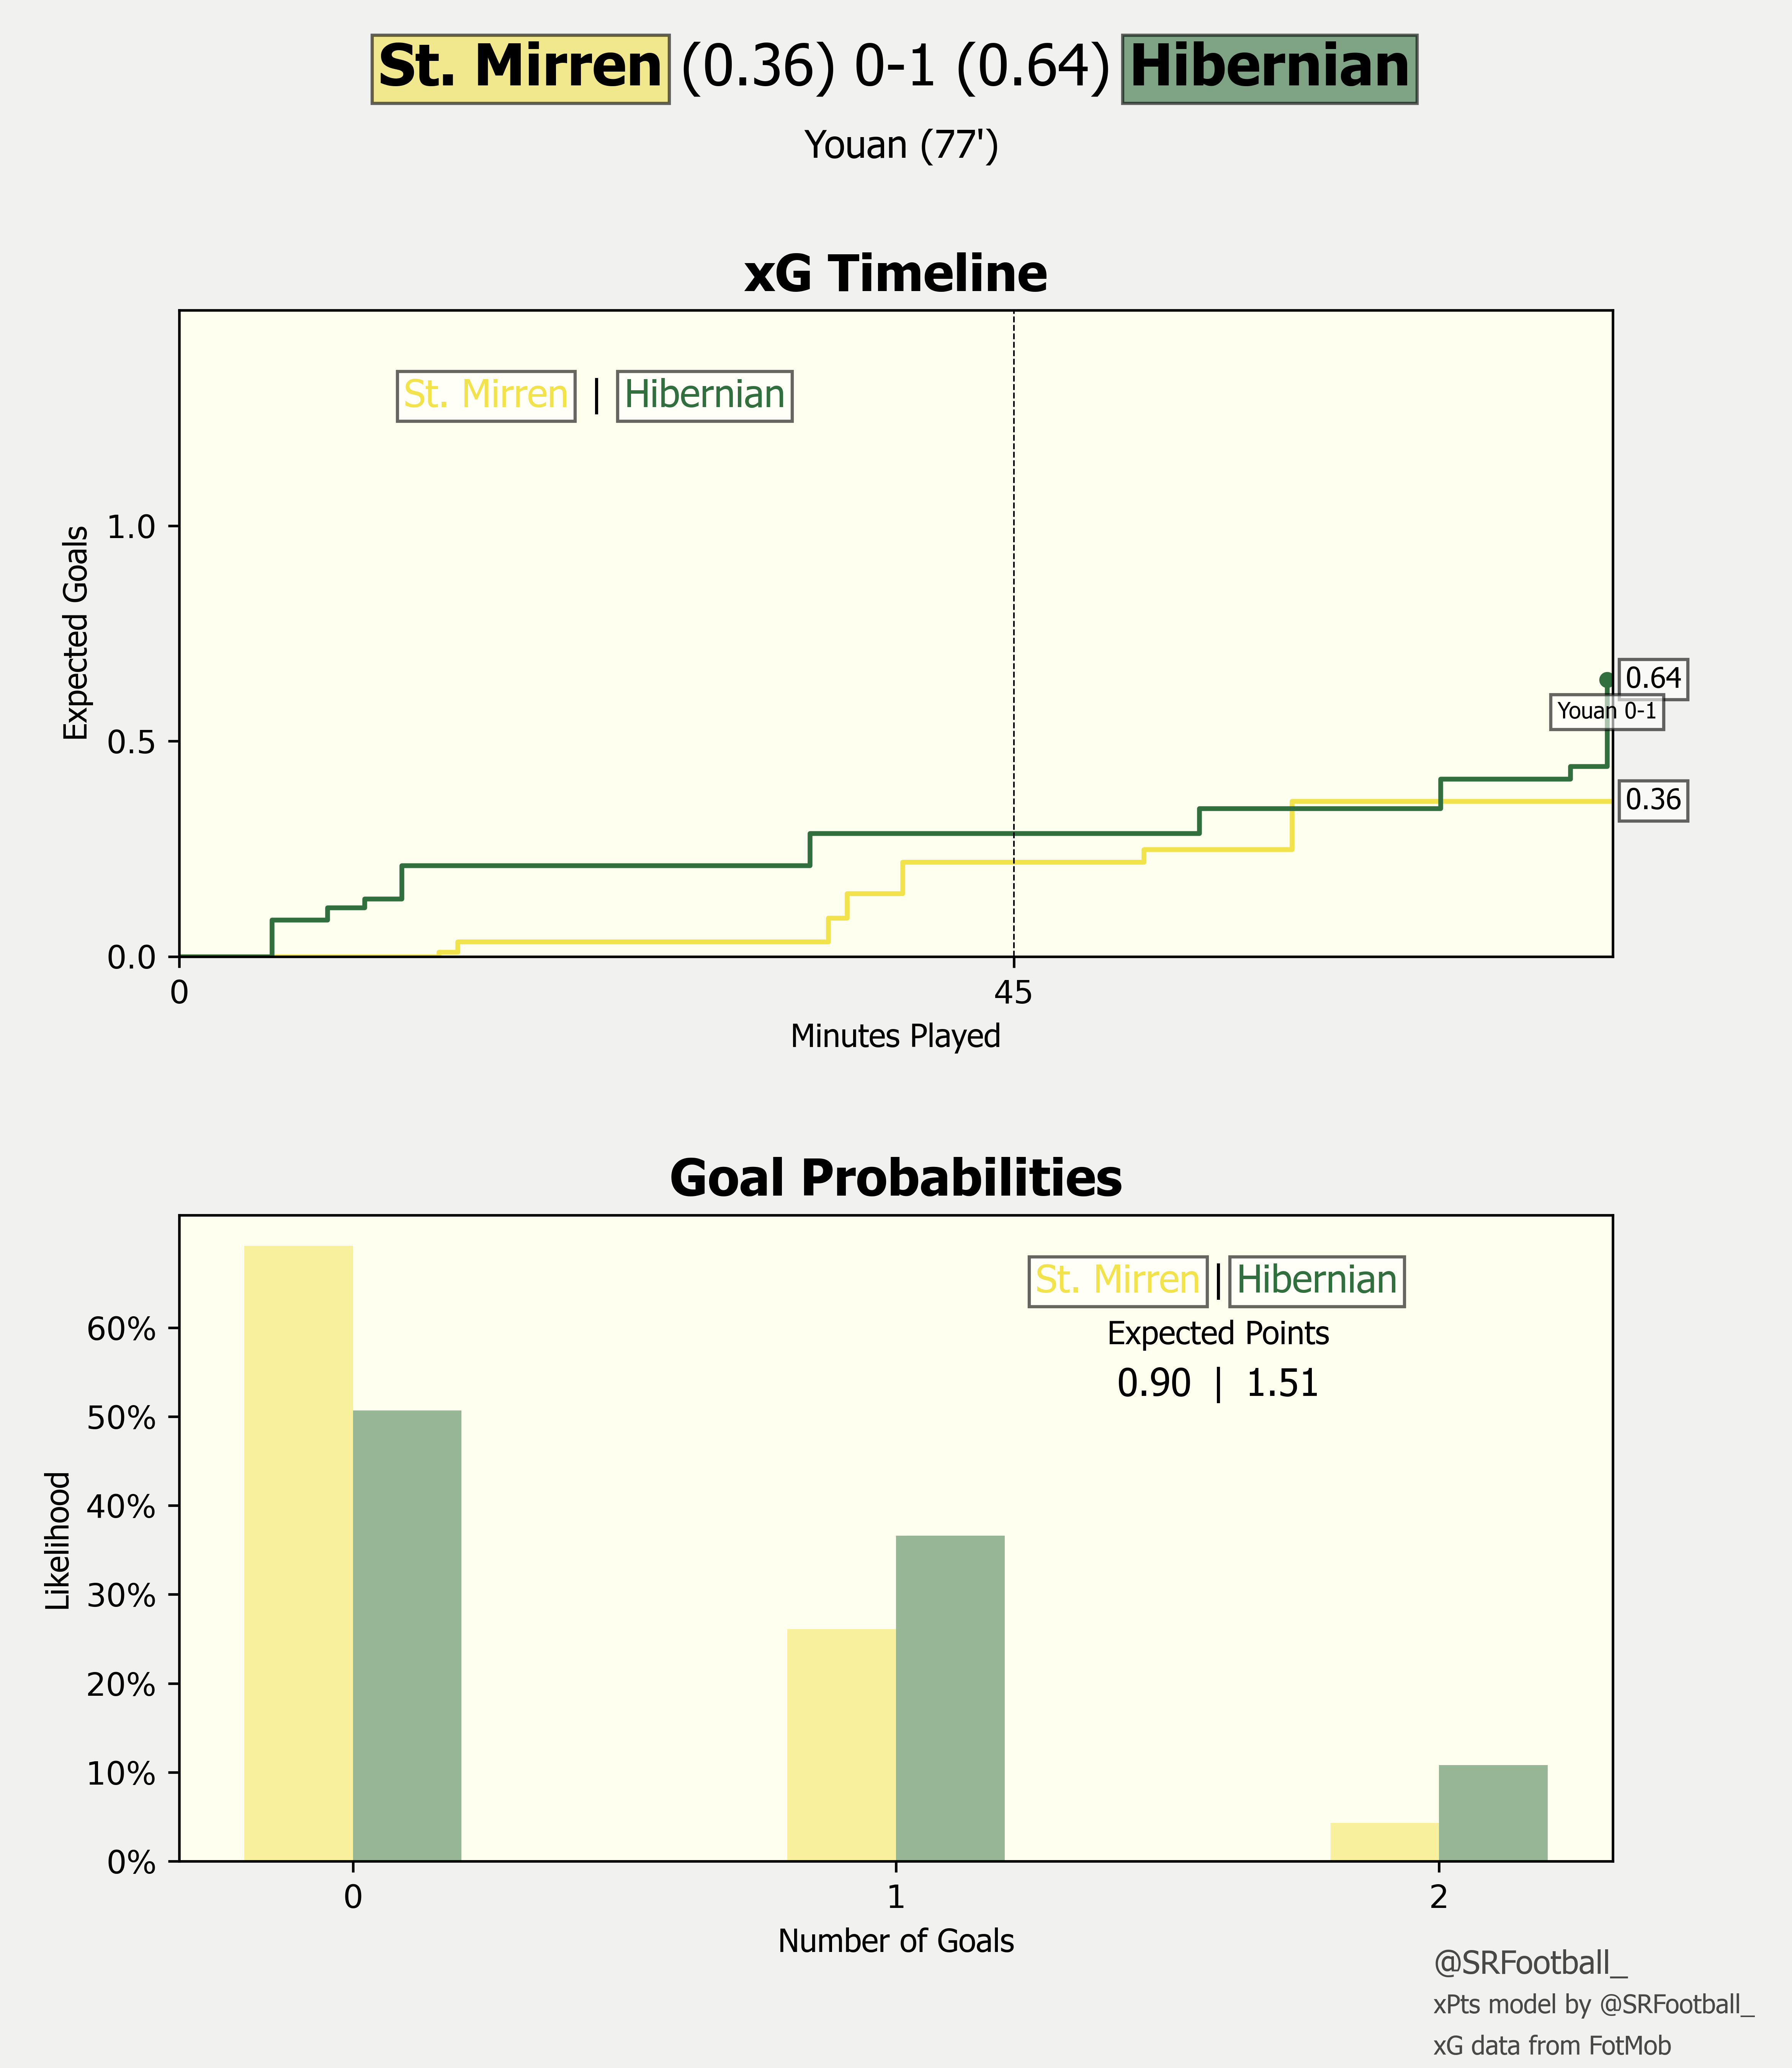
St. Mirren 0-1 Hibernian
League Update
St. Johnstone 1-4 Celtic
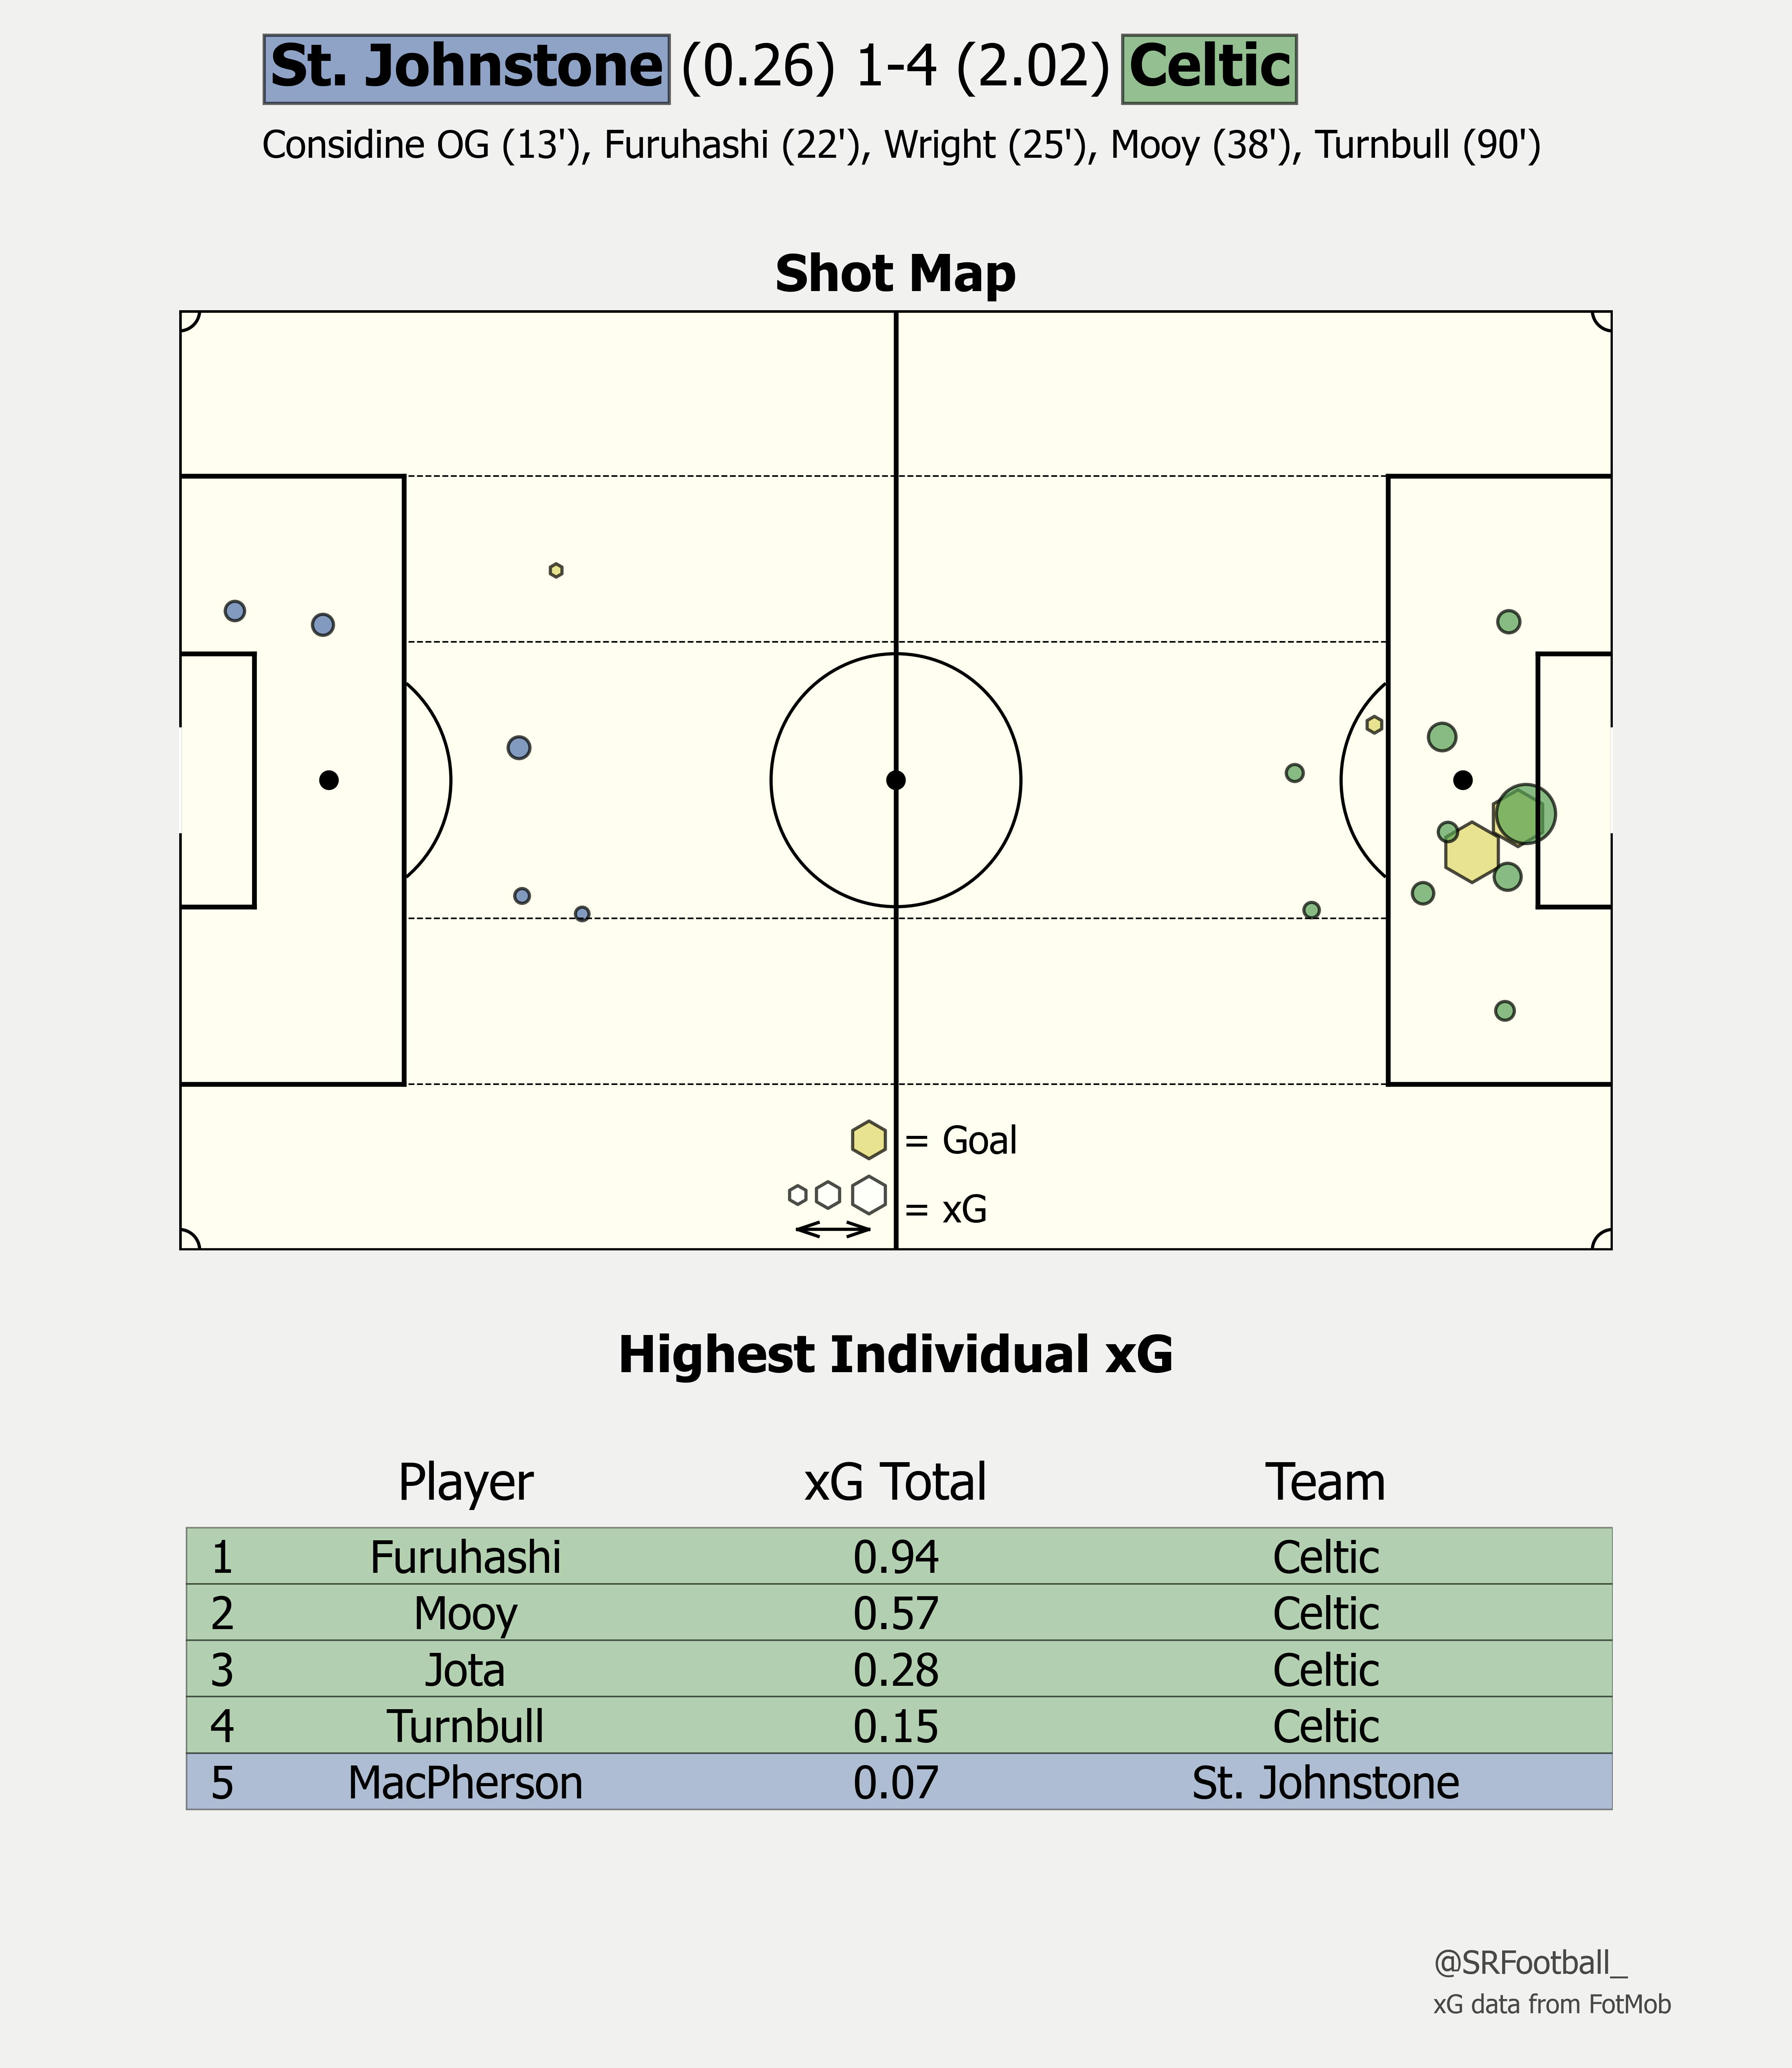
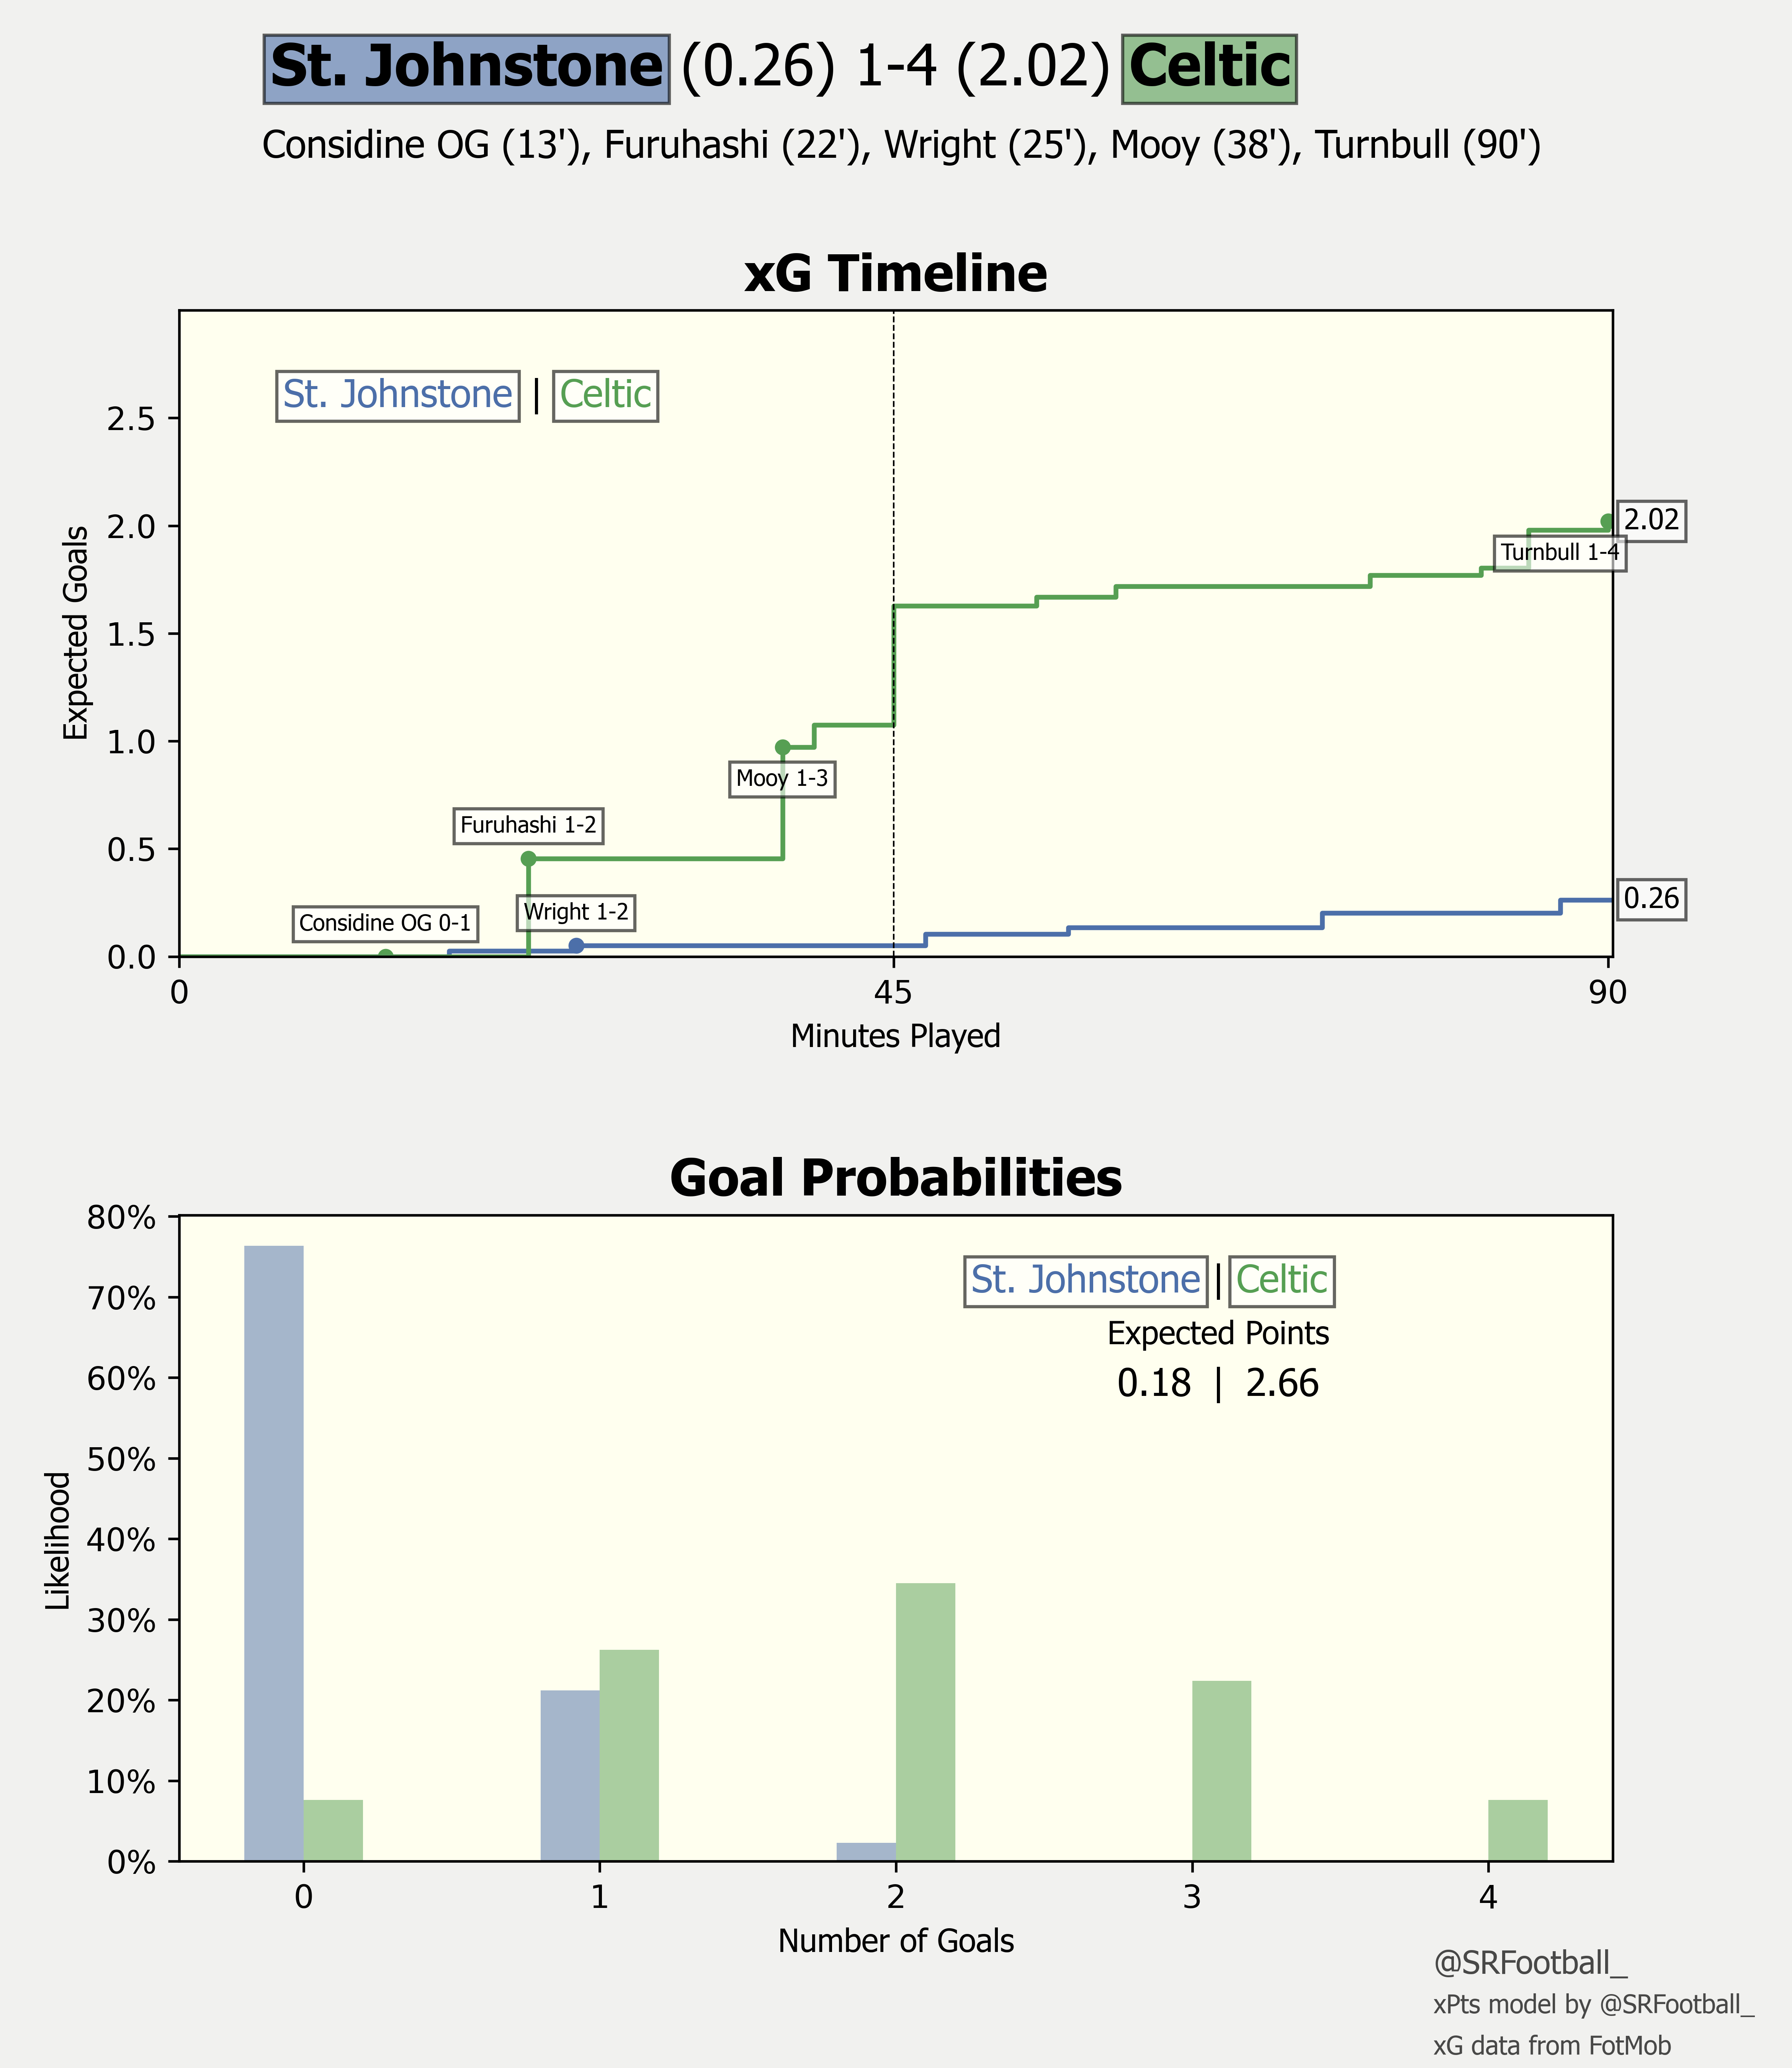
After cruising past Livingston midweek, Celtic ensured that they started February perfectly with a 4-1 away victory over St. Johnstone. Last week’s newsletter discussed Aaron Mooy’s limitations - specifically regarding central play and susceptibility to compactness - and, almost as if to prove the point, Matt O’Riley started against Livingston’s rigid block while Mooy started against the aggressive and much more loose St. Johnstone. However, the newsletter also touched on the notion the issue wasn’t exclusively to be found at the micro level - in Mooy’s play style - but also at the meso level: the players chosen around him. It was theorised that a right hand side of Mooy supported by Alastair Johnston and Liel Abada was collectively too rigid. In both of these matches, Abada was dropped in favour of Daizen Maeda, moving Jota onto the right hand side. This analysis will review the differences in Jota’s play style on either side of the pitch, and the bilateral relationship this has with Celtic’s rigid right hand side.
Firstly, Jota and Maeda have made a strong winger pairing. Despite both being right footed, they both naturally preferred the left wing when brought to Glasgow but Jota primarily was shifted to the right to accommodate both in the team. Both are quick, agile, and are able to accelerate to the byline without being forced wide to utilise narrow cutbacks - a critical part of the attacking system implemented by Ange Postecoglou.
However, it’s their differences that make them such a powerful pairing. While still performing the core duties of their role within the confines of the strict Positionalist system (receiving wide to create qualitative superiorities, for example), Maeda has a much more natural inclination to use his pace to beat the defender to the line to create his cutback while Jota is more dynamic, often stopping the ball with the threat of coming inside before using quick acceleration to beat the defender down the line. This allows them to be switched to solve problems in-game. Therefore, while this analysis will look at actions performed/finishing on the left/right of the pitch, it must be noted that this is a limited approach adopted due to a lack of clarity surrounding which side Jota was intended to be playing on when each action occurred.
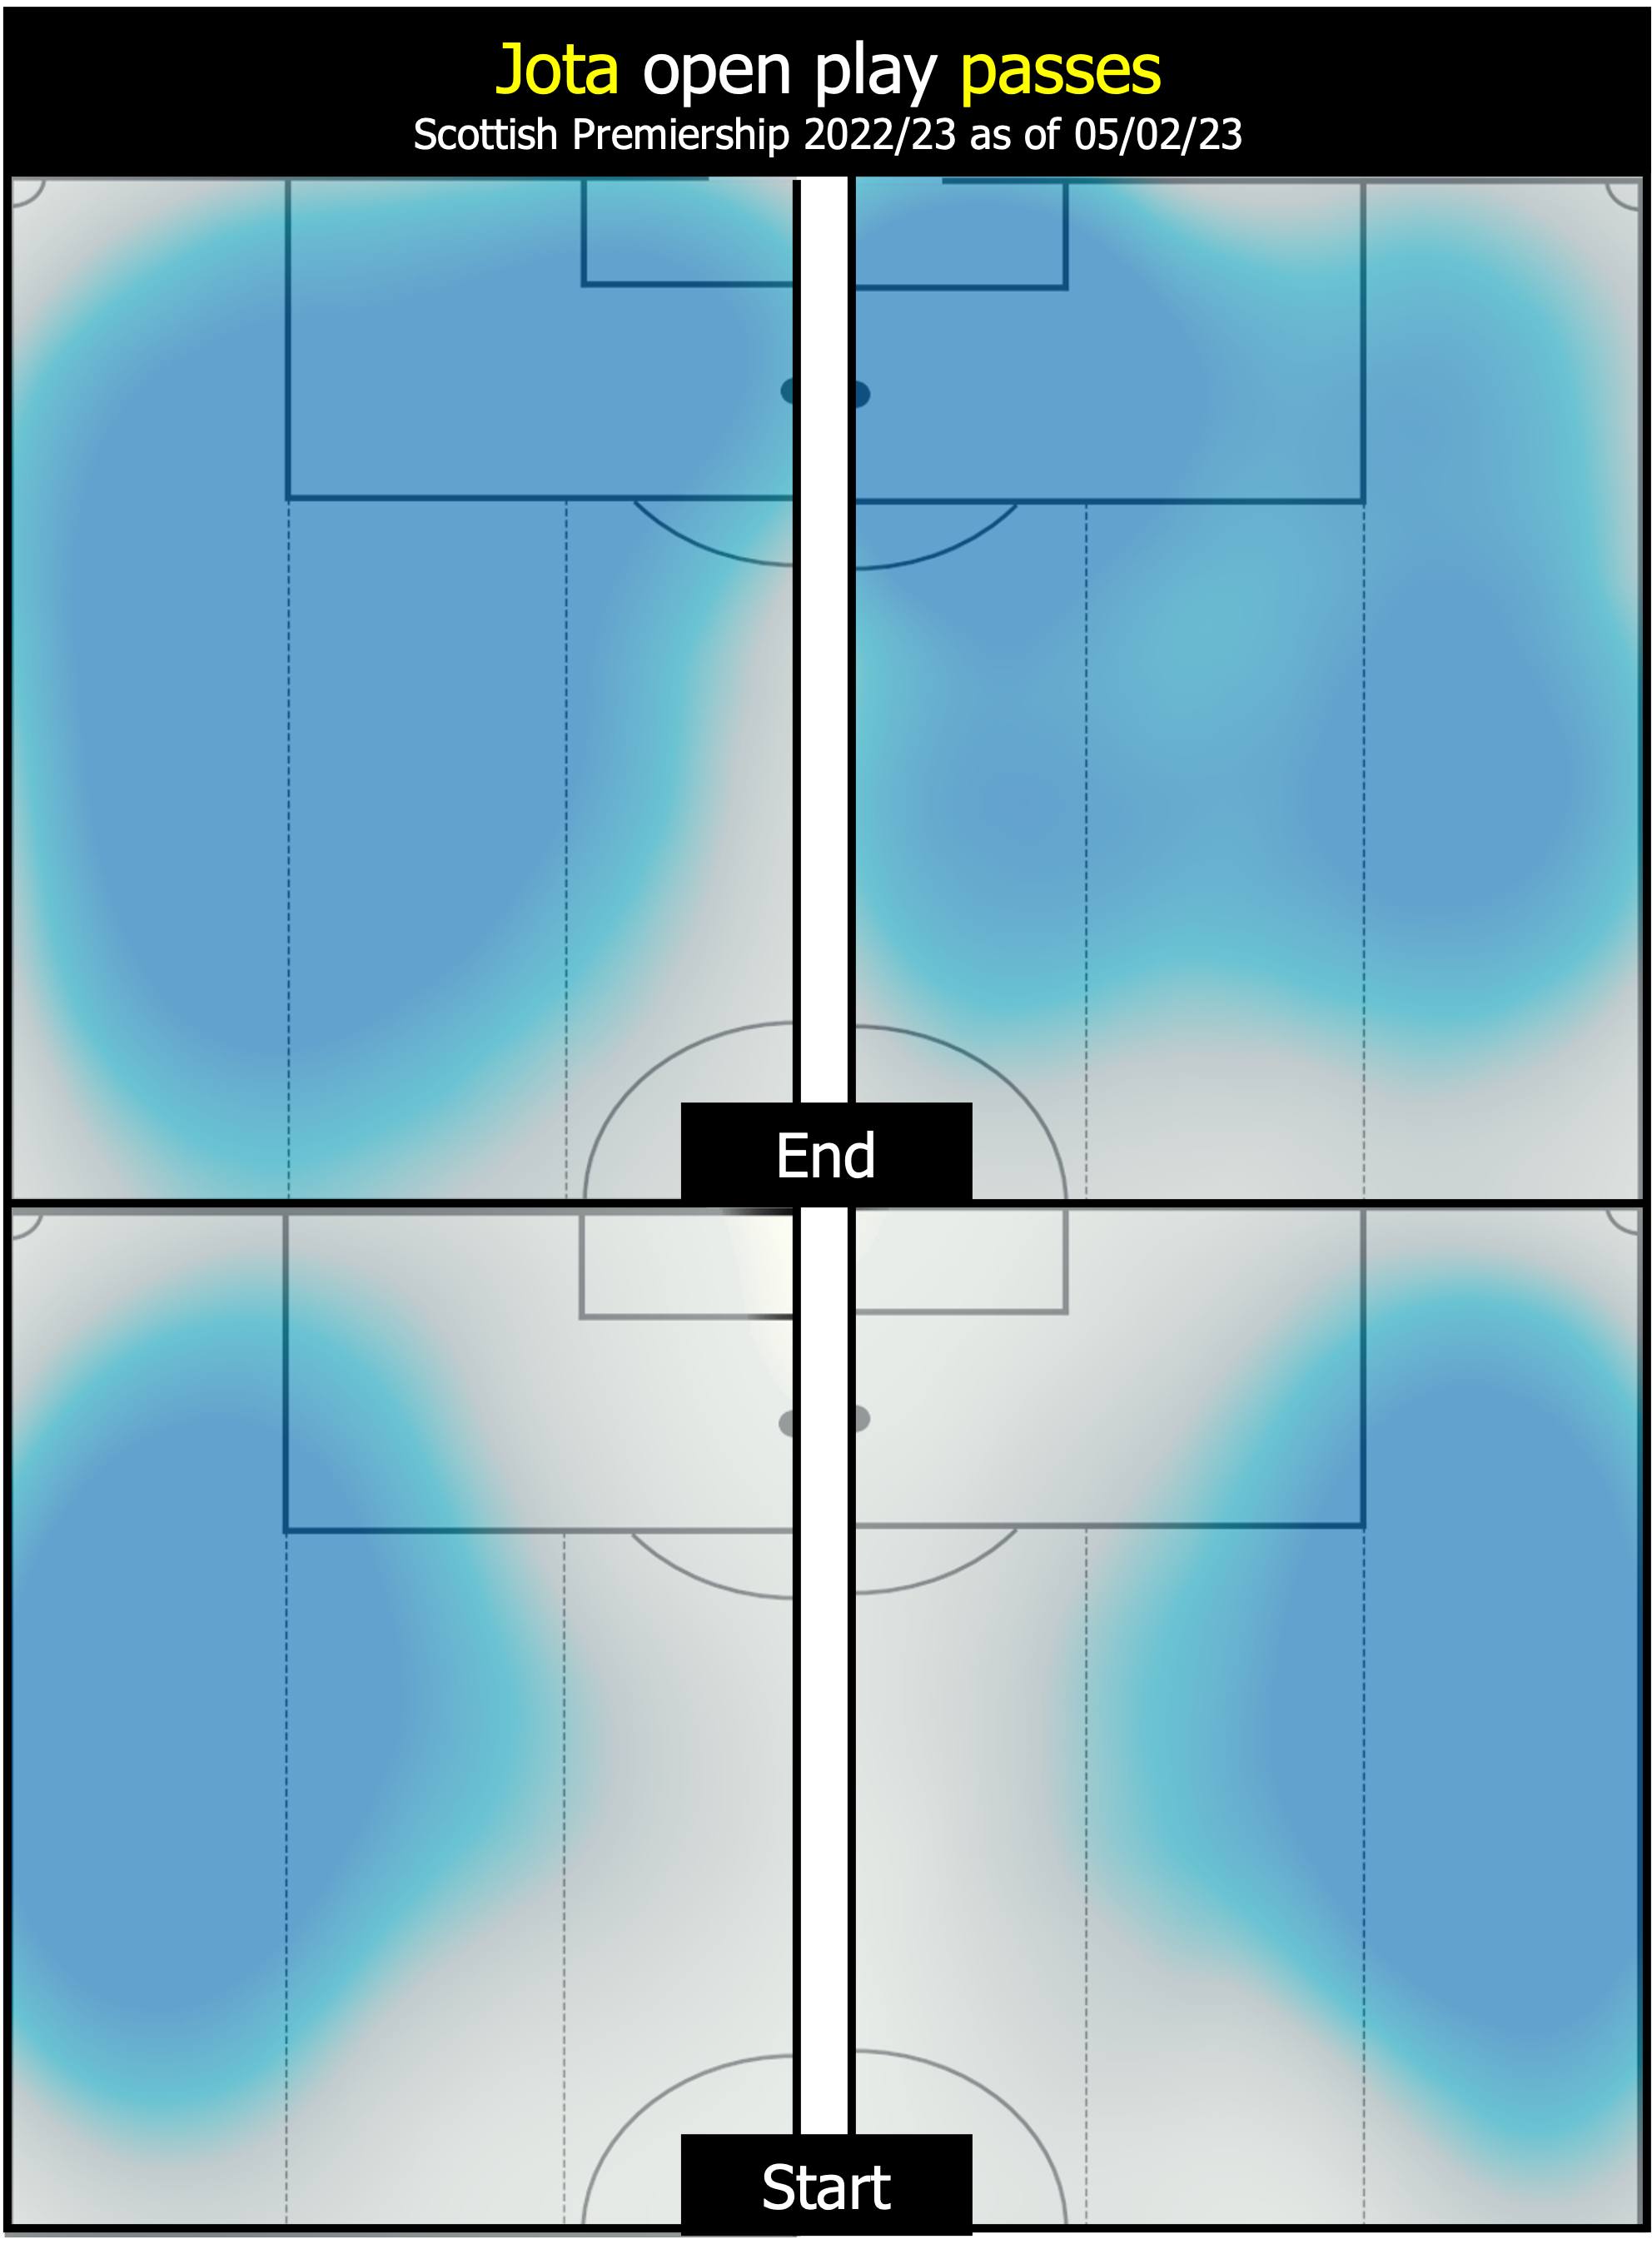
As mentioned, a key part of being a winger in this system is receiving the ball wide, even when the ball is on the other side of the pitch previously. This allows for horizontal distances to be covered more quickly than the defending team can move which isolates the ball far fullback for a 1v1 with the winger. The below heatmaps show how Jota is consistent with this trait on either side of the pitch.

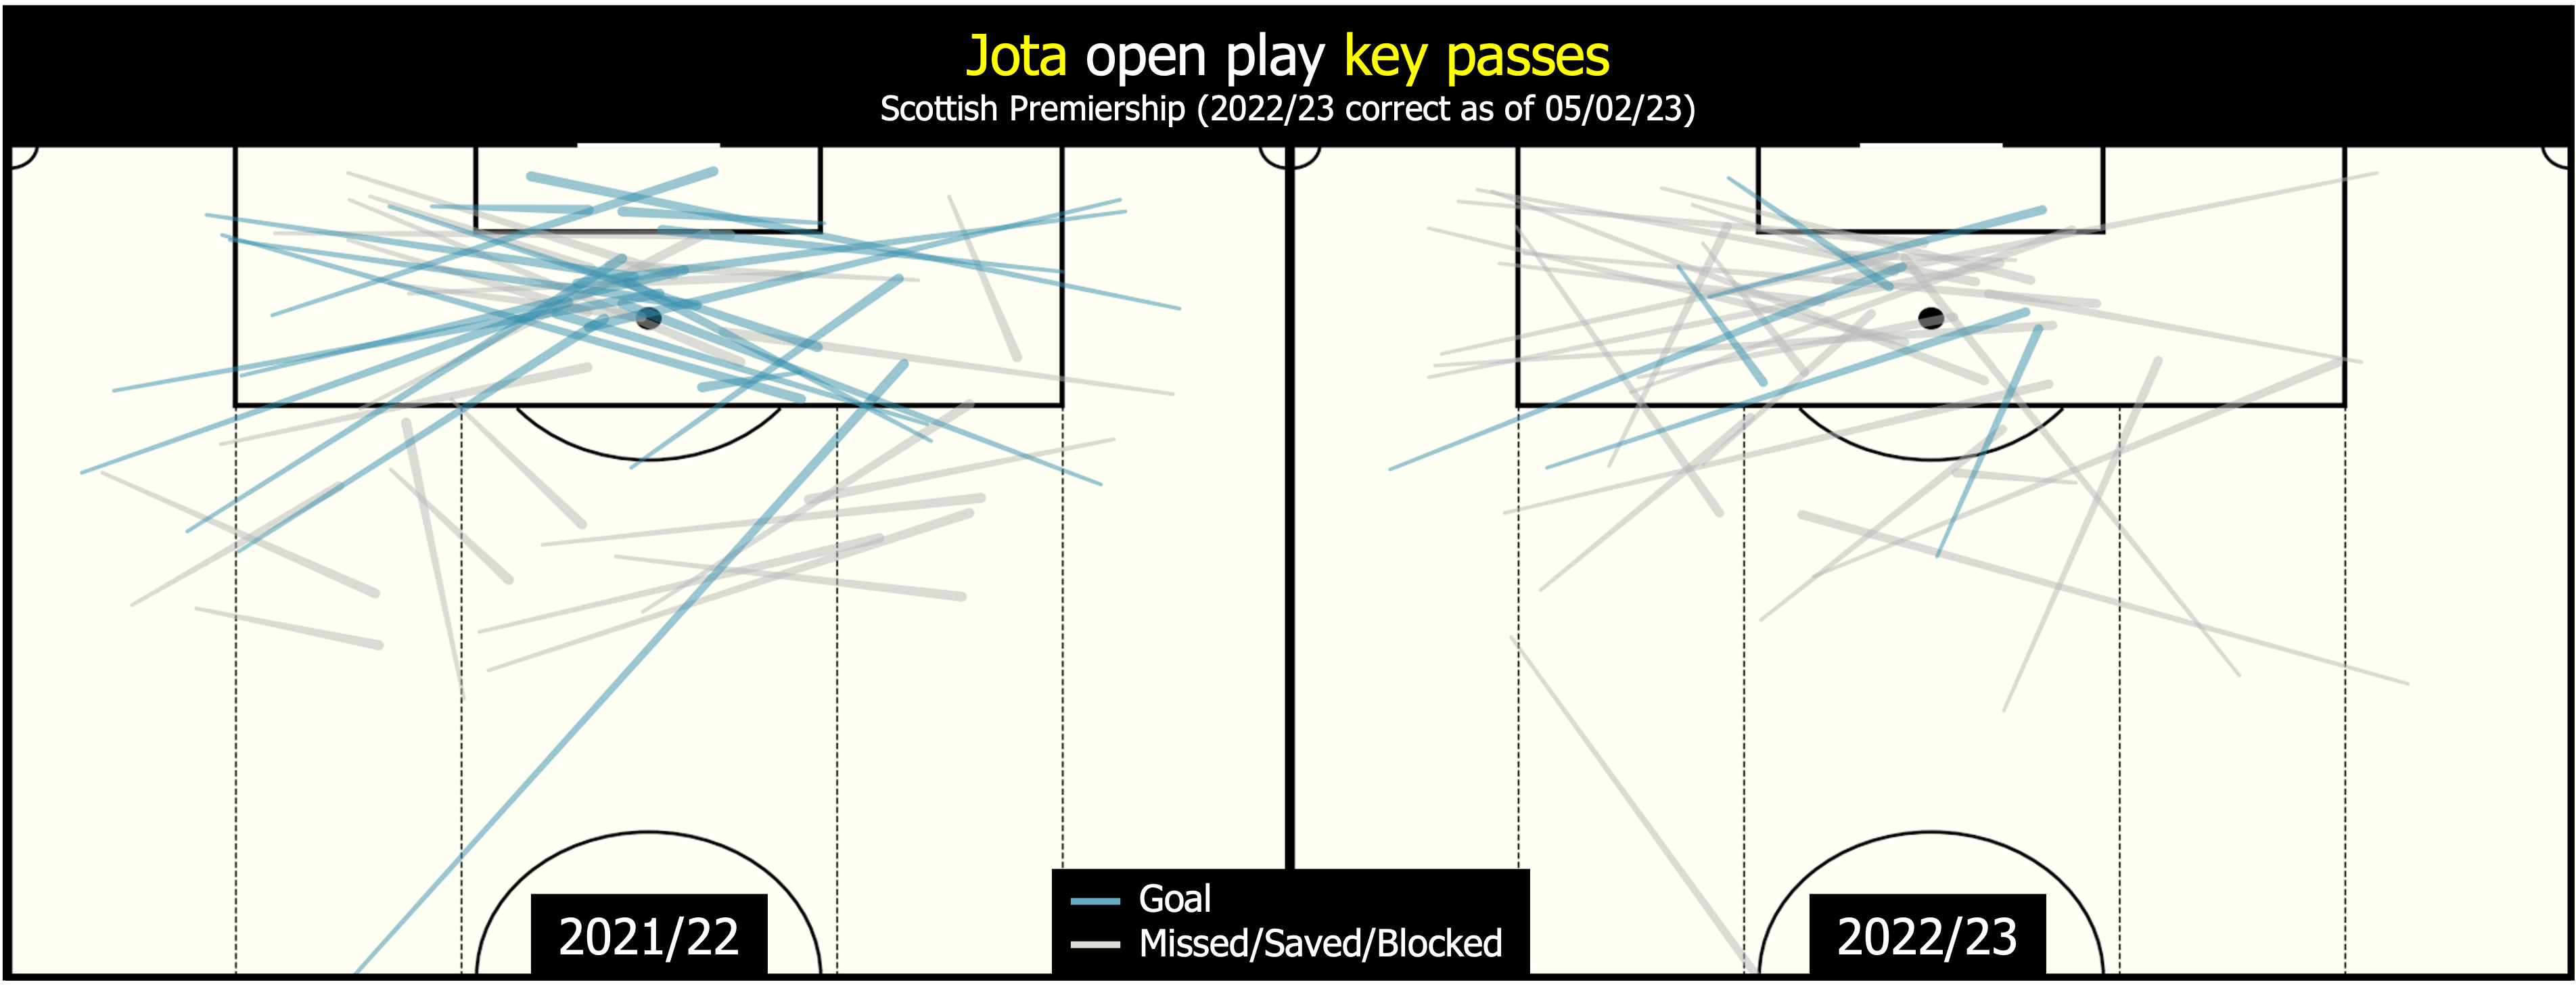
When choosing to pass, there aren’t any drastic differences. Given the consistency in receiving passes, it’s reasonable that passes start in similar positions on the left and right. The end location of passes made on the right focus more around distinct areas: the box, the supporting player on the wing, and the centre. This supports the idea of a more rigid right hand side for Celtic, with the players on that side sticking more rigidly to positions rather than attempting to be fluid and rotate. Another consideration, though, is that Jota is right footed. When heading down the wing, a cross into the centre of the box perhaps feels more natural while, when stopping and turning back, he turns onto his weaker (left) foot which could limit his ability to thread the ball into different areas. These differences can be seen in the below visual.
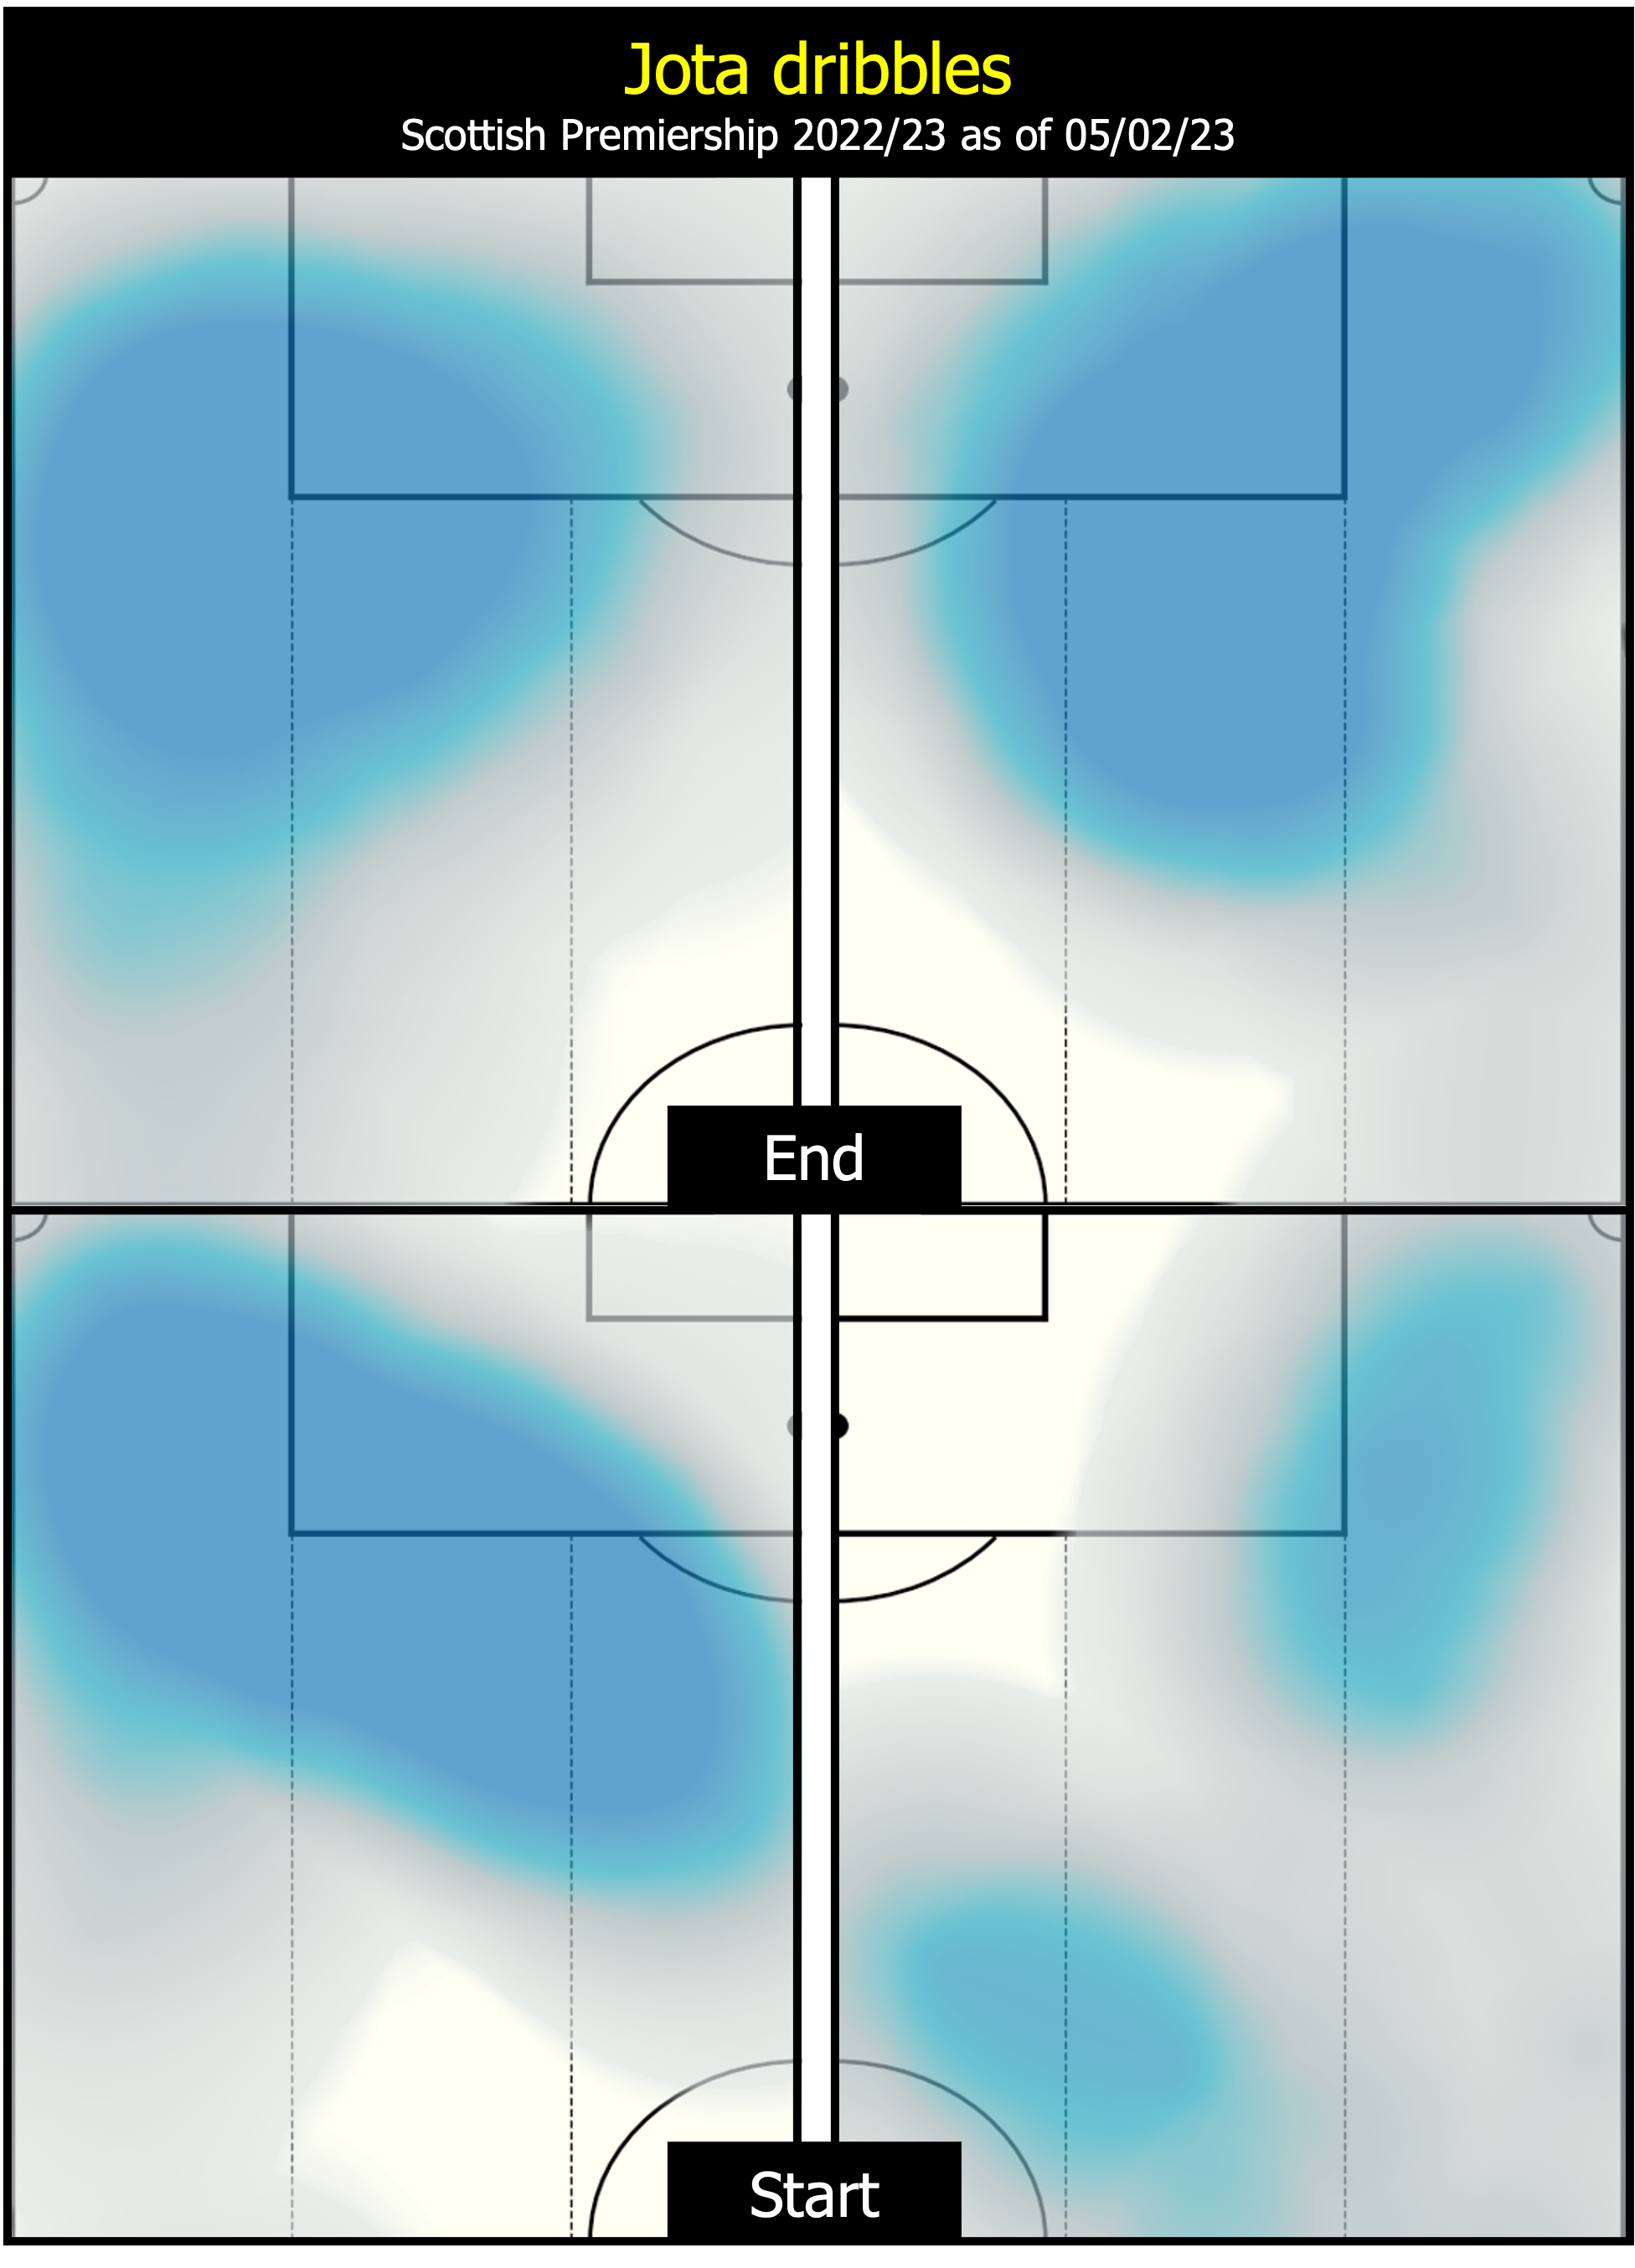
One of the bigger differences that can be seen when Jota switches wings is what happens when Jota opts to carry the ball instead of passing. The positions from which he chooses to do this are much more varied on the left, while the right suggests safer use of the ball - dribbling almost exclusively from deep centre and wide right instead. Dribbles on the right reach the touchline a lot more frequently, too. One argument for Jota playing on the left instead of Maeda is his on-ball dynamism that feels less present on the right. However, after Postecoglou’s comments about players ‘not hitting the right areas’ during a period of squad rotation (Jota’s absence suggesting he may be one of the guilty parties), it’s perhaps the simplification of Jota’s role that makes him more desirable on the right than the left; playing on his traditionally natural side (right footed on the right) as a part of Celtic’s less fluid side, Jota is forced to cut the superfluous additions from his role, hitting the byline to cut the ball back more often. This difference is visualised below.
It’s a little more difficult to assess actual chance creation from either side as - due to less time on the right - there aren’t enough chances created from the right to draw definitive conclusions. Looking just at the left, though, there does seem to be an increased emphasis on wider cutbacks this season. This is shown below.
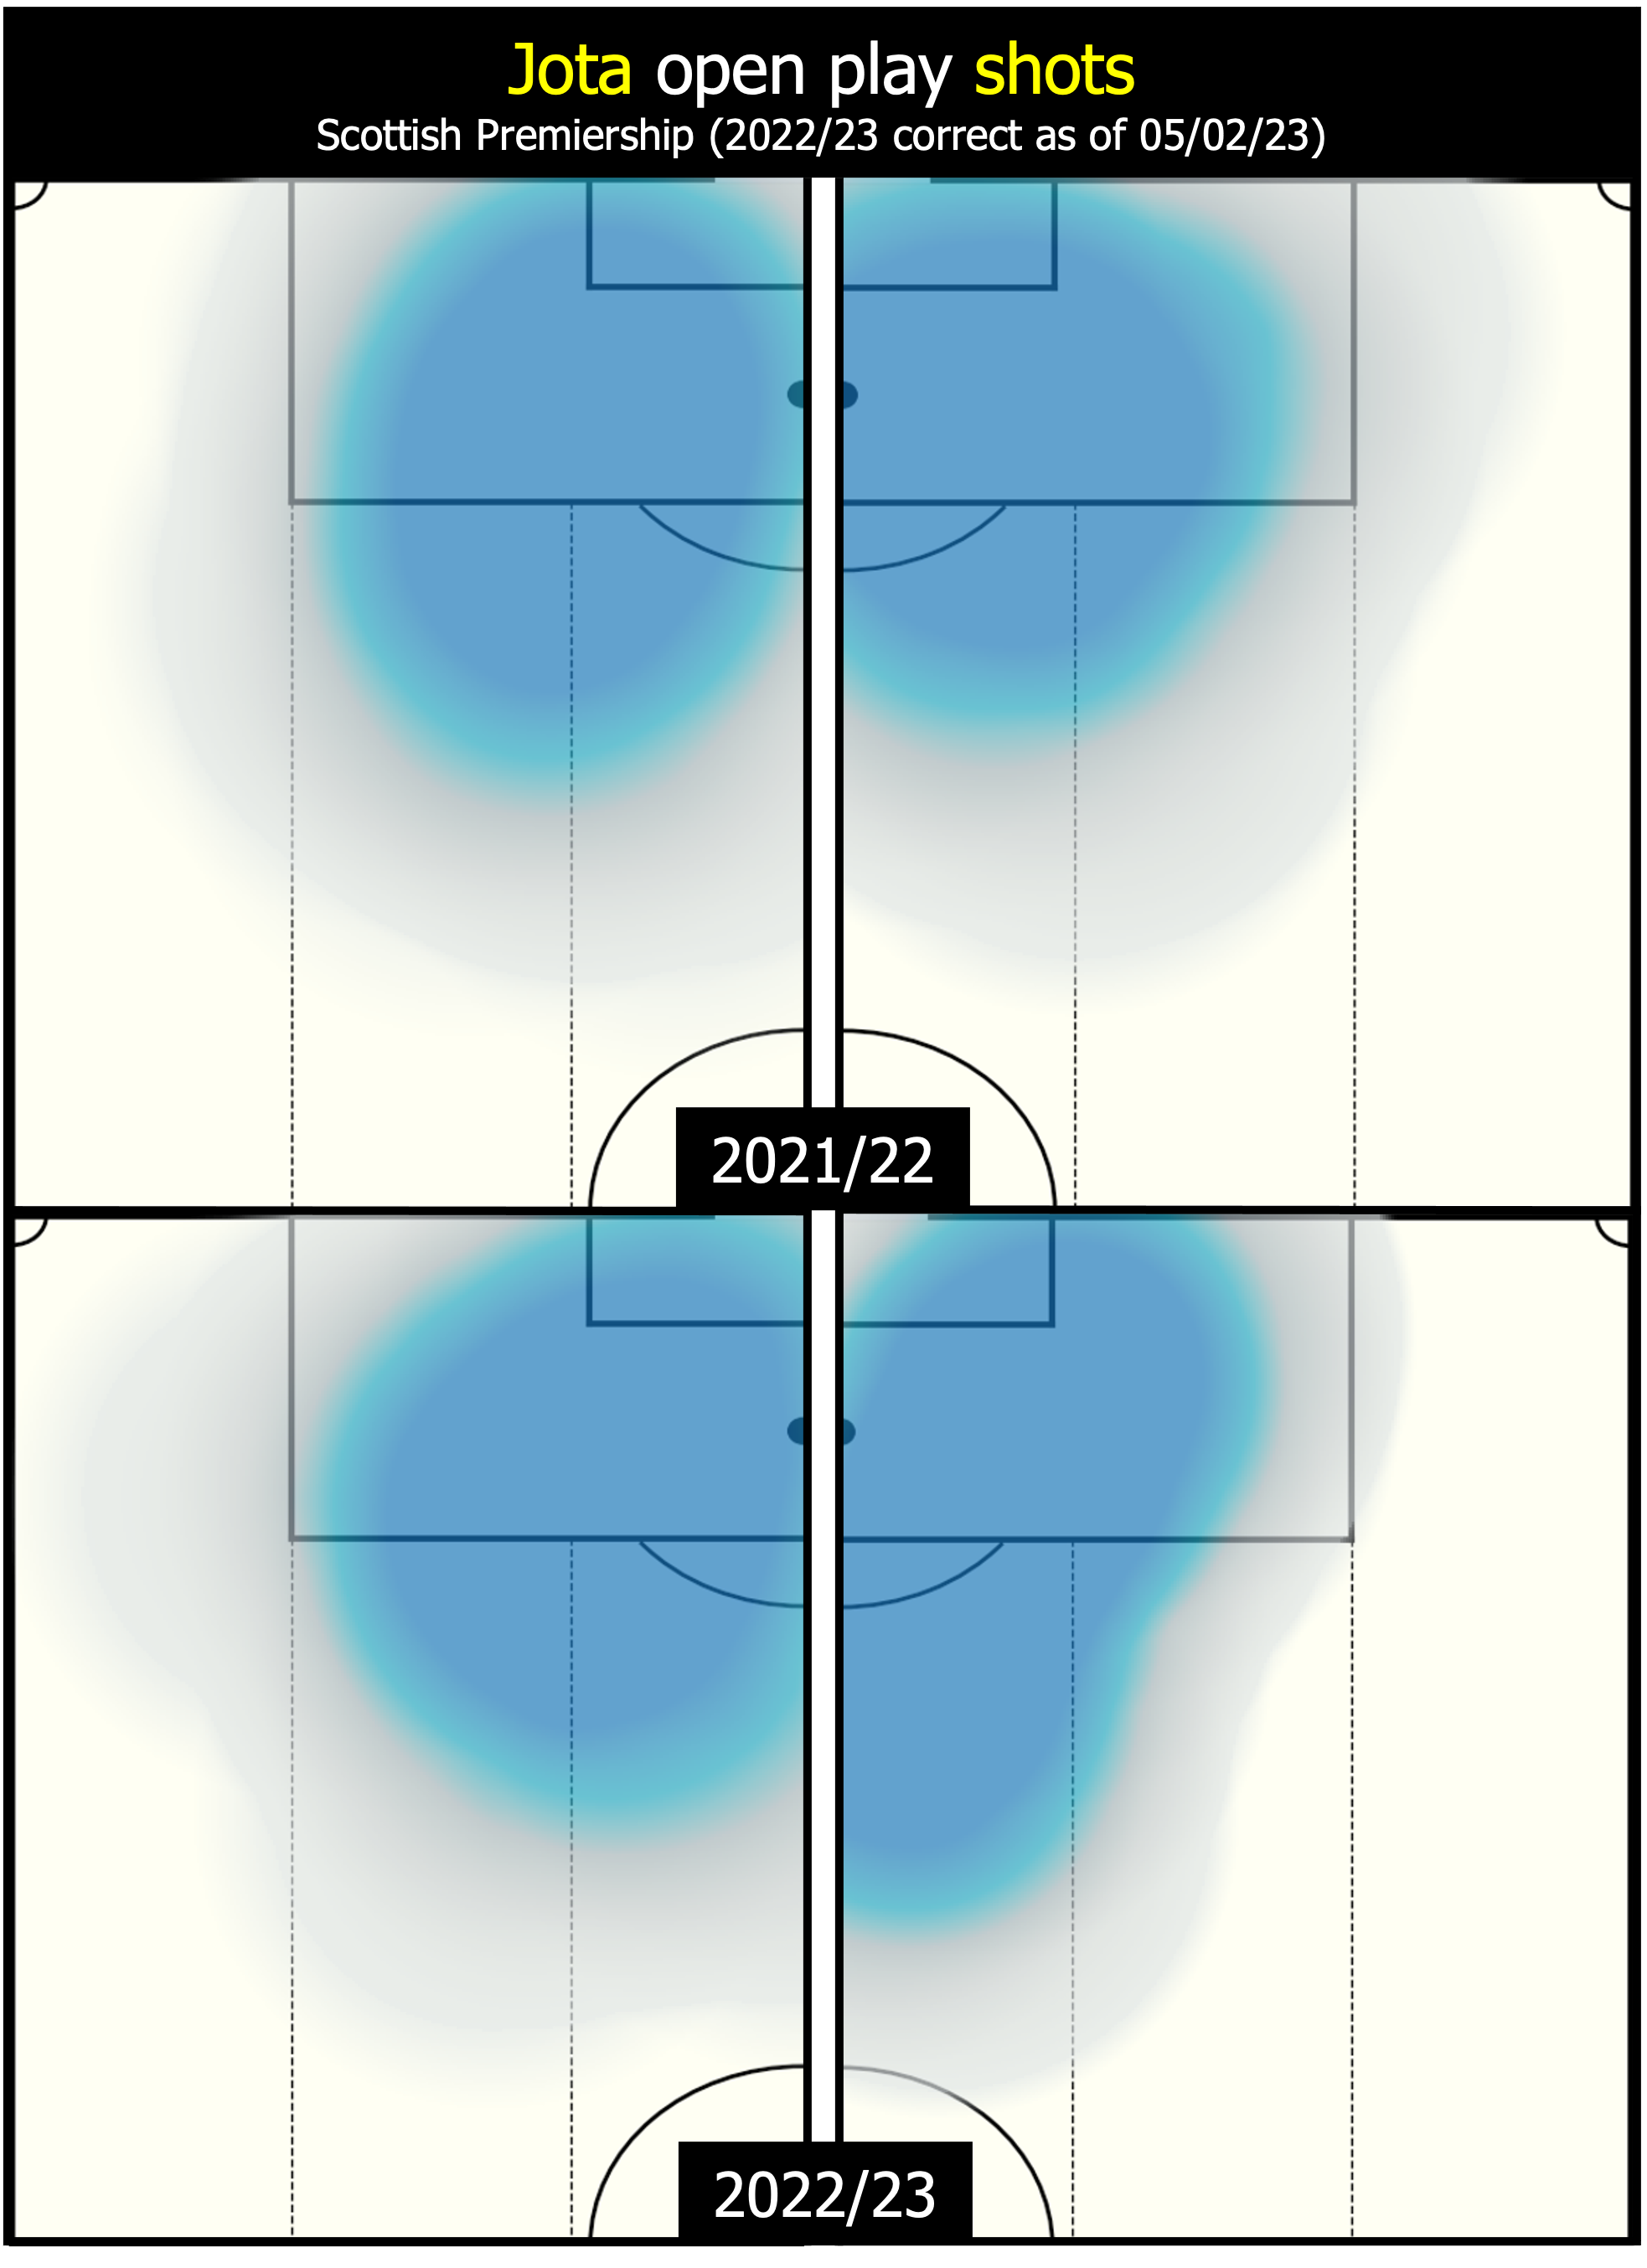
The last in-possession event to be analysed is Jota’s shooting which - last season - was largely similar from either side of the box. This season, however, there is an increase in distance shots from the right hand side. As mentioned in the introduction, though, this dataset was unable to differentiate between situations where Jota was intended to play on either wing so this could be the result of Jota cutting across from the left and getting tunnel vision until he can get a shot off - a situation that regularly occurred in the first part of the season.
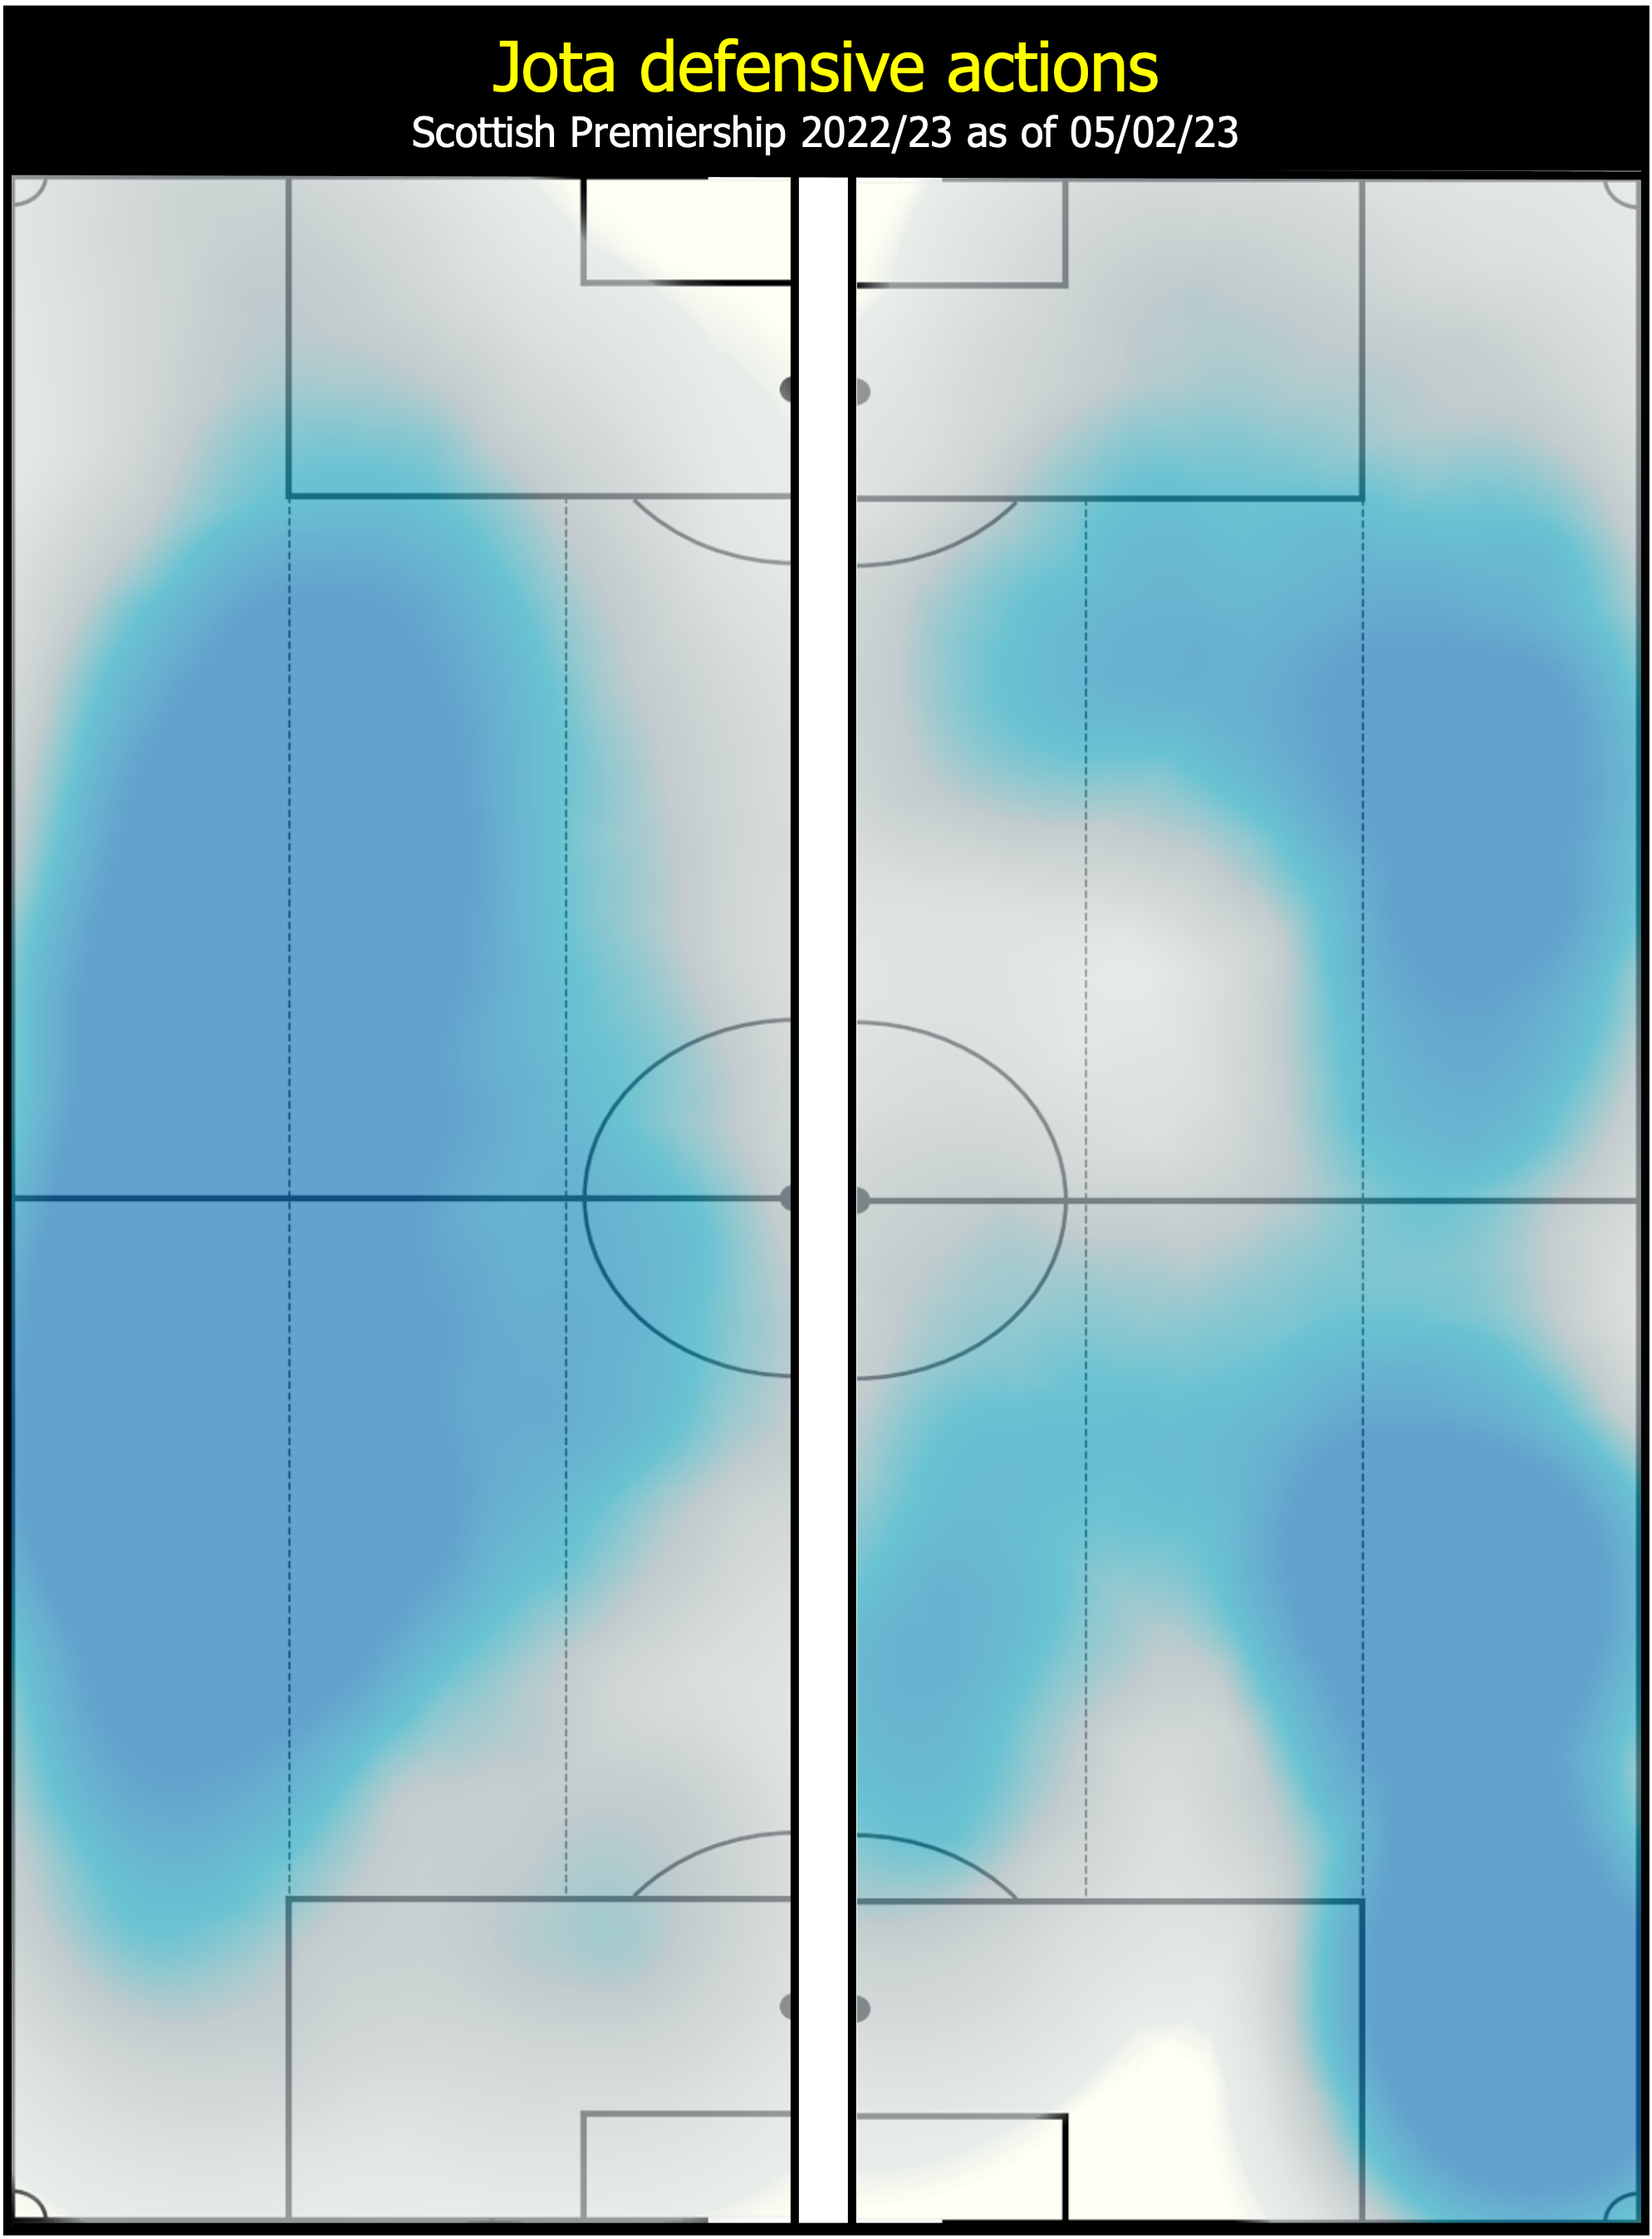
Finally, this analysis looks at Jota’s defensive actions on either side. The biggest differences on the right (shown below) are less presence centrally in the middle third and more presence centrally in the defensive and attacking thirds, as well as significantly more presence near the defensive corner flag. This could indicate vulnerabilities at right back that need support, but could also represent an area that opponents target in transition as Celtic build up more on the left (leaving the right vulnerable to becoming underloaded).
Overall, Jota instinctively feels limited on the right. The traits that have become associated with him - fluidity, dynamism, and dribbles - are hampered by playing on his traditional natural side, as well as by Celtic’s more rigid players on that side. However, this creates two key advantages. Firstly, it reduces Jota’s role to the core duties that Postecoglou values within the system. Secondly, it assists the problems created by the Johnston-Mooy-Abada triad discussed last week. While playing this simplified role may feel more suited to Maeda’s tendencies, it might be the desire to have Jota emulate these actions more often that keeps him on the right of the pitch.

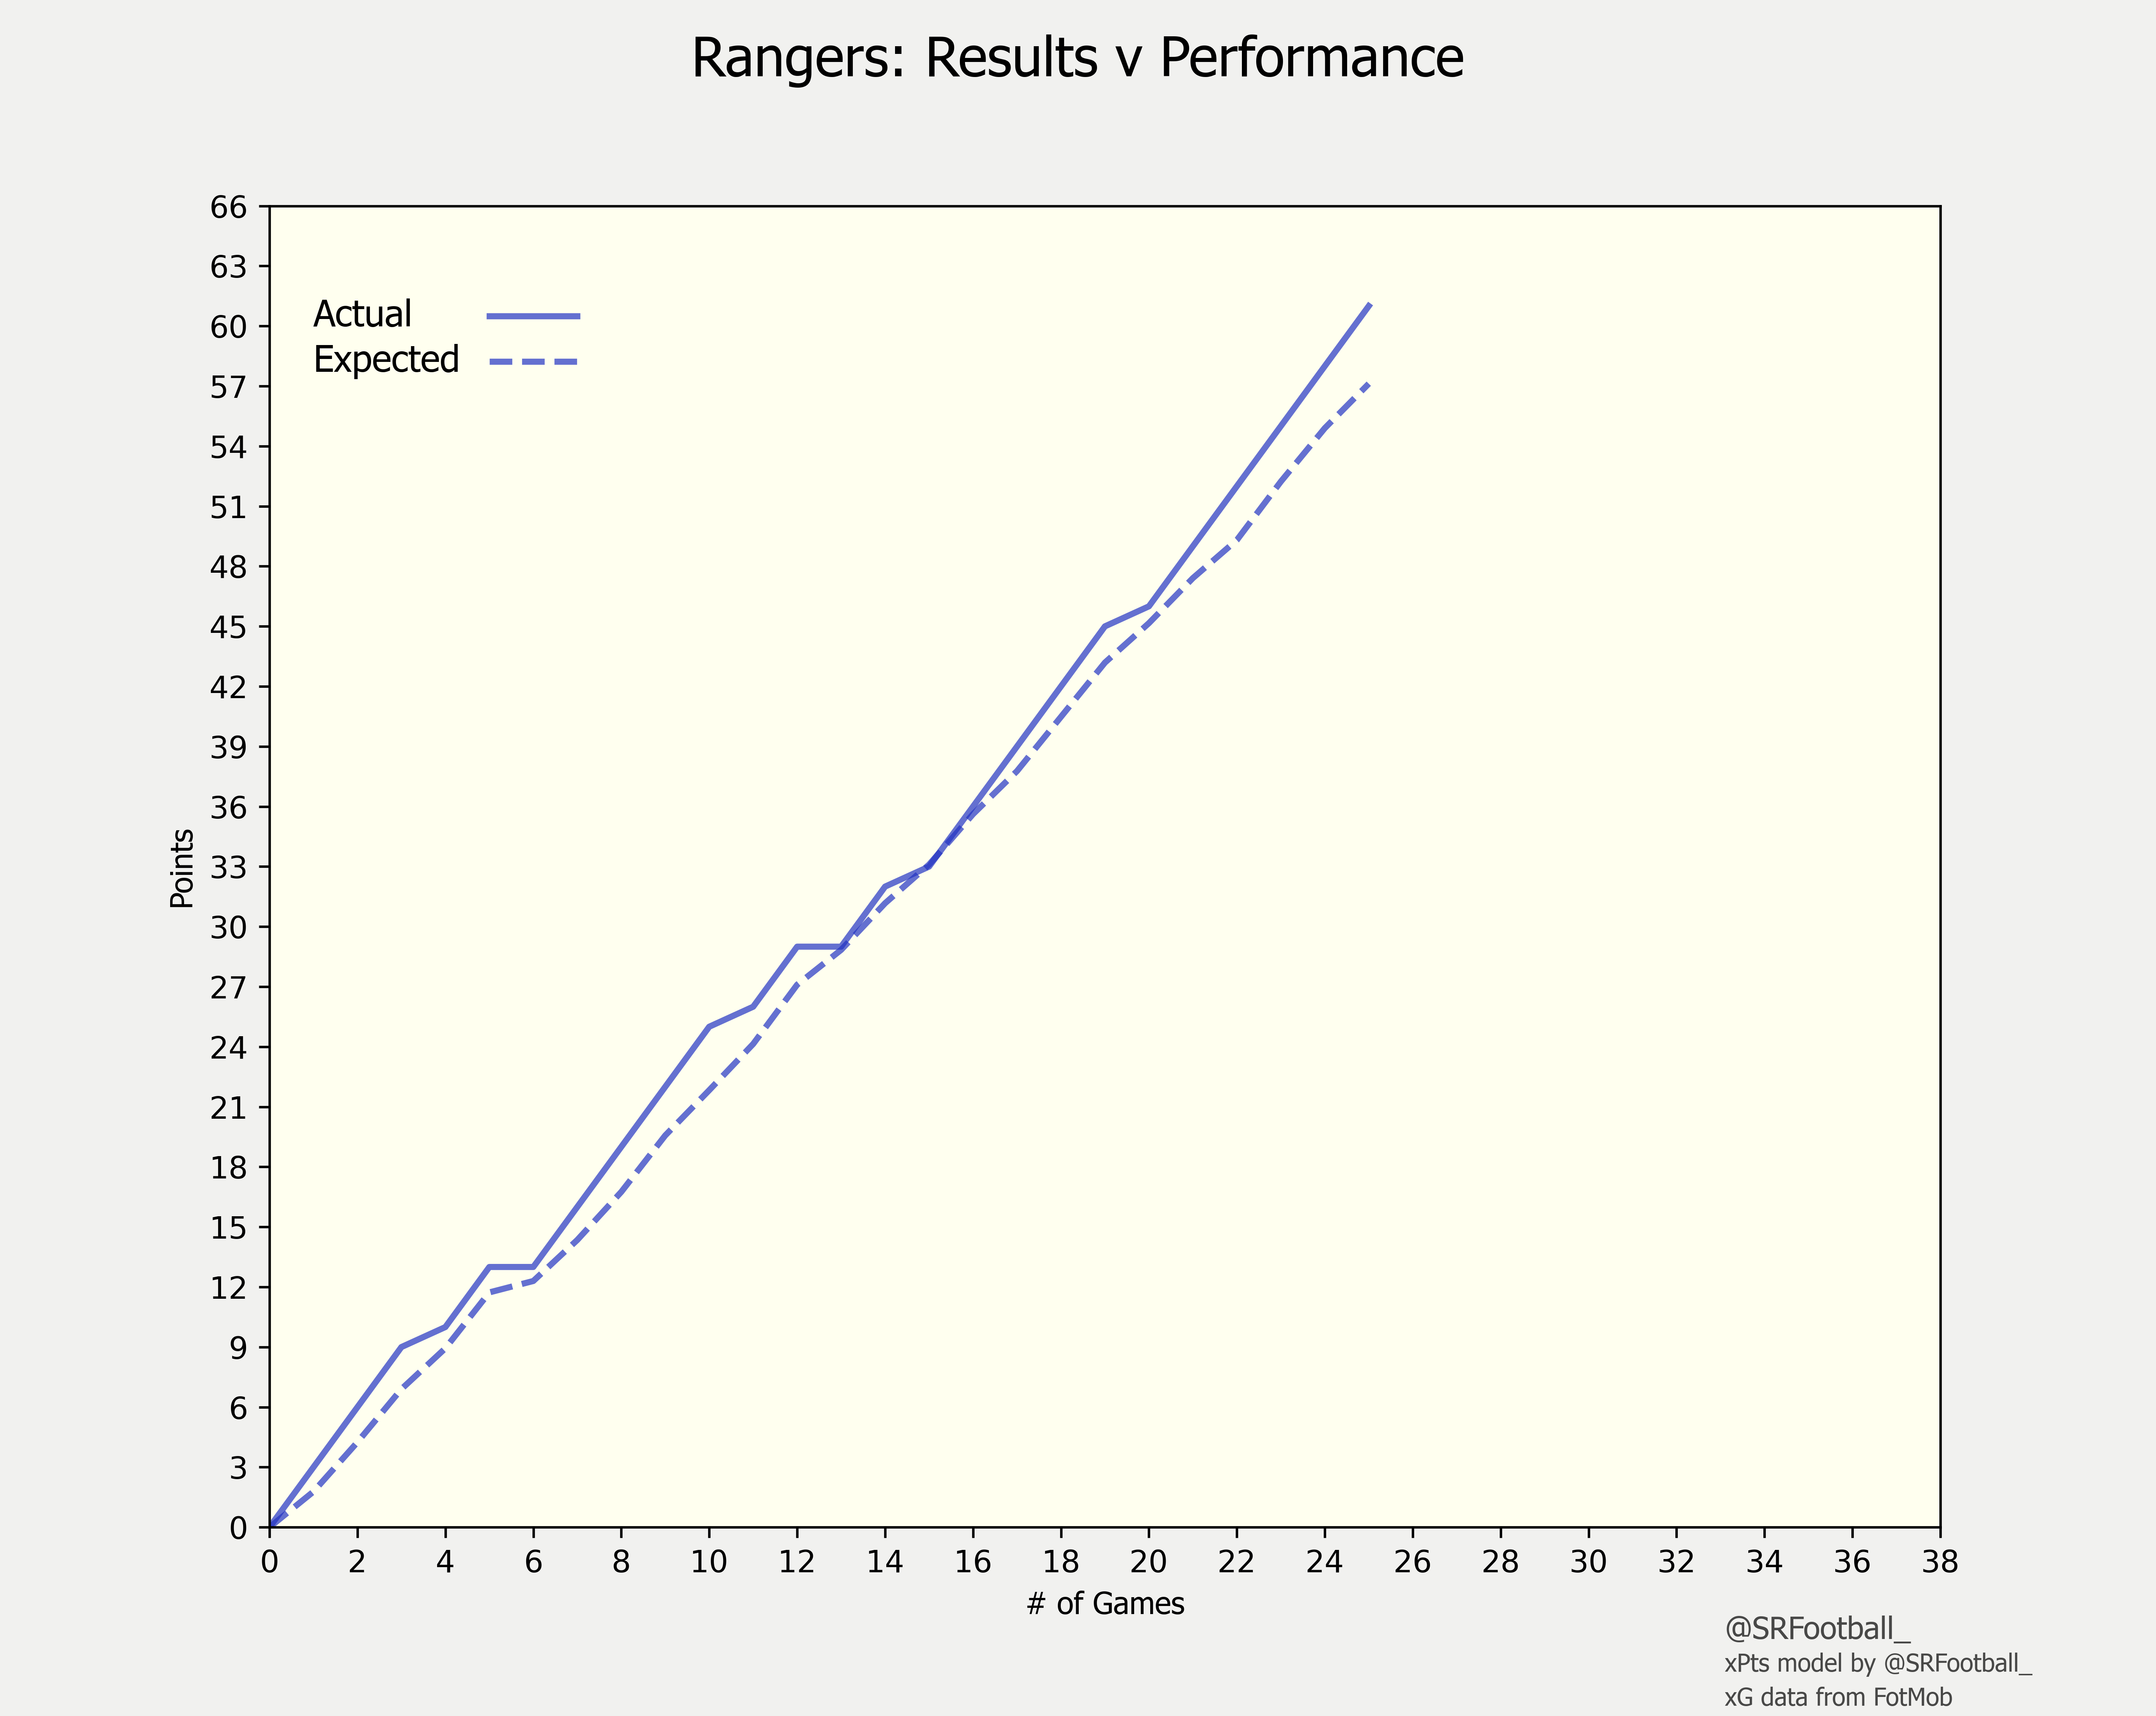
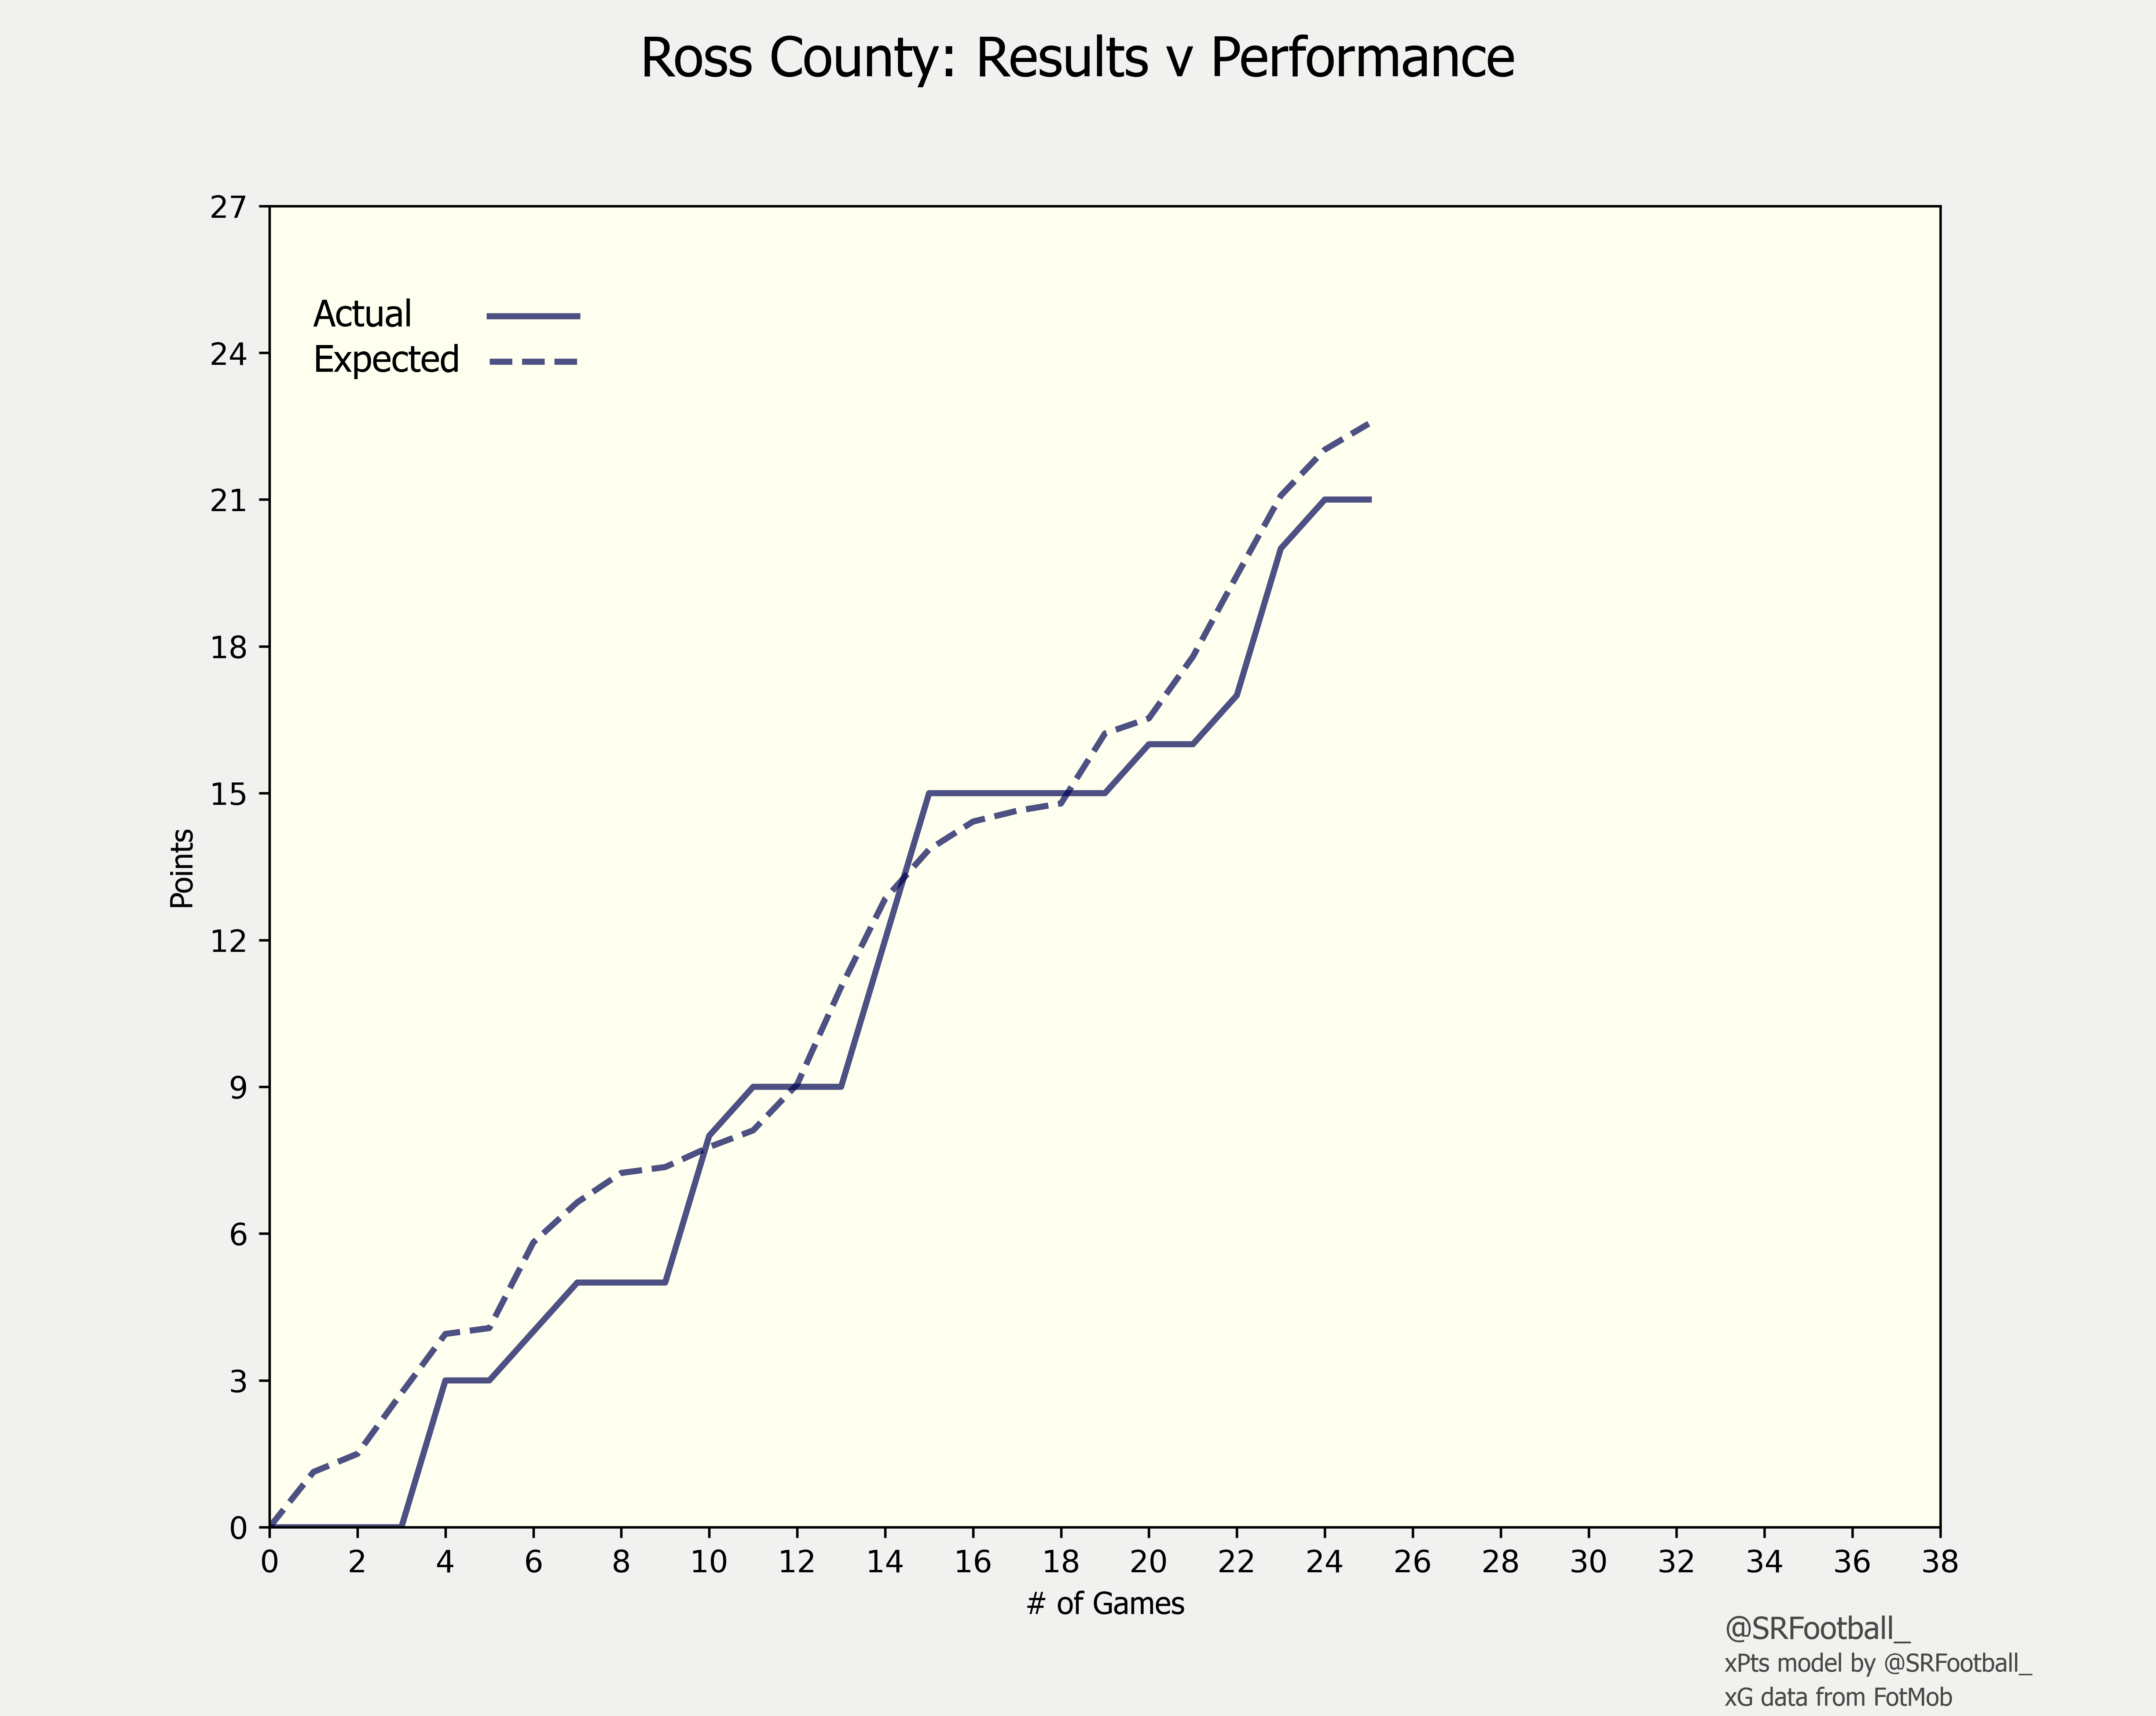
Rangers 2-1 Ross County


A routine victory for Rangers came despite Ross County’s attempts to cluster the box and prevent Rangers from taking any high-quality chances. The fruits of this tactic can be seen in the cluster of low-xG shots from Rangers inside the centre of the box, and the fact that Ross County blocked six of their shots.
As discussed previously, Ryan Kent played an extremely narrow role contrasted with how Giovanni van Bronckhorst looked to utilise him previously. Along with the team-level benefits that come from the increased compactness (overloads in dangerous areas, shorter access distances to second balls etc), this suits Kent as a player, too. The below visual highlights how, since Michael Beale took over, Kent’s role has drifted inwards once again.
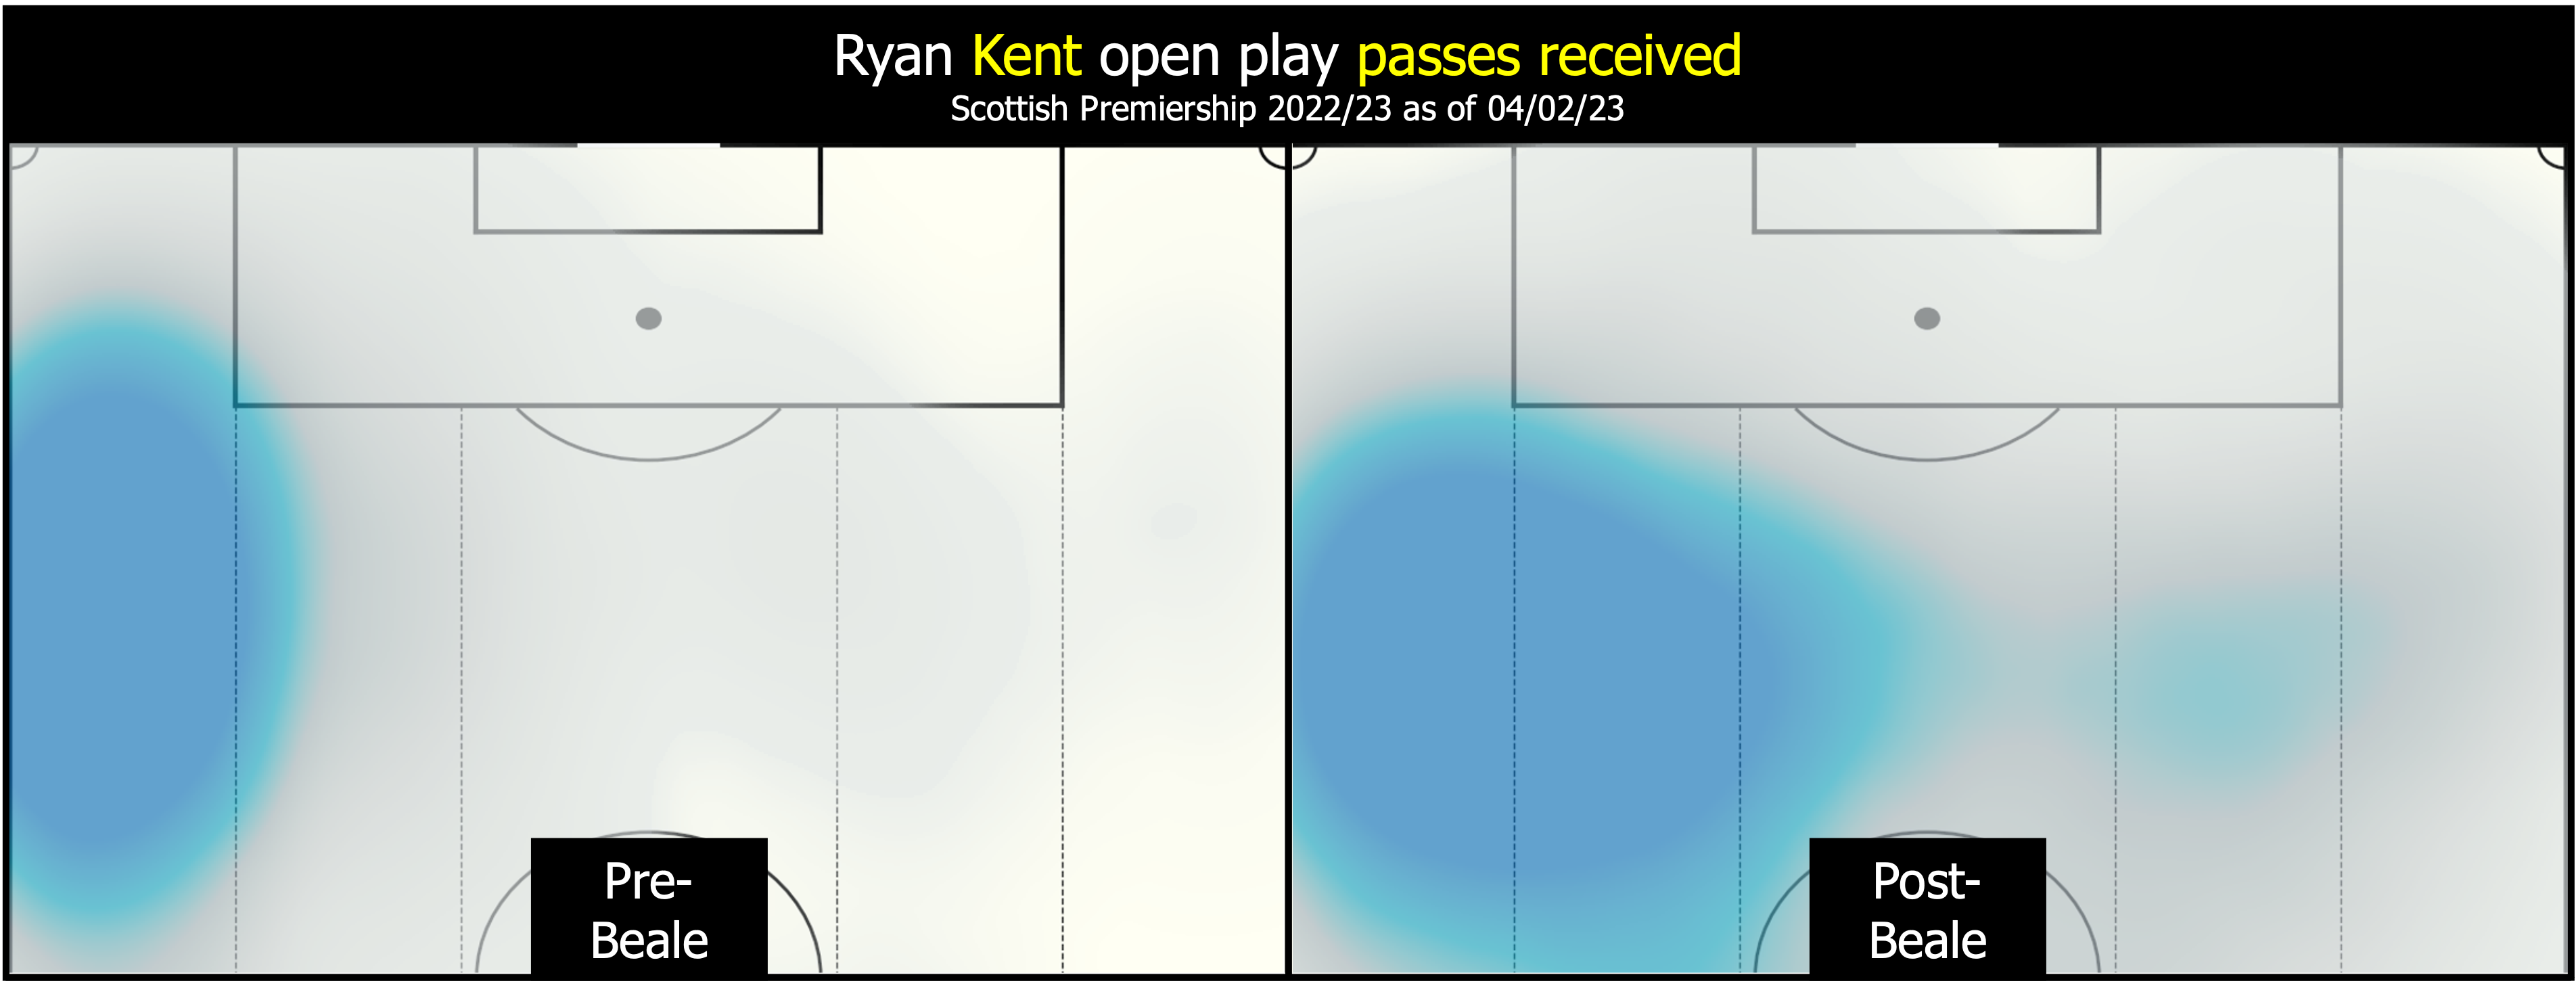
A key trait that makes Kent successful is his ability to carry the ball and change direction quickly. Under Steven Gerrard, this was utilised centrally to cause disorganisation inside defensive blocks as Kent could be dynamic with direction to lose his marker. Under Van Bronckhorst, Kent was pushed wider with the aim of having him engage fullbacks and attack the space behind from nearer the touchline. This allowed defenders to know ahead of time where Kent’s end destination was which limited the impact of his ability to change direction, rendering him less effective. Beale moving Kent centrally once again allows the winger to take advantage of his key strength, making him more effective once again. This is highlighted in the visual below.

Thus far, it appears as though Beale is simply working to undo the changes made by Van Bronckhorst. This has been successful through his first ten games, but it remains to be seen how Beale will deal with adversity through his reign and make this team his own rather than a recreation of the side Gerrard and him built.
Hearts 3-1 Dundee United

Aberdeen 3-1 Motherwell

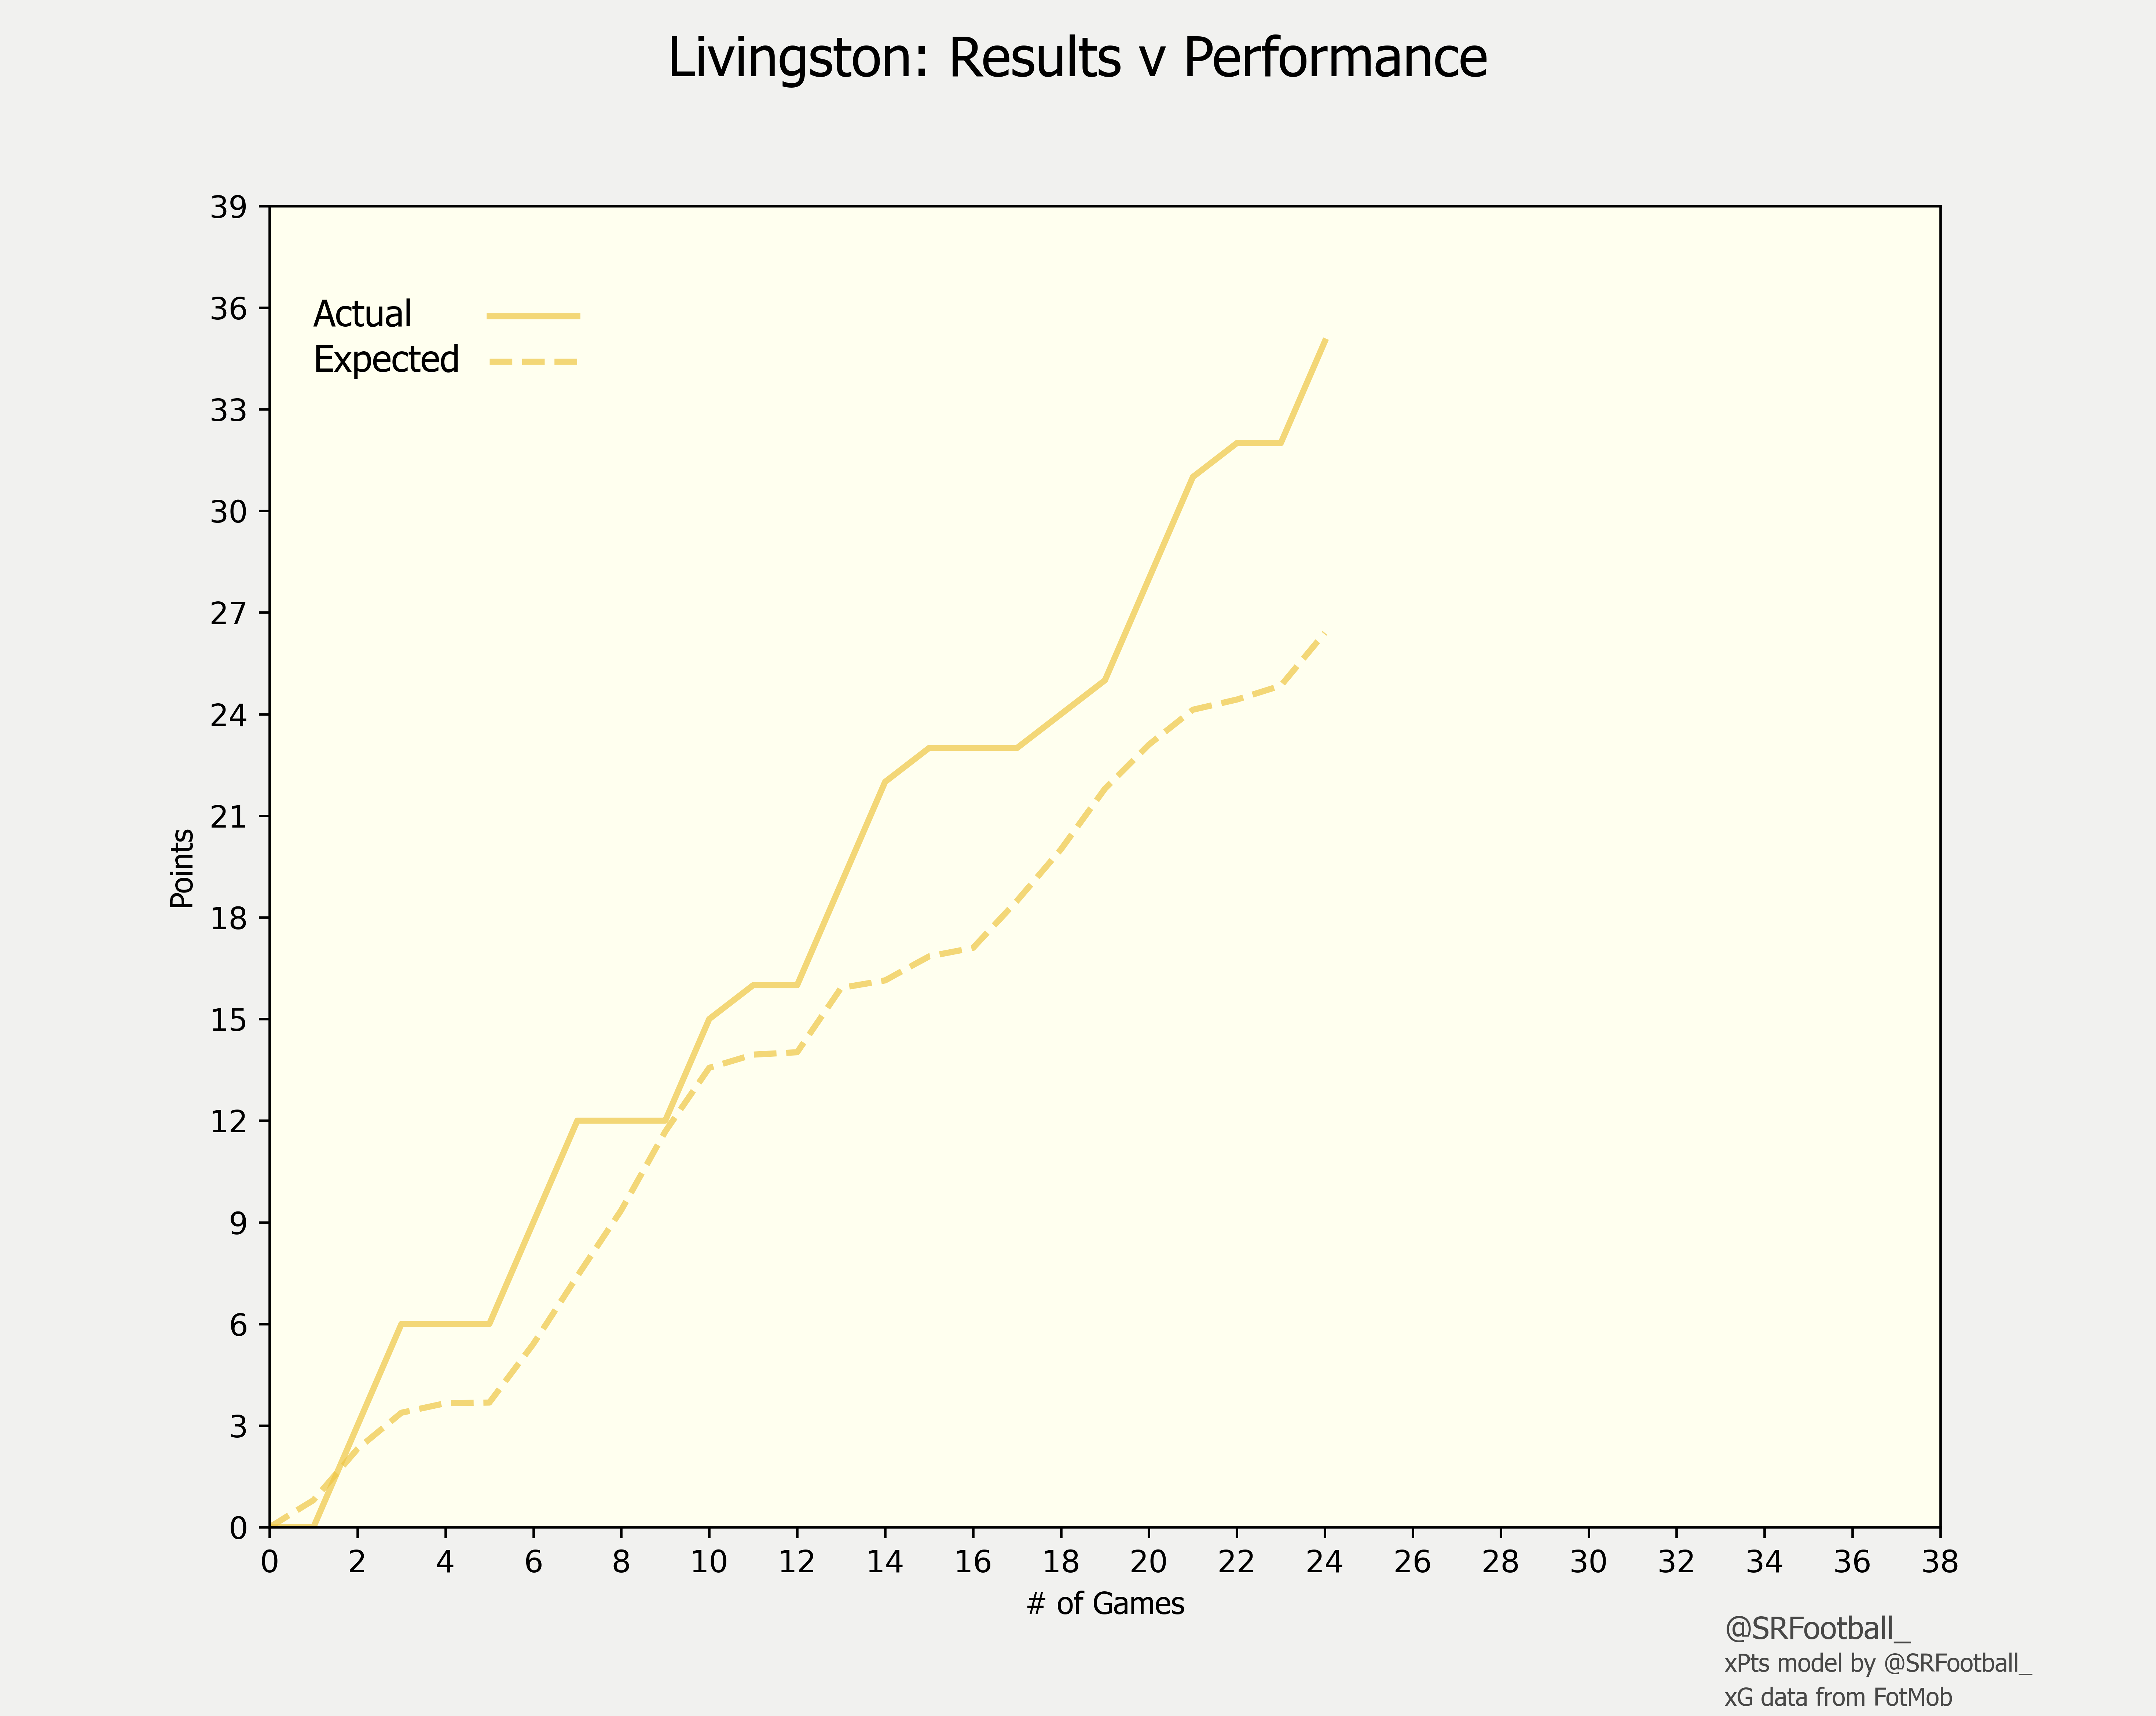
Livingston 3-1 Kilmarnock


St. Mirren 0-1 Hibernian

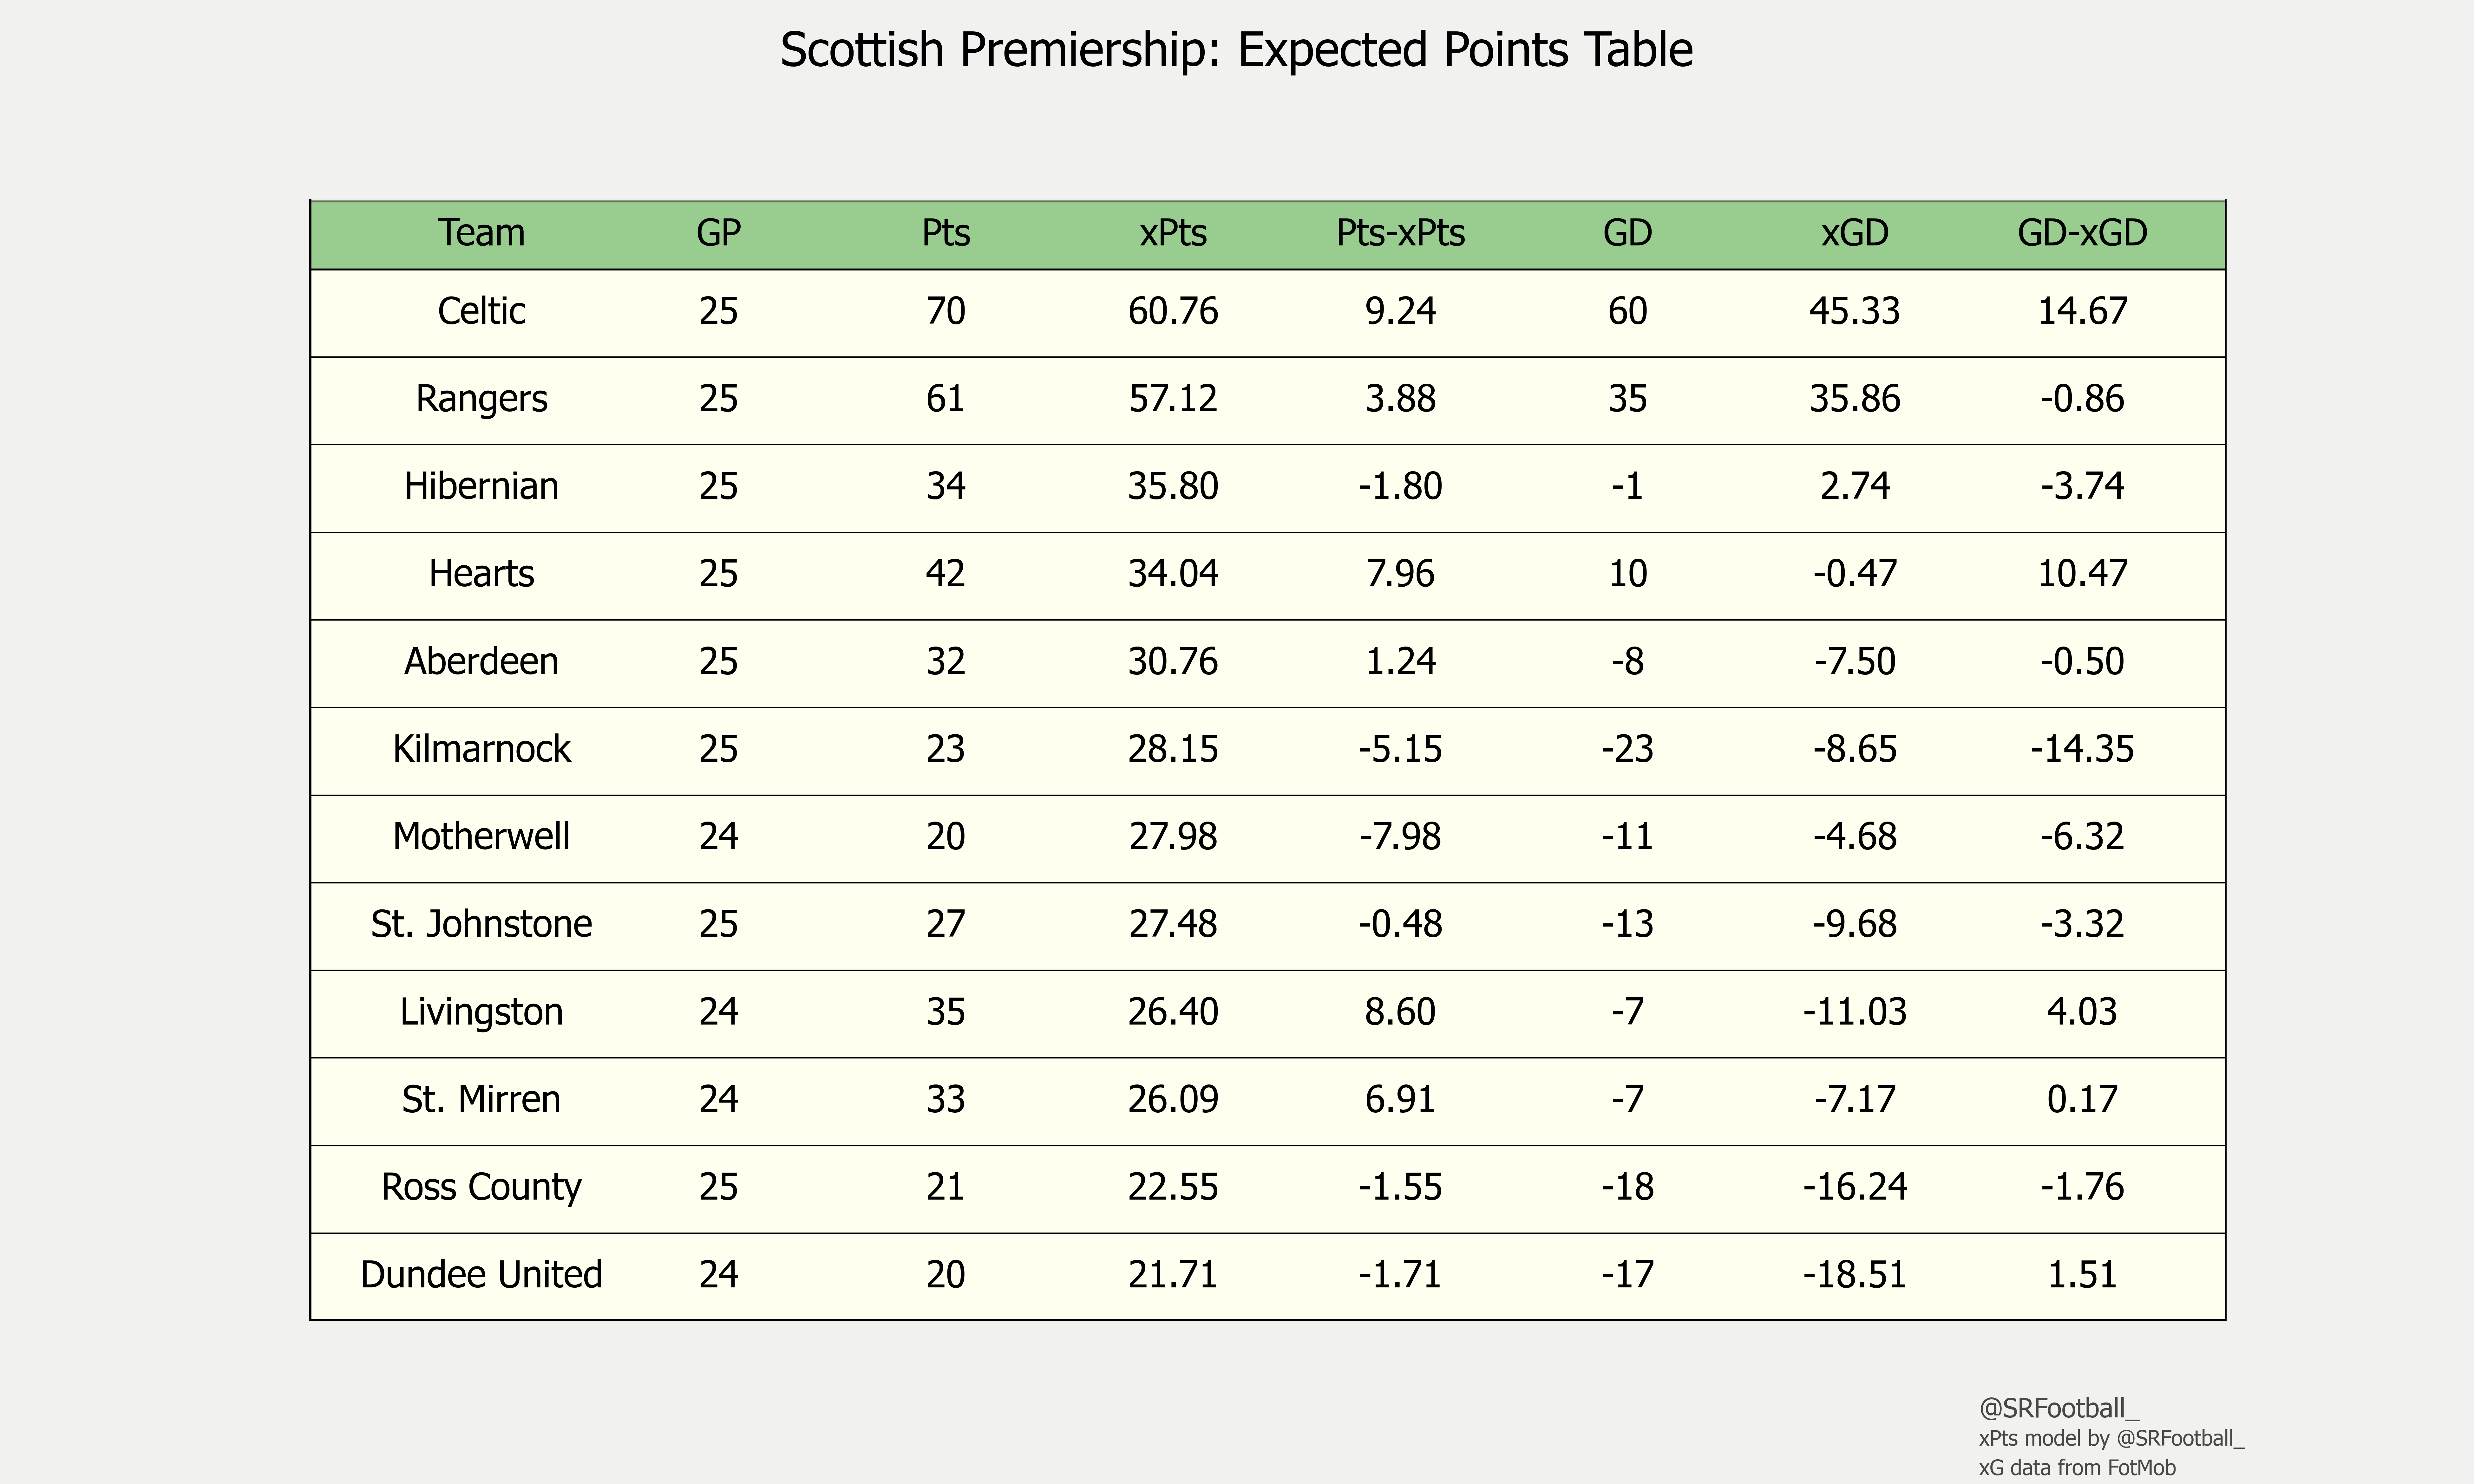
xPoints Table
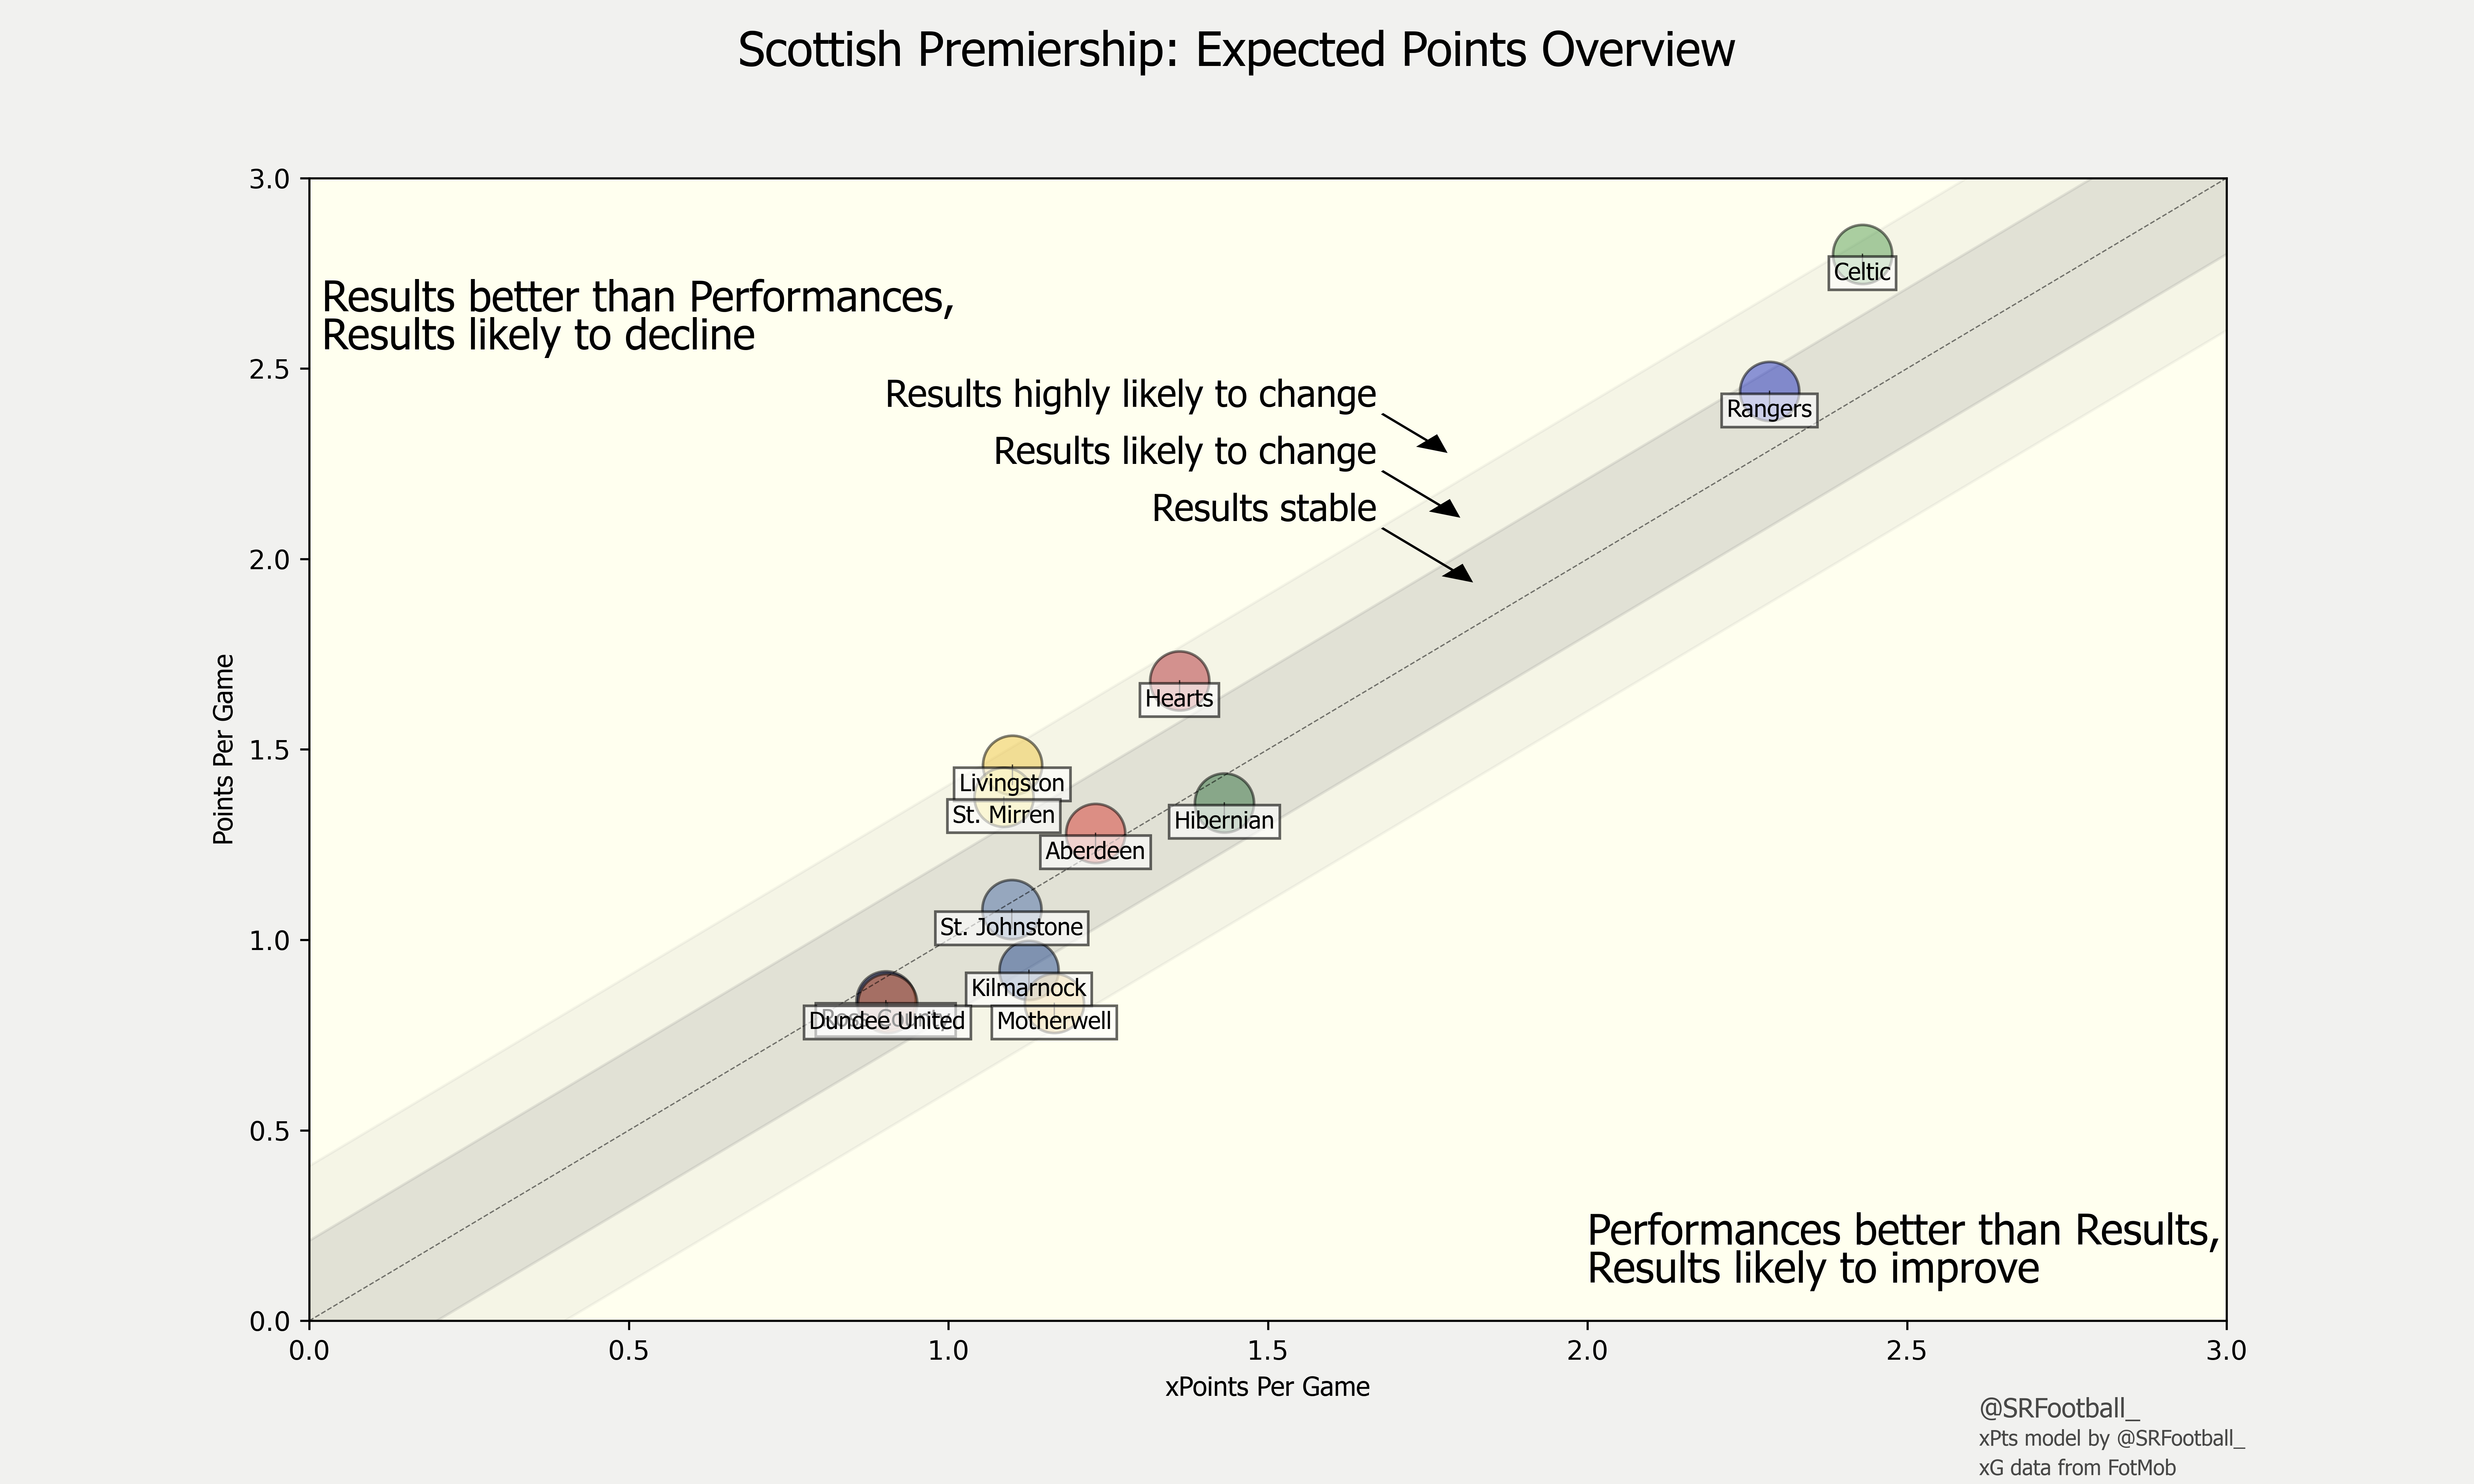
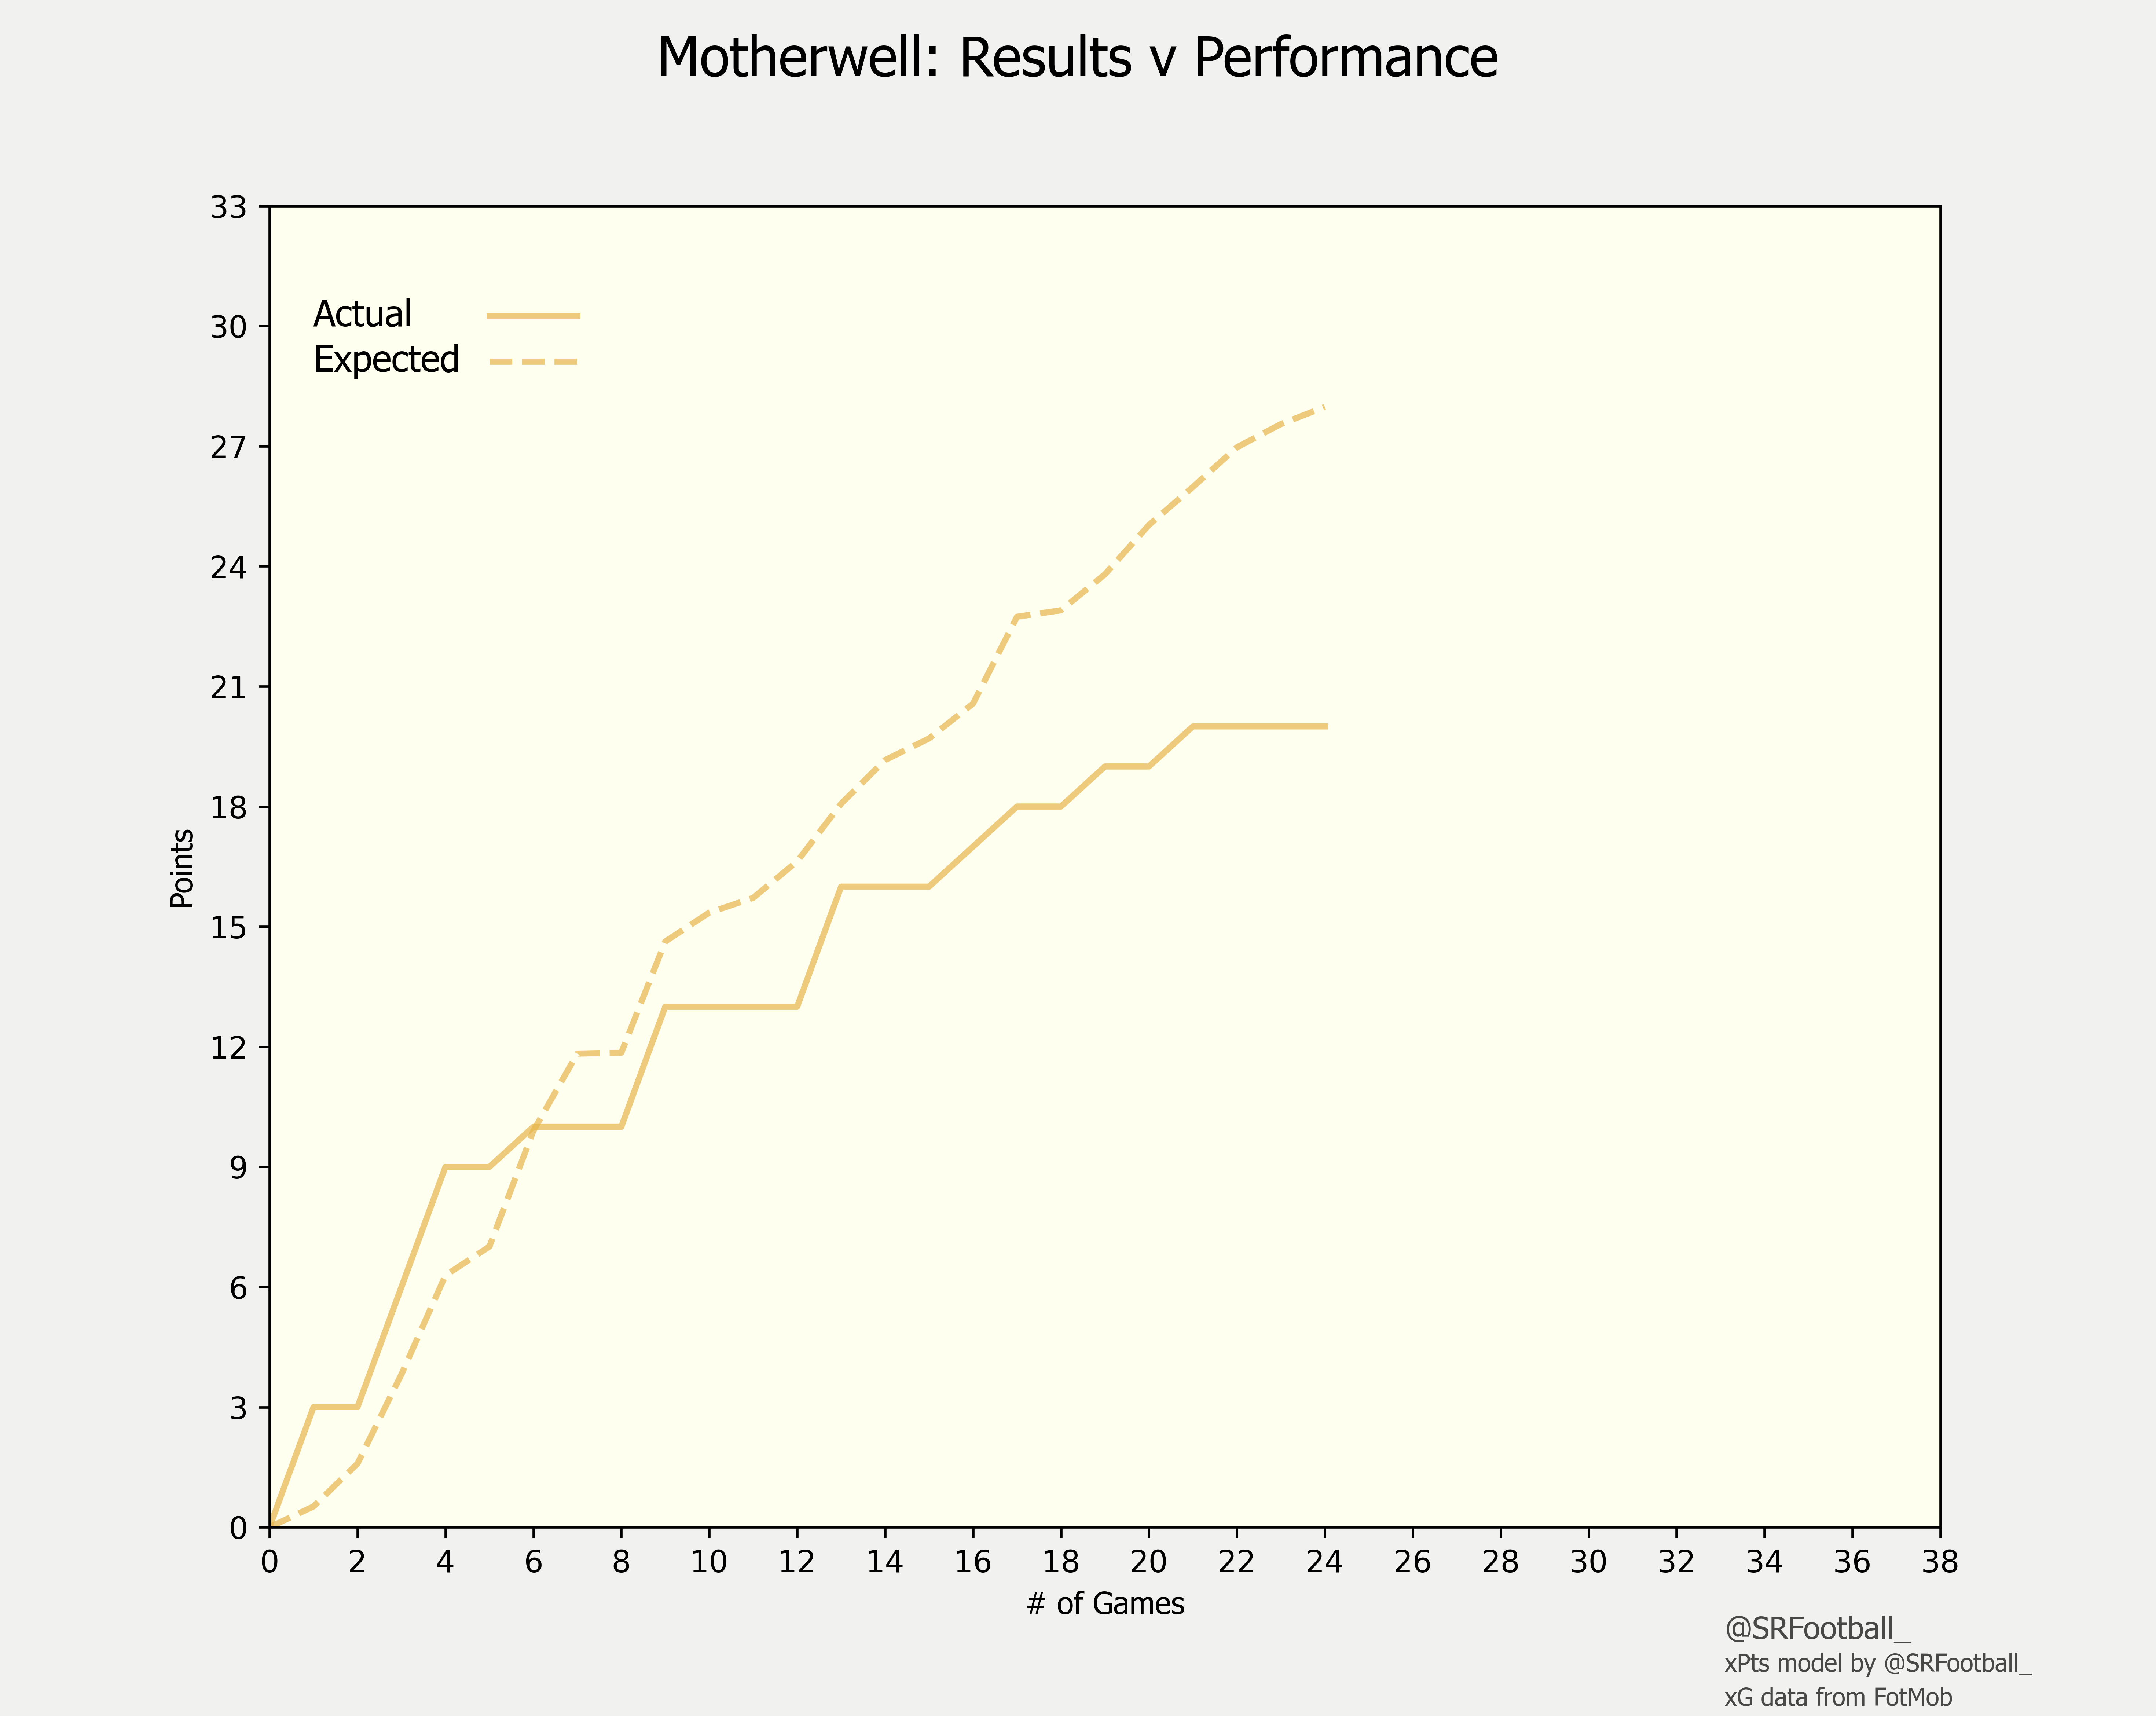
Ross County (covered by Dundee United in the above visual) could be about to take the lead in the race for relegation - a race many models had them favourites for at the start of the season. Although 10th in the actual table, both Motherwell and Dundee United below them have a game in hand and are each only a point behind. While Dundee United appear to be competing for the title of xWorstInTheLeague, Motherwell’s xPoints indicate that they should perhaps feel unlucky to be where they are.
At the top of the table, Rangers are unable to narrow Celtic’s lead. Although averaging 2.40 xPoints in the ten league games Michael Beale has taken charge of (a rise from the season average of 2.21 before this), Celtic’s average xPoints of 2.43 through the whole season (2.45 in the last ten) is enough to maintain the previously earned lead.