

Prepping - Water

"Thousands have lived without love, not one without water." - W. H. Auden
BLUF: Water is crucial to one’s survival. Depending on the environmental conditions, within only hours, a person could become combat ineffective. Securing and storing water is the first step one should take in the preparation process.
Introduction:
Imagine a pyramid, but instead of building blocks, it's constructed from our fundamental needs. This is Maslow's Hierarchy of Needs, a theory proposed by psychologist Abraham Maslow that outlines the driving forces behind human behavior. At the very base of this pyramid lie physiological needs, the foundation upon which all others rest. These are the essential requirements for our survival, like food, water, shelter, and sleep. They are universal, shared by all humans regardless of culture or background. Preppers, individuals who actively prepare for emergencies and disruptions, understand the critical importance of this bottom tier. By prioritizing the fulfillment of these basic needs, they ensure a solid foundation for facing any unforeseen challenges. Whether it's a natural disaster, an economic downturn, or any other event that disrupts normalcy, having a secure supply of food, water, and shelter becomes paramount to not only surviving but also tackling the higher needs that lie further up the pyramid.12
Water:
Water, the very essence of life, sits at the foundation of Maslow's Hierarchy of Needs, forming the bedrock upon which all other needs can be addressed. While the human body can survive for up to a few days without water, the ability to function and contribute meaningfully diminishes much faster. In extreme heat or during strenuous activity, dehydration can set in within hours, significantly impacting our cognitive and physical capabilities.
Preppers, keenly aware of this criticality, should prioritize securing a reliable source of clean water, not just for basic survival but also for food preparation, sanitation, and maintaining overall health, ensuring they are prepared to not only weather any storm but also actively contribute to their community's well-being.
Starting Small: The Urban Prepper
Bottled Water:
Purchase a variety of water containers of different sizes, enough for at least 3 days per person (ideally a week's worth). Store in a cool, dark place. Something readily portable for bug-out scenarios, if required.3
Storage for Collected Water:
Designate food-grade containers (plastic barrels, jugs, etc.) that are thoroughly cleaned and sealable. Identify potential sources (e.g., filling the bathtub). Ensure you can rapidly fill, or maintain filled water sources. Get a “water bob” that can sit in a bathtub, and be filled during periods of emergency. https://waterbob.com/
Collect Water:
For those with a balcony or access to the roof (where legal), consider a rain-barrel water collection system. [Check local laws, many cities do not allow rainwater collection.]
Beyond the Basics
Lake/Stream Collection & Purification:
Boiling: Bring water to a FULL rolling boil for at least one minute (longer at high altitudes). Requires a heat source (stove, campfire, fuel source).

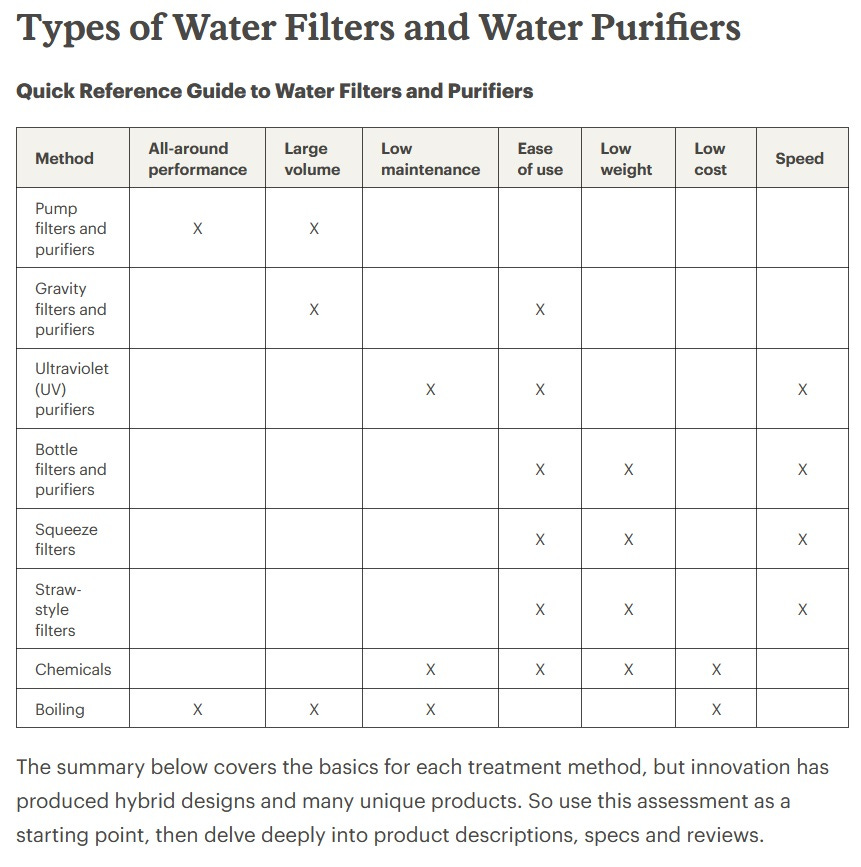
Filtration: Pump or gravity-fed filters are popular. Learn about pore sizes (microns) needed to target specific contaminants.4
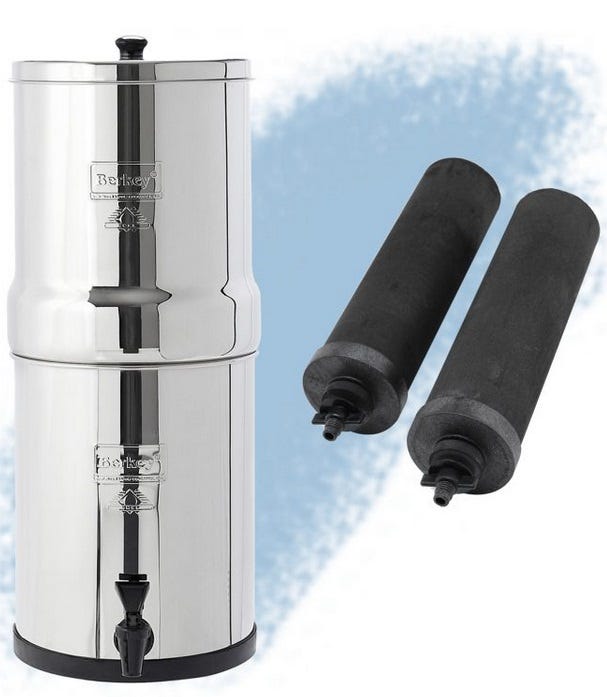
Consider a Berkey Filter (filters now hard to come by, targeted by EPA), or Alexapure gravity fed filtration system, designed to remove bacteria and impurities from collected water.5 6
Chemical Treatment: Carefully follow product instructions for iodine tablets or chlorine drops (different water volumes require different doses). Note potential aftertaste.7
Rainwater Collection: Divert rainwater through gutters into food-grade barrels. Install a "first flush" diverter to remove initial debris-filled runoff. Ensure a valve or diverter for when the tanks/barrels are full, for normal water runoff. Consider gutter guards for debris, like leaves and pine needles.89


Household Tie-in: Consult professionals, unless you have some basic plumbing know how. Involves tanks, pumps, some filtration, and potential plumbing modifications.
Freezing Concerns: Leave space at the top of tanks for expansion, insulate exposed areas, or use underground storage if possible. Bury water lines from the tanks to the house. Consider using PEX due to expansion capabilities. Dig into a hillside and build an insulated shed around your tanks. This combination may be sufficient for prolonged subzero temperatures, without the need to buy more expensive “ribbed” tanks that can handle the weight and pressure of being buried underground. Round tanks freeze slower due to the shape and area exposed versus square structures - like an IBC Tote (one of my exposed totes freezes solid, early every winter - consider burying the tote, or covering in straw).
Sandpoint Wells: Consider consulting a licensed well driller for installation and assessment of suitability on your property. Otherwise, if you believe you have a low water table, simply buy a sandpoint tip for 1 1/4 steel pipe, buy steel pipes, couplers, and a handheld fence-post driver (or a sledge hammer). Begin by post hole digging as deep as you can go, and then drive in your sandpoint well, adding sections of steel pipe as you go. Cap the system with a screw on hand pump (up to 30 feet of pumping power typically).
Important Notes:
Sandpoint wells are suitable for shallow water tables and sandy soil conditions.
They have limited water yield and may not be appropriate for all locations or water needs.
Regular maintenance and water quality testing are crucial.
Water pumps use leather and need to be primed and can freeze and break in winter.
Large-Scale Storage:
Water Tanks: Size it to your needs, research materials (plastic, steel, etc.), and consider professional installation for above-ground tanks. However, with just a little know how, one can do this one their own. Considerations include: laying down (rounded, like pea gravel) drainage rock on level ground (level ground is important, and rounded rock as a bed works well, to not pierce the tanks). Consider rubber connector sleeves between elements of ABS/PVC pipe, to allow for some shifting and ‘flex’ in the system.101112
Ultimately it is ideal to have multiple sources and redundancy in your system(s). Personally I have five different storage and collection methods/systems for water, with the last resort being a trip to one of the nearby lakes. This being stated, I didn’t start out this way. It is a journey. Begin small and expand outward.
Capturing & Storing:
Water Barrels: Large, portable containers suitable for storing rainwater or treated water. Many municipalities have discount container storage sellers, that have a myriad of used containers for sale, to include 55 gallon barrels. Often times these are food grade and served as food barrels for items like olives. One can save significantly by going in this direction.
Water Tanks: There are a myriad of tank and tank sizes out there. It is important to calculate your water needs. The absolute minimum for bare survival would be a gallon per person, per day. This rapidly expands to three gallons per person, per day when one takes into account cooking, re-hydration of stored foods, and the occasional cleaning / toilet usage (1.6 gallons per flush for newer toilets, as much as 8 gallons for old systems).
There are considerations regarding color. A black tank in a hot climate may heat up more than desired. In a colder climate, black may be ideal. A semi-clear tank will need to be covered, spray-painted, to block the light from entering, to prevent algae growth.
If one lives in a climate in which water freezes, consider building into a hillside and constructing a secure and insulated shed around your water tank(s), this should prevent freezing (a single incandescent light could be a sufficient heat source for very cold days), and further serve as a protective barrier for those desperate for water during prolonged periods of desperation.
Burying a tank is another consideration, but this requires specialized tanks designed to stand up to the pressures of earth, even when empty. Septic tanks can also work for water storage. As long as the majority of the water tank is below the permafrost level, the tank shouldn’t freeze over. This will require the rental or use of an excavator, as well as running water lines to the house, a pump, and ideally a pressure tank.
A consideration for burying water tanks is the depth of the water table. The dry season may make this entirely feasible. The wet season could cause the tank to “float” up through the ground. Know your water table before doing this, as well as soil type (sandy loam, clay, full of granite rocks).
Water Jugs: Have several portable five gallon water containers for a rapid egress in a difficult situation isn’t a bad idea. Further, this allows for the easy transport of water if necessary, for fulling a barrel in a truck, movement from a water source to a storage source, or simply filling a container and leaving it by the toilet, to flush the toilet.
Water Bags: Collapsible bags perfect for easy transportation and storage when empty. Great for those who live in tight confines like a city apartment. Cons, they lack durability, and can rupture more easily.
Dew Collection: Specialized traps can collect dew from the air, though the yield is limited. This is a consideration for those living in an arid environment. There are specialized technologies, and devices that can pull moisture out of the air.
Cleansing & Purifying:
Distillation: Boiling water and capturing the steam removes contaminants, but requires significant energy and resources. Furthermore, there is typically significant waste water produced in this system. This, however, will clean most contaminants.
Ultraviolet (UV) Treatment: Exposes water to UV light, killing microorganisms, but may not remove all contaminants and requires batteries or electricity. Furthermore, this only works with clear water, over a period of time, without much depth. This isn’t a common system (except in larger treatment plants).
Ceramic Filters: Can remove bacteria and protozoa, but require regular cleaning and may clog. These are a consideration, especially if you have several on hand and are willing to clean or swap out - and your water source is already quite clean, like rainwater capture.
Iodine: There are two main methods of treatment.
Liquid 2% Tincture of Iodine Add 5 drops per quart when the water is clear. Add 10 drops per quart when the water is cloudy.
Polar Pure Iodine Crystals Fill the Polar Pure bottle with water and shake. The solution will be ready for use in one hour. Add the number of cap fulls (per quart of water treated) listed on the bottle, based on the temperature of the iodine solution. The particle trap prevents crystals from getting into the water being treated. It is important to note that you are using the iodine solution to treat the water, not the iodine crystals. The concentration of iodine in a crystal is poisonous and can burn tissue or eyes. Let the treated water stand for 30 minutes before drinking. In order to destroy Giardia cysts, the drinking water must be at least 68 F (20 C). The water can be warmed in the sun before treating or hot water can be added. Refill the treatment bottle after use so that the solution will be ready one hour later. Crystals in the bottle make enough solution to treat about 2,000 quarts. Discard the bottle when empty.
Pool Shock: One can buy pool schock, and make their own bleach. This is advantageous as pool shock doesn’t have a shelf life, and can treat thousands of gallons of water. To make a bleach solution which approximates the strength of regular bleach concentrated at ~ 6% (sodium hypochlorite), use the following formula:
1 Tablespoon per 1-1/2 cups water.
2 teaspoons per cup of water.
11 Tablespoons per gallon of water.
DO NOT DRINK THIS! NEVER add water to the shock (Calcium Hypochlorite). ALWAYS add shock to the water. Chlorine gas can be debilitating in concentrations.13
The treatment protocol after making your own bleach is about eight drops per gallon of water you wish to treat. (There are around 100 drops to a teaspoon - i.e. one teaspoon treats 12 gallons. One cup will treat about 600 gallons, the size of a decently large water tank).
Bug-Out Bag Considerations:
LifeStraw: Portable straw-like filter that can remove bacteria, protozoa, and some viruses from water sources, but not chemicals. These are easy to procure in large shops like Costco, or online. There are also life-straw survival water bottles, that may be one of the easiest solutions, however, real-world testing shows these straw to clog up and drip slowly with muddy or cloudy water.14
Iodine Tablets: Effective against bacteria and some viruses, but can take time to work, have an aftertaste, and are not suitable for everyone (pregnant women, thyroid issues). This is the protocol used by military survival schools, as the pills are small, light, and work within 40 minutes of administering it to the water. The rule of thumb from the US Army Field Manuel is 16 mg of I2/L and 35 minutes of contact time (note: this may be insufficient for some pathogens).1516
Water Purification Tablets: Broader spectrum than iodine, but can be more expensive and require waiting time for effectiveness. These are a decent bug-out bag solution. Be familiar with the time to effectiveness, which, like iodine, depends on the temperature of the water, and the turbidity.17
Water Purification Powder: Often chlorine-based, effective against various contaminants but requires careful usage and may affect taste. This may also require some prep time, and is less commonly used.
Final Thoughts:
Recall the iterative method from Part 1, the process begins by dedicating focused time, energy, and resources to addressing a single fundamental need, such as water in this case. For example, if you live in an apartment and currently have no water backup, it can be as asimple as buying a couple 24 packs of drinking water. You’ll likely drink this water anyway, so no waste if the “end of the world” never comes (a prolonged blackout, a couple days of civil unrest, a bad winter storm, a mass cyber attack, etc). Using this iterative method, once you’ve established a few days of water for emergencies, then move on to securing a few days of food, then a move on to installing a deadbolt or some other security measures.
This idea is scalable. If you finished building a water tank system, consider how you’d secure this system. Consider typing it into the house system via pipes and a simple pump that could run off your backup solar system, for example. For those with a well, consider running the pump off solar, have an extra pump or parts for key failure points, and understand the components of that well.
The bottom line, each iteration expands upon each of the basic needs: food, water, shelter, security. Ultimately extending one’s ability to life off grid if necessary, self sufficiently, and without the fear of being constantly reliant on others for everything.
Related Posts:
Post 77: Prepping - Beginner's Guide: How to Prepare for Disaster
Post 78: Prepping - Mindset
Post 79: Prepping - An Intelligence Based Approach
https://www.simplypsychology.org/maslow.html
https://www.thoughtco.com/maslows-hierarchy-of-needs-4582571
https://www.rei.com/learn/expert-advice/water-treatment-backcountry.html
https://www.usaberkeyfilters.com/
https://alexapure.com/products/alexapure-pro-water-filtration-system
https://modernsurvivalblog.com/survival-skills/how-much-pool-shock-to-make-regular-bleach-equivalent-chlorine/
https://www.wikihow.com/Build-a-Rainwater-Collection-System
https://morningchores.com/rainwater-harvesting/
https://www.motherearthnews.com/diy/build-a-rainwater-collection-system-zb0z1307zsal/
https://homesteadandchill.com/rainwater-collection-systems-101/
https://www.watercache.com/education/rainwater-harvesting-101
https://modernsurvivalblog.com/survival-skills/how-much-pool-shock-to-make-regular-bleach-equivalent-chlorine/
https://lifestraw.com/
https://academic.oup.com/milmed/article/170/1/83/4577668?login=false
https://apps.dtic.mil/sti/citations/ADA453960
https://www.beprepared.com/products/drinking-water-treatment