

GPU-Enabled Workflows with Docker and WDL
GPU-Enabled Workflows with Docker and WDL
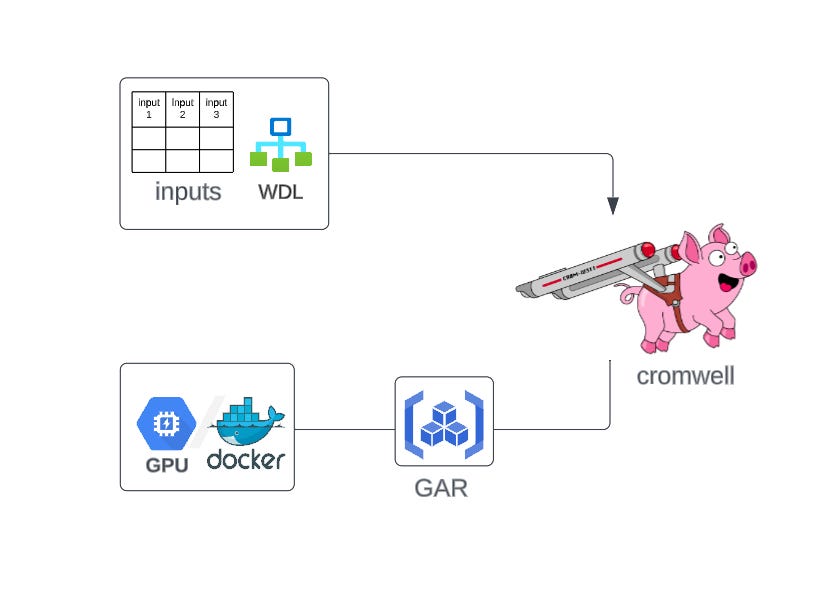
Optimize bioinformatics with Google Cloud: Learn how to create GPU-enabled Docker containers on Artifact Registry, and their application in running WDLs through the Cromwell.

As the data we deal with in bioinformatics gets more and more complex, using GPU acceleration in Docker containers presents a good strategy to speed things up.
In this blog, we will learn how to:
create a GPU-enabled Docker container
push the custom Docker image to Google Artifacts Registry
craft a WDL script that leverages the GPU-enabled Docker
run a WDL using Cromwell
0. Setting Up the Environment:
Start by making sure you have Docker installed on your system, or VM. Next, choose an artifact registry like Google Artifact Registry or AWS Elastic Container Registry and set it up according to their instructions. Finally, you can run the following linux command to check if your host machine's GPU is configured properly
nvidia-smiIf everything is in order, you'll see detailed information about your GPU.
1. Build a GPU-Enabled Docker Image
To begin, create a file named Dockerfile with the following content:
FROM nvidia/cuda:12.2.0-devel-ubuntu20.04This line sets up a GPU-enabled environment using NVIDIA's CUDA 12.2 development image based on Ubuntu 20.04.
From here, you can further customize the image to include specific tools or libraries relevant to your bioinformatics workflow, like so:
FROM nvidia/cuda:12.2.0-devel-ubuntu20.04

WORKDIR /usr/src/app

RUN apt-get update && apt-get install -y \
    git \
    wget

ENV CONDA_DIR /opt/conda
RUN wget --quiet https://repo.anaconda.com/miniconda/Miniconda3-py39_23.5.2-0-Linux-x86_64.sh -O ~/miniconda.sh && \
    /bin/bash ~/miniconda.sh -b -p /opt/conda

ENV PATH=$CONDA_DIR/bin:$PATH

RUN git clone https://github.com/example/example && \
    cd example && \
    python3 setup.py install
Build a Docker image named ‘example’ with the following command:
docker build -t example .Test the image locally:
docker run --rm --gpus=all -it exampleIf you see a GPU driver incompatibility error, you may use the following to avoid it:
docker run --rm --gpus=all --env NVIDIA_DISABLE_REQUIRE=1 -it example2. Push the Image to the Artifact Registry
Once you've built and tested the Docker image locally, you may want to deploy it in a cloud environment, like the Google Artifact Registry (GAR).
You'll need to authenticate your local Docker client with GAR so you can push and pull images from that registry.
gcloud auth configure-docker us-central1-docker.pkg.devNext, tag the image with the full registry path including the location (us-central1), project ID (project-1), repository name (repository-1) and image name (example):
docker tag example us-central1-docker.pkg.dev/project-1/repository-1/exampleFinally, push the tagged image to the registry:
docker push us-central1-docker.pkg.dev/project-1/repository-1/example3. Writing the WDL Task
Now let’s create a file named example_workflow.wdl to define a task to run an example command using the GPU-enabled Docker image we created earlier.
task example {
  String sequence_input

  runtime {
    docker: "us-central1-docker.pkg.dev/project-1/repository-1/example"
    memory: "16 GB"
    cpu: "8"
    disks: "local-disk 500 HDD"
    gpuCount: 1
    bootDiskSizeGb: 100
  }

  command <<<

    example [...] > result
    tar -cvf result.tar result/

  >>>
  output {
    File example_output = "result.tar"
  }
}

workflow example_workflow {
  String sequence_input

  call example {
    input:
      sequence_input = sequence_input
  }
  output{
    File example_output_workflow = example.example_output
    }
}
The next step is to execute it. We'll use Cromwell, a WDL execution engine.
java -jar cromwell.jar run my_task.wdl -i inputs.json
You'll need to create an inputs.json file with the necessary inputs. For the example workflow we defined earlier, the inputs file might look like this:
{
  "example_workflow.sequence_input": "your_sequence_here"
}
Cromwell will provide log output as the workflow runs, allowing you to monitor its progress.
With these steps, you can create, push, and use GPU-enabled Docker containers in your bioinformatics workflows using WDL.
References
WDL specifications: https://github.com/openwdl/wdl/blob/main/versions/1.1/SPEC.md
Setting WDL runtime attributes for Cromwell: https://cromwell.readthedocs.io/en/stable/RuntimeAttributes/